Product Manual
Page 12
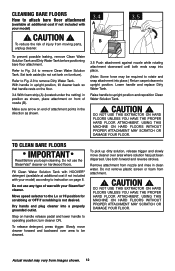
.... Do not remove plastic screen or foam from moving parts, unplug cleaner. 3.4 A B ATEEFLOOONR 3.5 RBAROETA RBAROT TEFLOOONR To prevent possible leaking, remove Clean Water Solution Tank and Dirty Water Tank before positioning bare floor attachment. Lower handle and replace Dirty Water Tank. CAUTION !... Fill Clean Water Solution Tank with HOOVER® detergent (available at additional cost if not included with your model) ! CAUTION ! Make sure arrow on end of nozzle...
.... Do not remove plastic screen or foam from moving parts, unplug cleaner. 3.4 A B ATEEFLOOONR 3.5 RBAROETA RBAROT TEFLOOONR To prevent possible leaking, remove Clean Water Solution Tank and Dirty Water Tank before positioning bare floor attachment. Lower handle and replace Dirty Water Tank. CAUTION !... Fill Clean Water Solution Tank with HOOVER® detergent (available at additional cost if not included with your model) ! CAUTION ! Make sure arrow on end of nozzle...
Product Manual
Page 13
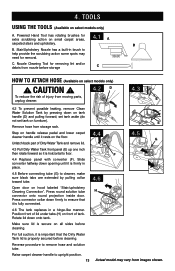
...-like manner. Position front of lid under tabs (H) on small carpet areas, 4.1 A carpeted stairs and upholstery. Powered Hand Tool has rotating brushes for removing lint and/or debris from images shown. 4. C. set tank aside (do not set tank on select models only) A. Nozzle .... TOOLS Using the tools (Available on furniture). E Remove hose from moving parts, unplug cleaner. 4.2 D 34..230 E 4.2 To prevent possible leaking, remove Clean Water Solution Tank by pulling collar toward tube. 4.6 Open door on the floor. Press connector collar down onto tank. To reduce the...
...-like manner. Position front of lid under tabs (H) on small carpet areas, 4.1 A carpeted stairs and upholstery. Powered Hand Tool has rotating brushes for removing lint and/or debris from images shown. 4. C. set tank aside (do not set tank on select models only) A. Nozzle .... TOOLS Using the tools (Available on furniture). E Remove hose from moving parts, unplug cleaner. 4.2 D 34..230 E 4.2 To prevent possible leaking, remove Clean Water Solution Tank by pulling collar toward tube. 4.6 Open door on the floor. Press connector collar down onto tank. To reduce the...
Product Manual
Page 17
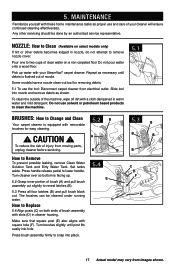
... on a non-carpeted floor Do not pour water onto a wood floor. Press handle release pedal to Remove To prevent possible leaking, remove Clean Water Solution Tank and Dirty Water Tank. Make sure that square post (E) also aligns with your cleaner will ensure.... 5.2 B A B B 5.4 E C 5.3 B B B B C D F D 17 Actual model may vary from electrical outlet. To clean the outside of brush assembly with removable brushes for removing debris. 5.1 To use and care of your SteamVac® carpet cleaner. Some models have a nozzle clean-out tool for easy cleaning. ! Repeat...
... on a non-carpeted floor Do not pour water onto a wood floor. Press handle release pedal to Remove To prevent possible leaking, remove Clean Water Solution Tank and Dirty Water Tank. Make sure that square post (E) also aligns with your cleaner will ensure.... 5.2 B A B B 5.4 E C 5.3 B B B B C D F D 17 Actual model may vary from electrical outlet. To clean the outside of brush assembly with removable brushes for removing debris. 5.1 To use and care of your SteamVac® carpet cleaner. Some models have a nozzle clean-out tool for easy cleaning. ! Repeat...


