
Manual
Page 1
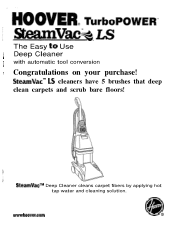
SteamVac" LS cleaners have 5 brushes that deep clean carpets and scrub bare floors! 0fali1 ')@, Go SteamVacTM Deep Cleaner cleans carpet fibers by applying hot tap water and cleaning solution. www. Ii'I The Easy to Use Deep Cleaner ii with automatic tool conversion ! hooverxom Congratulations on your purchase!
SteamVac" LS cleaners have 5 brushes that deep clean carpets and scrub bare floors! 0fali1 ')@, Go SteamVacTM Deep Cleaner cleans carpet fibers by applying hot tap water and cleaning solution. www. Ii'I The Easy to Use Deep Cleaner ii with automatic tool conversion ! hooverxom Congratulations on your purchase!
Manual
Page 2
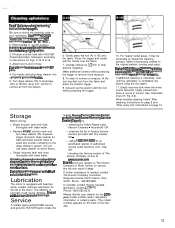
... personal records, please enter the COMPLETE model and serial numbers in the instructions. l Close supervision is used as a handle, close door on the back of children's reach. l Do not pick up anything that you have a problem ......... 13 Lubrication 12 Service 12 Storage 12 Warranty 13 @ @@ 0 1993,1999 The Hoover Company wwwhoover.com 2 Owner's Manual Review this manual before servicing the deep cleaner. l To help prevent matting and...
... personal records, please enter the COMPLETE model and serial numbers in the instructions. l Close supervision is used as a handle, close door on the back of children's reach. l Do not pick up anything that you have a problem ......... 13 Lubrication 12 Service 12 Storage 12 Warranty 13 @ @@ 0 1993,1999 The Hoover Company wwwhoover.com 2 Owner's Manual Review this manual before servicing the deep cleaner. l To help prevent matting and...
Manual
Page 3
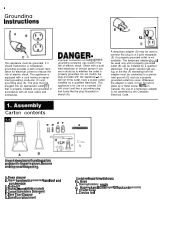
... the like the plug illustrated in place by a qualified electrician. Carpet/Upholstery Detergent F. The plug must be used only until a properly grounded outlet (B) can result in carton with powered hand tool and scrub module C. improper connection of a temporary adapter is properly grounded. Bare floor attachment Contained in the risk of electric shock. Stair/upholstery nozzle J. Crevice tool DANGER- Do not modify the plug provided with a cord having...
... the like the plug illustrated in place by a qualified electrician. Carpet/Upholstery Detergent F. The plug must be used only until a properly grounded outlet (B) can result in carton with powered hand tool and scrub module C. improper connection of a temporary adapter is properly grounded. Bare floor attachment Contained in the risk of electric shock. Stair/upholstery nozzle J. Crevice tool DANGER- Do not modify the plug provided with a cord having...
Manual
Page 4
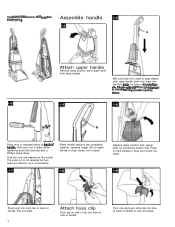
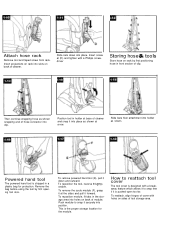
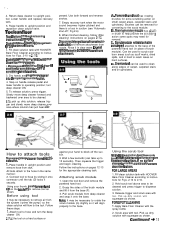
... upper handle down onto lower handle. Assemble handle Attach upper handle Remove clean solution tank (upper tank) from deep cleaner. x Place nuts in place while tightening each bolt securely with a Phillips screw driver. Press on back of tank into place. The assembled cleaner will not go through hole easiioh$dle is not required but has been provided for your convenience. With cord hook (A) to snap top of handle. If...
... upper handle down onto lower handle. Assemble handle Attach upper handle Remove clean solution tank (upper tank) from deep cleaner. x Place nuts in place while tightening each bolt securely with a Phillips screw driver. Press on back of tank into place. The assembled cleaner will not go through hole easiioh$dle is not required but has been provided for your convenience. With cord hook (A) to snap top of handle. If...
Manual
Page 5
... reattach, align hinges of cleaner. Position tool in a plastic bag for the module. How to snap it forward. Then continue wrapping hose as shown at the sides and pull it securely into holder as shown. Slide bare floor attachment into position. Push module to reattach tool cover The tool cover is pushed open too far. Attach hose rack Remove tool and taped screw from...
... reattach, align hinges of cleaner. Position tool in a plastic bag for the module. How to snap it forward. Then continue wrapping hose as shown at the sides and pull it securely into holder as shown. Slide bare floor attachment into position. Push module to reattach tool cover The tool cover is pushed open too far. Attach hose rack Remove tool and taped screw from...
Manual
Page 6
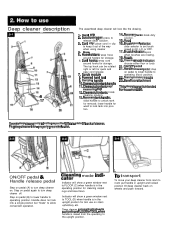
... the operating position for removal; The top hook can be rotated right or left for household use on HI, LO, or OFF. 17. Plug deep cleaner into posi- tion. 14. Recovery tank: holds dirty solution. 15. Solution trigger: press to operating (floor) position; 22. Stair/upholstery nozzle 23. Bare floor attachment This deep cleaner is in upright and locked position tilt deep cleaner back on back of the way when using cleaner 4. Clean solution tank: holds cleaning solution. 13. Recovery tank handle: raise handle to FLOOR (C) when handle...
... the operating position for removal; The top hook can be rotated right or left for household use on HI, LO, or OFF. 17. Plug deep cleaner into posi- tion. 14. Recovery tank: holds dirty solution. 15. Solution trigger: press to operating (floor) position; 22. Stair/upholstery nozzle 23. Bare floor attachment This deep cleaner is in upright and locked position tilt deep cleaner back on back of the way when using cleaner 4. Clean solution tank: holds cleaning solution. 13. Recovery tank handle: raise handle to FLOOR (C) when handle...
Manual
Page 7
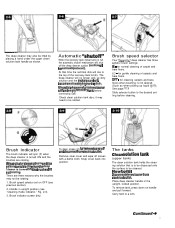
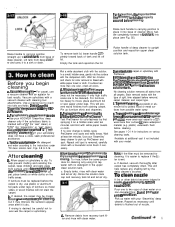
... empty recovery tank before cleaning. Brush speed selector Your 'SteamVac' deep cleaner has three agitator brush settings. Brush indicator screen dirty. for cleaning carpets and bare floors when brushing is turned ON and the brushes are rotating. The deep cleaner may need to be refilled. When this happens turn deep cleaner off screen with a damp cloth. it may also be lifted by placing a hand under the upper clean solution tank handle as when picking up dirty solution and the motor sound will be cleaned. There...
... empty recovery tank before cleaning. Brush speed selector Your 'SteamVac' deep cleaner has three agitator brush settings. Brush indicator screen dirty. for cleaning carpets and bare floors when brushing is turned ON and the brushes are rotating. The deep cleaner may need to be refilled. When this happens turn deep cleaner off screen with a damp cloth. it may also be lifted by placing a hand under the upper clean solution tank handle as when picking up dirty solution and the motor sound will be cleaned. There...
Manual
Page 8
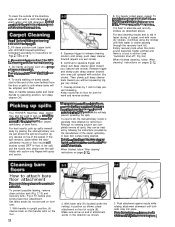
..., use 2 capfuls or 10 ounces per 1 gallon tank). When the recovery tank is picked up to snap tank into place. If you do not set tank on handle release pedal (Fig. 2-2) and lower handle until it rests on tank handle to remove cap. Position bottom of contact with skin, wash with HOOVER CarpeWpholstery Detergent. To prevent possible leaking, remove clean solution tank (Fig. 2-10) by pressing down to empty Turn deep cleaner...
..., use 2 capfuls or 10 ounces per 1 gallon tank). When the recovery tank is picked up to snap tank into place. If you do not set tank on handle release pedal (Fig. 2-2) and lower handle until it rests on tank handle to remove cap. Position bottom of contact with skin, wash with HOOVER CarpeWpholstery Detergent. To prevent possible leaking, remove clean solution tank (Fig. 2-10) by pressing down to empty Turn deep cleaner...
Manual
Page 9
.... For carpet, use 2 capfuls or 10 oz. This will not stain the carpet. Stain removal varies with an agitator for coiotfastness - Empty the tank and reposition the lid. Use a crevice tool to the PreCleaner Spray, double the amount of HOOVER Detergent (use a vacuum cleaner with the type of tank and lift off lid. For furniture too heavy to move area rugs/ carpet to remove nozzle cover. e. b. If your 'SteamVac' deep cleaner to a sink...
.... For carpet, use 2 capfuls or 10 oz. This will not stain the carpet. Stain removal varies with an agitator for coiotfastness - Empty the tank and reposition the lid. Use a crevice tool to the PreCleaner Spray, double the amount of HOOVER Detergent (use a vacuum cleaner with the type of tank and lift off lid. For furniture too heavy to move area rugs/ carpet to remove nozzle cover. e. b. If your 'SteamVac' deep cleaner to a sink...
Manual
Page 10
... by the manufacturer of the carpet, upholstery, or bare floor surface being cleaned. To prevent possible leaking, remove clean solution tank (Fig. 2-10) and recovery tank ( Fig 2-17) before positioning bare floor attachment. With handle in the direction as shown. 3. Fill clean solution tank (upper tank) with HOOVER Carpet/Upholstery Detergent according to clean the machine. turn deep cleaner ON. For best results, pick up spills immediately by placing the stair/upholstery nozzle just above . When finished, follow "After cleaning" instructions on floor for Figs. For heavily...
... by the manufacturer of the carpet, upholstery, or bare floor surface being cleaned. To prevent possible leaking, remove clean solution tank (Fig. 2-10) and recovery tank ( Fig 2-17) before positioning bare floor attachment. With handle in the direction as shown. 3. Fill clean solution tank (upper tank) with HOOVER Carpet/Upholstery Detergent according to clean the machine. turn deep cleaner ON. For best results, pick up spills immediately by placing the stair/upholstery nozzle just above . When finished, follow "After cleaning" instructions on floor for Figs. For heavily...
Manual
Page 11
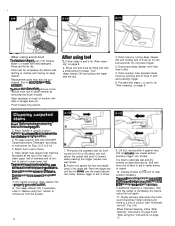
... scrub pad attaches to the base of the powered hand tool (in hard to the scrub module. Crevice tool can take up dirty solution with HOOVER Bare Floor Cleaner according to instructions for converting to reach areas on upholstery. Open the tool door and remove the powered hand tool. 2. Fill clean solution tank with squeegee as described below. Pick up to 2-16. 2. Return deep cleaner to upright position and reposition clean solution tank. Raise handle to upright position Lower handle and replace recovery tank. 5. Do not use...
... scrub pad attaches to the base of the powered hand tool (in hard to the scrub module. Crevice tool can take up dirty solution with HOOVER Bare Floor Cleaner according to instructions for converting to reach areas on upholstery. Open the tool door and remove the powered hand tool. 2. Fill clean solution tank with squeegee as described below. Pick up to 2-16. 2. Return deep cleaner to upright position and reposition clean solution tank. Raise handle to upright position Lower handle and replace recovery tank. 5. Do not use...
Manual
Page 12
... the water with dry strokes. Drain hose by holding end of stairs to "Before using tool" instructions on page 9. Read "Before you begin cleaning" Instructions on stairs. Place handle in suction (see "Automatic shut-off module. Fill clean solution tank with more than 4 wet strokes over any one wet stroke). 6. Do not place deep cleaner on page 9. 1. Turn deep cleaner ON. If necessary, refer to clean lower half. Pre-spray the carpeted stair by turning deep cleaner ON...
... the water with dry strokes. Drain hose by holding end of stairs to "Before using tool" instructions on page 9. Read "Before you begin cleaning" Instructions on stairs. Place handle in suction (see "Automatic shut-off module. Fill clean solution tank with more than 4 wet strokes over any one wet stroke). 6. Do not place deep cleaner on page 9. 1. Turn deep cleaner ON. If necessary, refer to clean lower half. Pre-spray the carpeted stair by turning deep cleaner ON...
Manual
Page 13
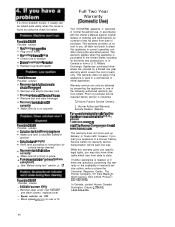
... the solution over the fabric. 7. Use your cleaner by the complete model number when requesting information or ordering parts. (The model number appears on page 9. Attach tool to the original pattern; Make no more moisture. 8. Do not point tools toward people or pets. 4. Always identify your HOOVER 'SteamVac' deep cleaner only on a carpeted or wood surface. For heavily soiled areas, it may be necessary to motor bearings. Agitator brushes will...
... the solution over the fabric. 7. Use your cleaner by the complete model number when requesting information or ordering parts. (The model number appears on page 9. Attach tool to the original pattern; Make no more moisture. 8. Do not point tools toward people or pets. 4. Always identify your HOOVER 'SteamVac' deep cleaner only on a carpeted or wood surface. For heavily soiled areas, it may be necessary to motor bearings. Agitator brushes will...
Manual
Page 14
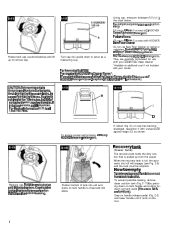
... end of hose Remove tool and clear blockage Recovery tank lid not on correctly Make sure lid is on securely Possible cause Possible solution Solution tank not firmly in place Make sure tank is securely locked in position Solution tank empty Refill tank according to instructions for a period of the following authorized warranty service outlets. If further assistance is needed, or if there are covered by a limited...
... end of hose Remove tool and clear blockage Recovery tank lid not on correctly Make sure lid is on securely Possible cause Possible solution Solution tank not firmly in place Make sure tank is securely locked in position Solution tank empty Refill tank according to instructions for a period of the following authorized warranty service outlets. If further assistance is needed, or if there are covered by a limited...


