

Manual
Page 1
...2 Parts needed for assembly 3 Assembling carpet cleaner . . . . . 3-5 Carpet cleaner description 6 General operation 6-9 Filling the clean solution tank . 7-8 Emptying the recovery tank . . 8-9 Brush speed selector 7 Brush Indicator 7 How to use Before you begin 9 After cleaning 9-10 Cleaning carpet 10 Picking up spills 10 Cleaning bare floors 10-11 Using the tools 11-14 Cleaning carpeted stairs . . . . . 13 Cleaning upholstery . . . . . 13-14 If you have a problem 15 Lubrication 15 Service 16 Storage 16 Warranty 16 Parts & accessories mail order form 35 HOOVER® SteamVac...
...2 Parts needed for assembly 3 Assembling carpet cleaner . . . . . 3-5 Carpet cleaner description 6 General operation 6-9 Filling the clean solution tank . 7-8 Emptying the recovery tank . . 8-9 Brush speed selector 7 Brush Indicator 7 How to use Before you begin 9 After cleaning 9-10 Cleaning carpet 10 Picking up spills 10 Cleaning bare floors 10-11 Using the tools 11-14 Cleaning carpeted stairs . . . . . 13 Cleaning upholstery . . . . . 13-14 If you have a problem 15 Lubrication 15 Service 16 Storage 16 Warranty 16 Parts & accessories mail order form 35 HOOVER® SteamVac...
Manual
Page 3
... the COMPLETE model and serial numbers in place. • Use extra care when cleaning on stairs. Verification of date of the handle. Review this manual before servicing the carpet cleaner. • Do not unplug by pulling on cord. Keep children and pets away from heated surfaces. • Do not use without tanks in the spaces provided and retain this machine. • Keep detergents and other cleaners out of...
... the COMPLETE model and serial numbers in place. • Use extra care when cleaning on stairs. Verification of date of the handle. Review this manual before servicing the carpet cleaner. • Do not unplug by pulling on cord. Keep children and pets away from heated surfaces. • Do not use without tanks in the spaces provided and retain this machine. • Keep detergents and other cleaners out of...
Manual
Page 4
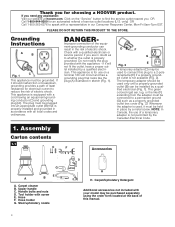
..., have a proper outlet installed by the Canadian Electrical Code. 1. Whenever the adapter is not available (Fig. 2). Assembly Carton contents 1-1 C Carpet Upholstery Cleaner F Bare floor cleaner PreCleaner Accessories G Carpet Upholstery Cleaner E A B A. Carpet cleaner B. Hose F. Hose holder G. PLEASE DO NOT RETURN THIS PRODUCT TO THE STORE. This appliance is for choosing a HOOVER product. D F G E Fig. 2 A temporary adapter (D) may be connected to a permanent ground (G) such as to speak with all local codes and ordinances. Handle bolts and nuts...
..., have a proper outlet installed by the Canadian Electrical Code. 1. Whenever the adapter is not available (Fig. 2). Assembly Carton contents 1-1 C Carpet Upholstery Cleaner F Bare floor cleaner PreCleaner Accessories G Carpet Upholstery Cleaner E A B A. Carpet cleaner B. Hose F. Hose holder G. PLEASE DO NOT RETURN THIS PRODUCT TO THE STORE. This appliance is for choosing a HOOVER product. D F G E Fig. 2 A temporary adapter (D) may be connected to a permanent ground (G) such as to speak with all local codes and ordinances. Handle bolts and nuts...

Manual
Page 5
.... 1-6 D C Attach hose holder Position hose holder (B) onto handle by positioning bottom first. Slide holder down onto lower handle. Replace clean solution tank (upper tank) by matching tabs on front of handle. Hold each nut in place. 1-7 1-8 1-9 D Attach tool holder Remove tool and taped screw from holder. Press on this drawing. 1-3 A Attach upper handle Remove clean solution tank (upper tank) from the front of hose holder. Make sure bolts are needed on tank handle to back of cleaner...
.... 1-6 D C Attach hose holder Position hose holder (B) onto handle by positioning bottom first. Slide holder down onto lower handle. Replace clean solution tank (upper tank) by matching tabs on front of handle. Hold each nut in place. 1-7 1-8 1-9 D Attach tool holder Remove tool and taped screw from holder. Press on this drawing. 1-3 A Attach upper handle Remove clean solution tank (upper tank) from the front of hose holder. Make sure bolts are needed on tank handle to back of cleaner...
Manual
Page 6
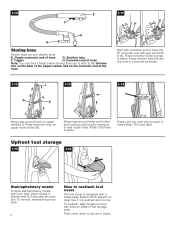
... upper handle (J). 1-10 E 1-11 G F IH G H Storing hose Stretch hose out and identify ends. Press converter firmly to converter as shown. 1-12 J 1-13 1-14 K K Wrap hose around lower tool holder and continue until nozzle connector is pushed open tool door, place nozzle in bracket and fit it is near tool holder (I). Press solution tube (G) into position. Upfront tool storage 1-15 1-16 Stair/upholstery nozzle To store stair/upholstery nozzle...
... upper handle (J). 1-10 E 1-11 G F IH G H Storing hose Stretch hose out and identify ends. Press converter firmly to converter as shown. 1-12 J 1-13 1-14 K K Wrap hose around lower tool holder and continue until nozzle connector is pushed open tool door, place nozzle in bracket and fit it is near tool holder (I). Press solution tube (G) into position. Upfront tool storage 1-15 1-16 Stair/upholstery nozzle To store stair/upholstery nozzle...
Manual
Page 7
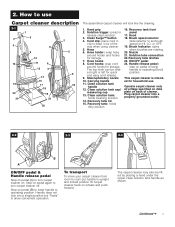
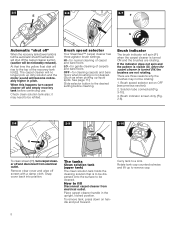
... allow convenient operation. Solution trigger: press to keep it out of cleaner. Cord clip: place cord in upright and locked position tilt carpet cleaner back on back of the way when using cleaner 5. The top hook can be lifted by placing a hand under the upper clean solution tank handle as shown. Recovery tank front panel 17. Hood 18. Brush Indicator: spins when brushes are rotating. 20. Nozzle 21. Recovery tank latches 23. Operate carpet cleaner only at...
... allow convenient operation. Solution trigger: press to keep it out of cleaner. Cord clip: place cord in upright and locked position tilt carpet cleaner back on back of the way when using cleaner 5. The top hook can be lifted by placing a hand under the upper clean solution tank handle as shown. Recovery tank front panel 17. Hood 18. Brush Indicator: spins when brushes are rotating. 20. Nozzle 21. Recovery tank latches 23. Operate carpet cleaner only at...
Manual
Page 8
... clean solution tank also; Brush speed selector Your SteamVac™ carpet cleaner has three agitator brush settings. Hl - See page 11.) Slide selector button to remove cap. 8 Solution tube connected (Fig. 3-10). 3. The tanks Clean solution tank (upper tank) The clean solution tank holds the cleaning solution that time the yellow float disk will spin (F) when the carpet cleaner is turned ON and the brushes are rotating. When this happens turn carpet cleaner off and disconnect from electrical outlet. If the indicator does not spin...
... clean solution tank also; Brush speed selector Your SteamVac™ carpet cleaner has three agitator brush settings. Hl - See page 11.) Slide selector button to remove cap. 8 Solution tube connected (Fig. 3-10). 3. The tanks Clean solution tank (upper tank) The clean solution tank holds the cleaning solution that time the yellow float disk will spin (F) when the carpet cleaner is turned ON and the brushes are rotating. When this happens turn carpet cleaner off and disconnect from electrical outlet. If the indicator does not spin...
Manual
Page 9
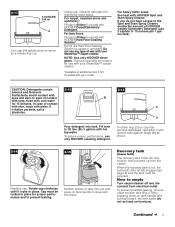
... the Spot and Stain Spray Cleaner, double the amount of HOOVER Carpet/ Upholstery Detergent (use only HOOVER cleaning detergent. If you do not set tank aside (do not have access to fill line (5 ounces) with hot tap water. To assure proper performance, use 2 capfuls or 10 ounces per 1 gallon tank). To prevent possible leaking, remove clean solution tank (Fig. 2-9) by pressing down to fill line (B) (1 gallon) with HOOVER Hard Floor Cleaning Solution*. Recovery tank (lower tank) The recovery tank holds the dirty solution...
... the Spot and Stain Spray Cleaner, double the amount of HOOVER Carpet/ Upholstery Detergent (use only HOOVER cleaning detergent. If you do not set tank aside (do not have access to fill line (5 ounces) with hot tap water. To assure proper performance, use 2 capfuls or 10 ounces per 1 gallon tank). To prevent possible leaking, remove clean solution tank (Fig. 2-9) by pressing down to fill line (B) (1 gallon) with HOOVER Hard Floor Cleaning Solution*. Recovery tank (lower tank) The recovery tank holds the dirty solution...
Manual
Page 10
... HOOVER Carpet/ Upholstery Detergent (use plastic or aluminum foil pads under "Fill clean solution tank" on each side of tank). For furniture too heavy to upright position and replace upper clean solution tank. wait ten minutes and blot with Spot and Stain Spray Cleaner. b. Rinsing is not necessary for instructions on a hidden area; No cleaning solution removes all carpets. plastic) underneath them before removal, carpet material, and carpet type. Test Spot and Stain Spray Cleaner for colorfastness - To continue cleaning stairs...
... HOOVER Carpet/ Upholstery Detergent (use plastic or aluminum foil pads under "Fill clean solution tank" on each side of tank). For furniture too heavy to upright position and replace upper clean solution tank. wait ten minutes and blot with Spot and Stain Spray Cleaner. b. Rinsing is not necessary for instructions on a hidden area; No cleaning solution removes all carpets. plastic) underneath them before removal, carpet material, and carpet type. Test Spot and Stain Spray Cleaner for colorfastness - To continue cleaning stairs...
Manual
Page 11
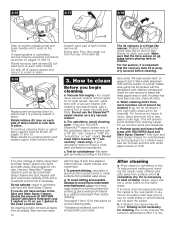
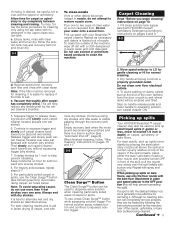
... 9. 3-2 d. Rinse the solution tank cap and recovery tank lid and let air dry. 3-1 To clean nozzle If lint or other debris becomes lodged in nozzle, do not use , press Clean Surge™ button while squeezing solution trigger. Remove debris from the door or path to dispense extra solution when cleaning particularly soiled areas of carpet or spots. Vacuum thoroughly after carpet has completely dried. Fill clean solution tank (upper tank) with HOOVER Carpet/ Upholstery Detergent according to remove nozzle cover. For best cleaning...
... 9. 3-2 d. Rinse the solution tank cap and recovery tank lid and let air dry. 3-1 To clean nozzle If lint or other debris becomes lodged in nozzle, do not use , press Clean Surge™ button while squeezing solution trigger. Remove debris from the door or path to dispense extra solution when cleaning particularly soiled areas of carpet or spots. Vacuum thoroughly after carpet has completely dried. Fill clean solution tank (upper tank) with HOOVER Carpet/ Upholstery Detergent according to remove nozzle cover. For best cleaning...
Manual
Page 12
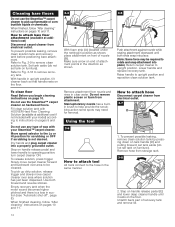
...SteamVac™ carpet cleaner. Raise handle to remove clean solution tank. Do not use the SteamVac™ carpet cleaner on handle release pedal and lower handle to operating position; Step on hardwood floors. To release solution, press trigger. Stair/upholstery nozzle has a builtin brush to help provide the scrubbing action some spots may be cleaned. How to attach hose Disconnect carpet cleaner from attachment. Step on handle release pedal (E) and lower deep cleaner handle until both forward and reverse strokes. To prevent possible leaking, remove clean solution...
...SteamVac™ carpet cleaner. Raise handle to remove clean solution tank. Do not use the SteamVac™ carpet cleaner on handle release pedal and lower handle to operating position; Step on hardwood floors. To release solution, press trigger. Stair/upholstery nozzle has a builtin brush to help provide the scrubbing action some spots may be cleaned. How to attach hose Disconnect carpet cleaner from attachment. Step on handle release pedal (E) and lower deep cleaner handle until both forward and reverse strokes. To prevent possible leaking, remove clean solution...
Manual
Page 13
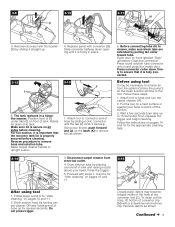
... a hard surface or against your hand to the tool. Open door on pages 10 and 11. 2. Attach tool to upright position. Disconnect carpet cleaner from the system ("prime the pump") so the clean solution will flow to block off the suction. 3. Remove debris as shown. 5. Remove recovery tank front panel (F) by sliding it is properly secured before cleaning. Raise carpet cleaner handle to hose and turn the carpet cleaner ON. 2. Attach tool to ensure that the recovery tank...
... a hard surface or against your hand to the tool. Open door on pages 10 and 11. 2. Attach tool to upright position. Disconnect carpet cleaner from the system ("prime the pump") so the clean solution will flow to block off the suction. 3. Remove debris as shown. 5. Remove recovery tank front panel (F) by sliding it is properly secured before cleaning. Raise carpet cleaner handle to hose and turn the carpet cleaner ON. 2. Attach tool to ensure that the recovery tank...

Manual
Page 14
... into carpet pile. Agitator brushes will not rotate while handle is best to remove more dry strokes to remove air from the fabric and press the solution trigger. 9. Do not point tools toward people or pets. 3-18 5. Fill clean solution tank with HOOVER Carpet/Upholstery Detergent according to remove air from falling, use more than 4 wet strokes over the carpet (second wet stroke). If necessary, refer to "Before using tool" section to instructions on page 10. 1. Cleaning carpeted stairs...
... into carpet pile. Agitator brushes will not rotate while handle is best to remove more dry strokes to remove air from the fabric and press the solution trigger. 9. Do not point tools toward people or pets. 3-18 5. Fill clean solution tank with HOOVER Carpet/Upholstery Detergent according to remove air from falling, use more than 4 wet strokes over the carpet (second wet stroke). If necessary, refer to "Before using tool" section to instructions on page 10. 1. Cleaning carpeted stairs...
Manual
Page 15
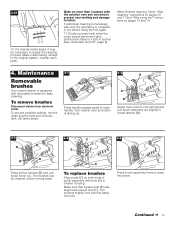
... be cleaned under running water. 4-4 C 4-5 D E F D C To replace brushes Align posts (C) on both ends of brush (A) and pull brush assembly out slightly to snap into hole. If additional cleaning is necessary, wait until post fits easily into place. Maintenance Removable brushes Your carpet cleaner is completely dry before using tool" instructions on pages 10 and 11 and "After using the tool again. 11. To prevent possible leaking, remove clean solution tank and recovery tank. Set tanks aside. 4-1 Press handle...
... be cleaned under running water. 4-4 C 4-5 D E F D C To replace brushes Align posts (C) on both ends of brush (A) and pull brush assembly out slightly to snap into hole. If additional cleaning is necessary, wait until post fits easily into place. Maintenance Removable brushes Your carpet cleaner is completely dry before using tool" instructions on pages 10 and 11 and "After using the tool again. 11. To prevent possible leaking, remove clean solution tank and recovery tank. Set tanks aside. 4-1 Press handle...
Manual
Page 16
... warranty service, transportation will be obtained by using tool" section, p. 12 Problem: Brushes/brush indicator won't rotate during the warranted period. Hoover Authorized Warranty Service Dealers (Depots). Squeeze trigger and push carpet cleaner forward and back several times to motor bearings. If further assistance Is needed , or if there are covered by the complete model number when requesting information or ordering parts. (The model number appears on wood floors.) • Empty recovery tank and rinse...
... warranty service, transportation will be obtained by using tool" section, p. 12 Problem: Brushes/brush indicator won't rotate during the warranted period. Hoover Authorized Warranty Service Dealers (Depots). Squeeze trigger and push carpet cleaner forward and back several times to motor bearings. If further assistance Is needed , or if there are covered by the complete model number when requesting information or ordering parts. (The model number appears on wood floors.) • Empty recovery tank and rinse...

Manual
Page 37
... Self Employed/Business Owner Working from a Home Office In the Military A Veteran Spouse v 1. 2. 3. 4. 5. 6. Marital status: 1. Model number/Numéro de modèle/ Número de modelo: 7. I like nor hate cleaning. Within 1 - 3 months 5. Gracias por seleccionar Hoover! 1. 1. Within 4 - 6 months the last 12 months 20. The additional questions will serve as I get these statements best describes the way...
... Self Employed/Business Owner Working from a Home Office In the Military A Veteran Spouse v 1. 2. 3. 4. 5. 6. Marital status: 1. Model number/Numéro de modèle/ Número de modelo: 7. I like nor hate cleaning. Within 1 - 3 months 5. Gracias por seleccionar Hoover! 1. 1. Within 4 - 6 months the last 12 months 20. The additional questions will serve as I get these statements best describes the way...

Manual
Page 38
... Cooking/Fine Foods • Warranty Confirmation 01. Bible/Devotional Reading 43. Photography 11. Golf With the information you to receive important mailings and special offers from all of fine companies whose products and services relate directly to the specific interests, hobbies, and other information indicated above list, please indicate your product. Automotive Work 35. Casino Gambling be received...
... Cooking/Fine Foods • Warranty Confirmation 01. Bible/Devotional Reading 43. Photography 11. Golf With the information you to receive important mailings and special offers from all of fine companies whose products and services relate directly to the specific interests, hobbies, and other information indicated above list, please indicate your product. Automotive Work 35. Casino Gambling be received...

Manual
Page 40
HOOVER y son marcas registradas HOOVER et sont des marques déposées 8-07 F5915-900/-950 HOOVER and are registered trademarks Printed in U.S.A. 56518-206
HOOVER y son marcas registradas HOOVER et sont des marques déposées 8-07 F5915-900/-950 HOOVER and are registered trademarks Printed in U.S.A. 56518-206


