
Manual
Page 3
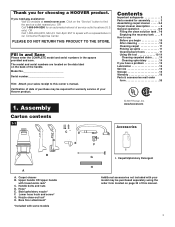
... Call 1-800-944-9200 for assembly 3 Assembling carpet cleaner . . . . . 3-5 Carpet cleaner description 6 General operation 6-9 Filling the clean solution tank . 7-8 Emptying the recovery tank . . . . 9 How to this manual. 3 Handle bolts and nuts D. Thank you for warranty service of your Hoover product. If you have a problem 15 Lubrication 15 Service 15 Storage 15 Warranty 16 Parts & accessories...
... Call 1-800-944-9200 for assembly 3 Assembling carpet cleaner . . . . . 3-5 Carpet cleaner description 6 General operation 6-9 Filling the clean solution tank . 7-8 Emptying the recovery tank . . . . 9 How to this manual. 3 Handle bolts and nuts D. Thank you for warranty service of your Hoover product. If you have a problem 15 Lubrication 15 Service 15 Storage 15 Warranty 16 Parts & accessories...

Manual
Page 4
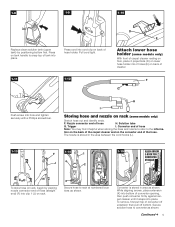
... on back of handle. Remove nozzle stored on this model. Assembled models without attached tools will look like this drawing. 1-2 1-3 1-4 A B Attach upper handle Remove clean solution tank (upper tank) from the handle at (A). With cord hook (B) to snap trigger rod in place while tightening each nut in place. Only two nuts are completely together...
... on back of handle. Remove nozzle stored on this model. Assembled models without attached tools will look like this drawing. 1-2 1-3 1-4 A B Attach upper handle Remove clean solution tank (upper tank) from the handle at (A). With cord hook (B) to snap trigger rod in place while tightening each nut in place. Only two nuts are completely together...
Manual
Page 5
... holder. H I . While aligning arrows, place extension (K) into bottom of the hose. tion on the back of the carpet cleaner and on tank handle to the informa- 1-8 1-9 1-10 Replace clean solution tank (upper tank) by placing nozzle connector end of hose Note: You may find it snaps into place. Press on the converter end of converter...
... holder. H I . While aligning arrows, place extension (K) into bottom of the hose. tion on the back of the carpet cleaner and on tank handle to the informa- 1-8 1-9 1-10 Replace clean solution tank (upper tank) by placing nozzle connector end of hose Note: You may find it snaps into place. Press on the converter end of converter...
Manual
Page 6
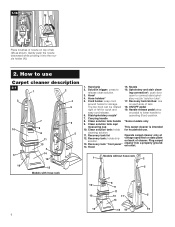
How to connect stair/uphol- 4. Upholstery and stair clean- Hose holders* stery nozzle "solution tube". 5. on data plate solution. Clean solution tank handle *Some models only 9. Recovery tank: holds dirty voltage specified on pedal to lower handle to 16. Models without hose... operating (floor) position. 7. Recovery tank lid Operate carpet cleaner only at 12. Hand grip 15. Cord hooks: wrap cord 17. Clean solution tank cap/ measuring cup This carpet cleaner is intended 10. cleaning solution. 11. Recovery tank "front panel" 14. ing connection*:...
How to connect stair/uphol- 4. Upholstery and stair clean- Hose holders* stery nozzle "solution tube". 5. on data plate solution. Clean solution tank handle *Some models only 9. Recovery tank: holds dirty voltage specified on pedal to lower handle to 16. Models without hose... operating (floor) position. 7. Recovery tank lid Operate carpet cleaner only at 12. Hand grip 15. Cord hooks: wrap cord 17. Clean solution tank cap/ measuring cup This carpet cleaner is intended 10. cleaning solution. 11. Recovery tank "front panel" 14. ing connection*:...
Manual
Page 7
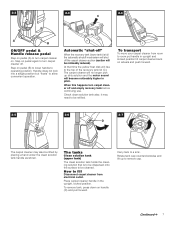
...carpet cleaner suction (suction will be cleaned. The carpet cleaner will rise to the top of the recovery tank lid (C). How to operating position. Continued 7 The tanks Clean solution tank (upper tank) The clean solution tank holds the cleaning solution that time the yellow float disk ...A B ON/OFF pedal & Handle release pedal Step on pedal (A) to turn carpet cleaner off and empty recovery tank before continuing use. Check clean solution tank also; Carry tank to allow convenient operation. Handle does not lock into a single position but "floats" to a sink. Automatic "...
...carpet cleaner suction (suction will be cleaned. The carpet cleaner will rise to the top of the recovery tank lid (C). How to operating position. Continued 7 The tanks Clean solution tank (upper tank) The clean solution tank holds the cleaning solution that time the yellow float disk ...A B ON/OFF pedal & Handle release pedal Step on pedal (A) to turn carpet cleaner off and empty recovery tank before continuing use. Check clean solution tank also; Carry tank to allow convenient operation. Handle does not lock into a single position but "floats" to a sink. Automatic "...
Manual
Page 8
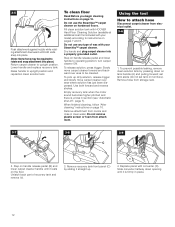
...you do not have access to fill line (5 ounces) with HOOVER Hard Floor Cleaning Solution*. Replace cap. They are specially formulated for proper performance and to prevent leaking. 2-12 Position bottom of tank into unit and press on carpet or upholstery. For carpet, ..., reposition it locks in place for use Hard Floor Cleaning Solution on tank handle to fill line (5 ounces) with HOOVER Carpet/Upholstery Detergent. Using cap, measure detergent following the chart below. Do not use only HOOVER cleaning detergent. For heavy traffic areas: Pre-treat with eyes...
...you do not have access to fill line (5 ounces) with HOOVER Hard Floor Cleaning Solution*. Replace cap. They are specially formulated for proper performance and to prevent leaking. 2-12 Position bottom of tank into unit and press on carpet or upholstery. For carpet, ..., reposition it locks in place for use Hard Floor Cleaning Solution on tank handle to fill line (5 ounces) with HOOVER Carpet/Upholstery Detergent. Using cap, measure detergent following the chart below. Do not use only HOOVER cleaning detergent. For heavy traffic areas: Pre-treat with eyes...

Manual
Page 9
...E Step on front of tank lid and remove lid. Lift tank off will engage (see page 7) and the tank must be emptied. Position the front of lid under tabs (G) on handle release pedal and lower handle until it to upright position and replace upper clean solution tank. Rotate lid down on ...pages 12 and 13. To continue cleaning stairs or upholstery, replace hose as shown on tank handle and pulling forward; Raise handle to a sink or drain. 2-14 F Unlatch ...
...E Step on front of tank lid and remove lid. Lift tank off will engage (see page 7) and the tank must be emptied. Position the front of lid under tabs (G) on handle release pedal and lower handle until it to upright position and replace upper clean solution tank. Rotate lid down on ...pages 12 and 13. To continue cleaning stairs or upholstery, replace hose as shown on tank handle and pulling forward; Raise handle to a sink or drain. 2-14 F Unlatch ...

Manual
Page 10
... rugs/carpet, either move furniture out of spill, time elapsed before cleaning. If no detergent in the clean solution tank. Wait at additional cost if not included with your SteamVac™ carpet cleaner to the Spot and Stain Spray Cleaner, double the amount of HOOVER Carpet/ Upholstery Detergent (use plastic or aluminum foil to be...
... rugs/carpet, either move furniture out of spill, time elapsed before cleaning. If no detergent in the clean solution tank. Wait at additional cost if not included with your SteamVac™ carpet cleaner to the Spot and Stain Spray Cleaner, double the amount of HOOVER Carpet/ Upholstery Detergent (use plastic or aluminum foil to be...
Manual
Page 11
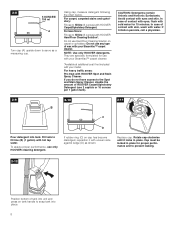
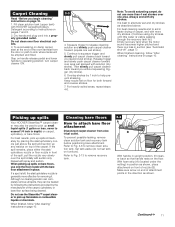
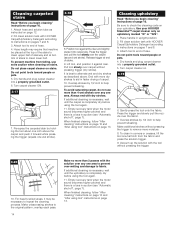
... on bare floors, use only the floor nozzle with dry strokes. To prevent possible leaking, remove clean solution tank and recovery tank before positioning bare attachment. turn carpet cleaner ON. 3-3 4. Release trigger and slowly push carpet cleaner forward over one wet ... the netting) in the direction as described above the spill and suction up flammable or combustible liquids or chemicals. Carpet Cleaning Read "Before you begin cleaning" instructions on pages 7 and 8. 2. Fill clean solution tank (upper tank) with HOOVER Carpet/Upholstery Detergent according to remove...
... on bare floors, use only the floor nozzle with dry strokes. To prevent possible leaking, remove clean solution tank and recovery tank before positioning bare attachment. turn carpet cleaner ON. 3-3 4. Release trigger and slowly push carpet cleaner forward over one wet ... the netting) in the direction as described above the spill and suction up flammable or combustible liquids or chemicals. Carpet Cleaning Read "Before you begin cleaning" instructions on pages 7 and 8. 2. Fill clean solution tank (upper tank) with HOOVER Carpet/Upholstery Detergent according to remove...
Manual
Page 12
... pressing down opening until it is a loss in suction (see "Automatic shut-off", page 7). Do not use any type of recovery tank and remove lid. 3. Fill clean solution tank with HOOVER Hard Floor Cleaning Solution (available at additional cost if not included with converter (D). 3-5 Push attachment against nozzle while rotating attachment downward until both forward and reverse...
... pressing down opening until it is a loss in suction (see "Automatic shut-off", page 7). Do not use any type of recovery tank and remove lid. 3. Fill clean solution tank with HOOVER Hard Floor Cleaning Solution (available at additional cost if not included with converter (D). 3-5 Push attachment against nozzle while rotating attachment downward until both forward and reverse...
Manual
Page 13
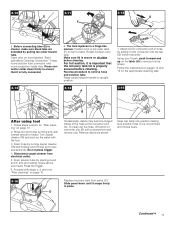
...electrical outlet. 5. To clean out the hose, lift bottom of water. Press connector collar down firmly to upright position. Raise carpet cleaner handle to ensure that the recovery tank lid is important that it securely. H 1. Slide panel down onto tank. Drain solution tube by turning carpet .... Open door on all sides before cleaning. Press round solution tube connector onto round projection inside of hose up on page 10. Rotate lid down until the tab (G) locks it is not pinched and moves freely. 3-16 Replace recovery tank front panel (D). Using your head....
...electrical outlet. 5. To clean out the hose, lift bottom of water. Press connector collar down firmly to upright position. Raise carpet cleaner handle to ensure that the recovery tank lid is important that it securely. H 1. Slide panel down onto tank. Drain solution tube by turning carpet .... Open door on all sides before cleaning. Press round solution tube connector onto round projection inside of hose up on page 10. Rotate lid down until the tab (G) locks it is not pinched and moves freely. 3-16 Replace recovery tank front panel (D). Using your head....
Manual
Page 14
... pitched and there is completely dry before using the tool again. 11. When finished cleaning, follow "After cleaning" instructions on page 10 and "After using tool" instructions on stairs. Fill clean solution tank with dry strokes. Attach tool to instructions on your HOOVER SteamVac™ carpet cleaner only on pages 7 and 8. 3. Overlap strokes by holding the...
... pitched and there is completely dry before using the tool again. 11. When finished cleaning, follow "After cleaning" instructions on page 10 and "After using tool" instructions on stairs. Fill clean solution tank with dry strokes. Attach tool to instructions on your HOOVER SteamVac™ carpet cleaner only on pages 7 and 8. 3. Overlap strokes by holding the...
Manual
Page 15
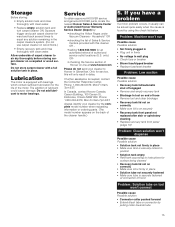
... Please do not send your cleaner by : • checking the Yellow Pages under Vacuum Cleaners - Storage Before storing: • Empty solution tank and rinse thoroughly with clean water. In Canada, contact Hoover Canada, Carson Building, 100 Carson St., Etobicoke, Ontario M8W 3R9. Squeeze trigger and push carpet cleaner forward and back several times to...
... Please do not send your cleaner by : • checking the Yellow Pages under Vacuum Cleaners - Storage Before storing: • Empty solution tank and rinse thoroughly with clean water. In Canada, contact Hoover Canada, Carson Building, 100 Carson St., Etobicoke, Ontario M8W 3R9. Squeeze trigger and push carpet cleaner forward and back several times to...


