Product Manual
Page 1
página E1 www.hoover.com IMPORTANT: READ CAREFULLY BEFORE ASSEMBLY AND USE. Owner's Manual Operating and Servicing Instructions Español - For assistance, please call Customer Service at 1-800-944-9200 Mon-Fri 8am-7pm EST before returning this product to the store. All rights reserved. #961069011 R0 • ID 102713 R0 THIS PRODUCT IS INTENDED FOR COMMERCIAL USE ONLY. ©2011 Techtronic Floor Care Technology Limited. Questions or concerns?
página E1 www.hoover.com IMPORTANT: READ CAREFULLY BEFORE ASSEMBLY AND USE. Owner's Manual Operating and Servicing Instructions Español - For assistance, please call Customer Service at 1-800-944-9200 Mon-Fri 8am-7pm EST before returning this product to the store. All rights reserved. #961069011 R0 • ID 102713 R0 THIS PRODUCT IS INTENDED FOR COMMERCIAL USE ONLY. ©2011 Techtronic Floor Care Technology Limited. Questions or concerns?
Product Manual
Page 2
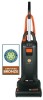
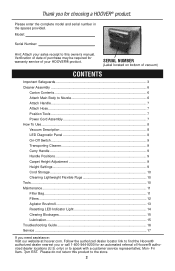
...warranty service of Hoover® authorized dealer locations (U.S. Please do not return this owner's manual. Follow the authorized dealer locator link to Nozzle 6 Attach Handle...7 Attach Hose...7 Position Tools...7 Power Cord Assembly 7 How To Use...8 Vacuum Description 8 LED Diagnostic Panel 8 On-Off Switch...9 Transporting Cleaner 9 Carry Handle...9 Handle Positions 9 Carpet Height Adjustment 9 Height Settings...9 Cord Storage...10 Cleaning Lightweight Flexible Rugs 10 Tools...10 Maintenance...11 Filter Bag...11 Filters...12 Agitator Brushroll 13 Resetting LED Indicator Light...
...warranty service of Hoover® authorized dealer locations (U.S. Please do not return this owner's manual. Follow the authorized dealer locator link to Nozzle 6 Attach Handle...7 Attach Hose...7 Position Tools...7 Power Cord Assembly 7 How To Use...8 Vacuum Description 8 LED Diagnostic Panel 8 On-Off Switch...9 Transporting Cleaner 9 Carry Handle...9 Handle Positions 9 Carpet Height Adjustment 9 Height Settings...9 Cord Storage...10 Cleaning Lightweight Flexible Rugs 10 Tools...10 Maintenance...11 Filter Bag...11 Filters...12 Agitator Brushroll 13 Resetting LED Indicator Light...
Product Manual
Page 3
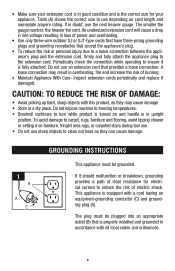
...; Turn off all parts of California to rotate when in this manual. Unplug from openings and moving parts. Do not run appliance over cord. To avoid injury or damage, keep free of stairs on wet surfaces. • Do not allow children to continuing use outdoors or on floor. WARNING: TO REDUCE THE RISK OF FIRE, ELECTRIC SHOCK OR INJURY: • Fully assemble before cleaning or servicing...
...; Turn off all parts of California to rotate when in this manual. Unplug from openings and moving parts. Do not run appliance over cord. To avoid injury or damage, keep free of stairs on wet surfaces. • Do not allow children to continuing use outdoors or on floor. WARNING: TO REDUCE THE RISK OF FIRE, ELECTRIC SHOCK OR INJURY: • Fully assemble before cleaning or servicing...
Product Manual
Page 4
... and flooring, avoid tipping cleaner or setting it is properly installed and grounded in loss of electric shock. Table (A) shows the correct size to use sharp objects to ensure it on and handle is turned on furniture, fringed area rugs, or carpeted stairs during tool use. • Do not use depending on cord length and nameplate ampere rating. Periodically check the connection while operating to clean out hose...
... and flooring, avoid tipping cleaner or setting it is properly installed and grounded in loss of electric shock. Table (A) shows the correct size to use sharp objects to ensure it on and handle is turned on furniture, fringed area rugs, or carpeted stairs during tool use. • Do not use depending on cord length and nameplate ampere rating. Periodically check the connection while operating to clean out hose...
Product Manual
Page 5
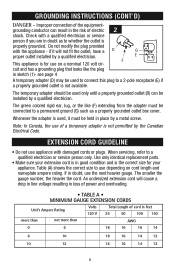
... loss of power and overheating. • TABLE A • MINIMUM GAUGE EXTENSION CORDS Unit's Ampere Rating Volts 120 V Total Length of electric 2 shock. When servicing, refer to a 2-pole receptacle (E) if a properly grounded outlet is not available. Table (A) shows the correct size to whether the outlet is used to connect this plug to a qualified electrician or service person only. Check with the...
... loss of power and overheating. • TABLE A • MINIMUM GAUGE EXTENSION CORDS Unit's Ampere Rating Volts 120 V Total Length of electric 2 shock. When servicing, refer to a 2-pole receptacle (E) if a properly grounded outlet is not available. Table (A) shows the correct size to whether the outlet is used to connect this plug to a qualified electrician or service person only. Check with the...
Product Manual
Page 6
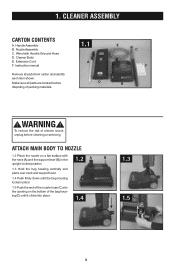
... packing materials. 1.1 A D E C F B ! Extension Cord F. Instruction manual Remove all parts are located before cleaning or servicing. To reduce the risk of the bag housing (D) until it clicks into the opening on a flat surface with Handle Grip and Hose D. attach main body to nozzle 1.2 Place the nozzle on the bottom of electric shock, unplug before disposing of the nozzle hose (C) into place. 1.4 1.3 1.5 D C 6 Handle Assembly B. 1. WARNING ! Nozzle Assembly C. Cleaner Body E. Make sure all parts from carton and...
... packing materials. 1.1 A D E C F B ! Extension Cord F. Instruction manual Remove all parts are located before cleaning or servicing. To reduce the risk of the bag housing (D) until it clicks into the opening on a flat surface with Handle Grip and Hose D. attach main body to nozzle 1.2 Place the nozzle on the bottom of electric shock, unplug before disposing of the nozzle hose (C) into place. 1.4 1.3 1.5 D C 6 Handle Assembly B. 1. WARNING ! Nozzle Assembly C. Cleaner Body E. Make sure all parts from carton and...

Product Manual
Page 7
... as you slide bottom end of wand into the opening in their designated places on handle to operate. 1. Power cord assembly 1.12 This cleaner is damaged during use, simply replace with a Quick-Change power cord (A). cleaner ASSEMBLY (cont'd) attach handle 1.6 Lift the handle lock button up on the back of the Quick-Change cord. As a precaution, pull up and place the handle assembly down into channel on back of bag housing. 1.9 As you are in the...
... as you slide bottom end of wand into the opening in their designated places on handle to operate. 1. Power cord assembly 1.12 This cleaner is damaged during use, simply replace with a Quick-Change power cord (A). cleaner ASSEMBLY (cont'd) attach handle 1.6 Lift the handle lock button up on the back of the Quick-Change cord. As a precaution, pull up and place the handle assembly down into channel on back of bag housing. 1.9 As you are in the...
Product Manual
Page 8
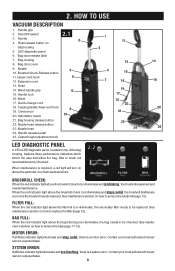
... the user that needs serviced. 2.2 BRUSHROLL CHECK: When the red indicator light above the brushroll check icon illuminates and is blinking, the brushroll is a system error. HOW TO USE Vacuum Description 1. Hose release button on how to be replaced. Bag door cover 9. Wand 17. Nozzle hose 24. Contact your local authorized Hoover service representative. Extension cord 13. When maintenance is a motor error. When the red indicator light above the bag full/clog icon illuminates, the bag needs to replace the filter (page...
... the user that needs serviced. 2.2 BRUSHROLL CHECK: When the red indicator light above the brushroll check icon illuminates and is blinking, the brushroll is a system error. HOW TO USE Vacuum Description 1. Hose release button on how to be replaced. Bag door cover 9. Wand 17. Nozzle hose 24. Contact your local authorized Hoover service representative. Extension cord 13. When maintenance is a motor error. When the red indicator light above the bag full/clog icon illuminates, the bag needs to replace the filter (page...

Product Manual
Page 9
... used for bare floors and low pile, level loop, kitchen-type or commercial grade carpet. • Medium setting (2): For medium pile types of carpet and rugs takes place at the nozzle. LED lights will not move your cleaner has three B positions; (A) upright for storage and when using the carry handle (A). carry handle 2.5 2.5 The cleaner can also be in turning knob, the handle should be moved by using cleaning tools; (B) operating position for general operation...
... used for bare floors and low pile, level loop, kitchen-type or commercial grade carpet. • Medium setting (2): For medium pile types of carpet and rugs takes place at the nozzle. LED lights will not move your cleaner has three B positions; (A) upright for storage and when using the carry handle (A). carry handle 2.5 2.5 The cleaner can also be in turning knob, the handle should be moved by using cleaning tools; (B) operating position for general operation...

Product Manual
Page 10
... vacuum is ready for the desired floor/carpet type. This will lift up nozzle so that when you have reached the edge, it on and handle is completely off the rug. To avoid damage to reach the optimal setting for tool use when handle is turned on furniture, fringed area rugs, or carpeted stairs during tool use only forward strokes. 3. The DUAL wheel stabilizing system, located...
... vacuum is ready for the desired floor/carpet type. This will lift up nozzle so that when you have reached the edge, it on and handle is completely off the rug. To avoid damage to reach the optimal setting for tool use when handle is turned on furniture, fringed area rugs, or carpeted stairs during tool use only forward strokes. 3. The DUAL wheel stabilizing system, located...
Product Manual
Page 11
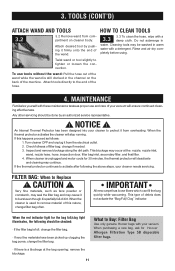
... ! Turn cleaner OFF and unplug it firmly onto the end of the hose. remove the blockage. 11 This blockage may continue. IMPORTANT All new carpet has loose fibers which can fill the bag quickly while vacuuming. MAINTENANCE Familiarize yourself with your vacuum will ensure continued cleaning effectiveness. Attach desired tool by an authorized service representative. ! How to the end of the wand. What to Buy: Filter Bag Use only genuine Hoover...
... ! Turn cleaner OFF and unplug it firmly onto the end of the hose. remove the blockage. 11 This blockage may continue. IMPORTANT All new carpet has loose fibers which can fill the bag quickly while vacuuming. MAINTENANCE Familiarize yourself with your vacuum will ensure continued cleaning effectiveness. Attach desired tool by an authorized service representative. ! How to the end of the wand. What to Buy: Filter Bag Use only genuine Hoover...
Product Manual
Page 12
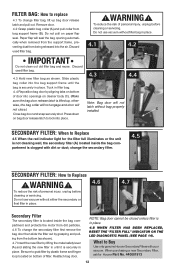
... flap will seal the bag opening automatically when removed from the support frame, preventing dust from bag support frame (B). WARNING ! What to Buy Use only genuine Hoover Secondary Filters with dirt or dust; filter bag: How to replace 4.1 To change filter bag, lift up , otherwise, the bag collar will not engage and door will not close.) Close bag door and snap securely shut. Slide plastic bag collar into openings on bag door release latch to...
... flap will seal the bag opening automatically when removed from the support frame, preventing dust from bag support frame (B). WARNING ! What to Buy Use only genuine Hoover Secondary Filters with dirt or dust; filter bag: How to replace 4.1 To change filter bag, lift up , otherwise, the bag collar will not engage and door will not close.) Close bag door and snap securely shut. Slide plastic bag collar into openings on bag door release latch to...
Product Manual
Page 13
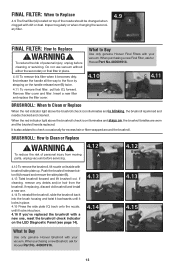
... C What to Buy Use only genuine Hoover Brushroll with dirt or dust. WARNING ! Push the brushroll release button (A) forward and remove the side plate (B). 4.13 Twist brushroll forward and lift brushroll out. When purchasing a new Final Filter, ask for ® Hoover Part No.440001914. 4.10 C 4.11 B BRUSHROLL: When to Clean or Replace When the red indicator light above the brushroll check icon illuminates and stays on the handle release lever...
... C What to Buy Use only genuine Hoover Brushroll with dirt or dust. WARNING ! Push the brushroll release button (A) forward and remove the side plate (B). 4.13 Twist brushroll forward and lift brushroll out. When purchasing a new Final Filter, ask for ® Hoover Part No.440001914. 4.10 C 4.11 B BRUSHROLL: When to Clean or Replace When the red indicator light above the brushroll check icon illuminates and stays on the handle release lever...
Product Manual
Page 14
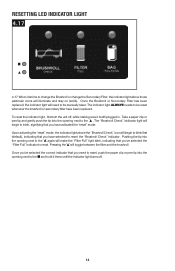
... it is still plugged in. The indicator light ALWAYS needs to be manually reset. The "Brushroll Check" inidicator light will begin to blink first (default), indicating that you need to be reset whenever the brushroll or secondary filter have been replaced. Pressing the will need to reset, push the paper clip or pen tip into the opening next to reset the "Brushroll Check" indicator. Once you...
... it is still plugged in. The indicator light ALWAYS needs to be manually reset. The "Brushroll Check" inidicator light will begin to blink first (default), indicating that you need to be reset whenever the brushroll or secondary filter have been replaced. Pressing the will need to reset, push the paper clip or pen tip into the opening next to reset the "Brushroll Check" indicator. Once you...

Product Manual
Page 15
... cleaning or servicing. a. Turn cleaner OFF and unplug. Replace brushroll by pressing hose release button on page13. Twist nozzle hose to a blockage in wand. 4.19 ii) Remove hose by following steps on cleaner body (C) and pulling hose out. Clearing blockages ! To reduce the risk of lubricant could cause damage. Low suction or pick up may be due to unlock hose inside nozzle and twist to motor bearings. 15 Change if needed. 4.18 4.19 Check...
... cleaning or servicing. a. Turn cleaner OFF and unplug. Replace brushroll by pressing hose release button on page13. Twist nozzle hose to a blockage in wand. 4.19 ii) Remove hose by following steps on cleaner body (C) and pulling hose out. Clearing blockages ! To reduce the risk of lubricant could cause damage. Low suction or pick up may be due to unlock hose inside nozzle and twist to motor bearings. 15 Change if needed. 4.18 4.19 Check...
Product Manual
Page 16
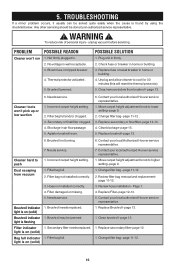
...- Filter bag full. 2. Filter damaged or missing. 5. Change filter bag- unplug vacuum before servicing. Move carpet height adjustment knob to cool for 30 minutes (this will reset the thermal protector). 5. Change filter bag - page 13. page 12. Incorrect carpet height setting. 2. Thermal protector activated . 5. Unplug and allow cleaner to higher setting- Cleaner/ tools won 't run 1. Agitator brushroll worn. 6. Brushroll Indicator 1. Replace Brushroll- Filter bag full. 5. PROBLEM POSSIBLE REASON Cleaner won 't pick up or low suction 6. page 12-13. 4. Needs service...
...- Filter bag full. 2. Filter damaged or missing. 5. Change filter bag- unplug vacuum before servicing. Move carpet height adjustment knob to cool for 30 minutes (this will reset the thermal protector). 5. Change filter bag - page 13. page 12. Incorrect carpet height setting. 2. Thermal protector activated . 5. Unplug and allow cleaner to higher setting- Cleaner/ tools won 't run 1. Agitator brushroll worn. 6. Brushroll Indicator 1. Replace Brushroll- Filter bag full. 5. PROBLEM POSSIBLE REASON Cleaner won 't pick up or low suction 6. page 12-13. 4. Needs service...
Product Manual
Page 17
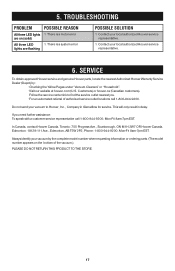
.... Follow the service center link to Hoover,® Inc., Company in delay. TROUBLESHOOTING PROBLEM POSSIBLE REASON All three LED lights 1. If you . • For an automated referral of the vacuum.) PLEASE DO NOT RETURN THIS PRODUCT TO THE STORE. 17 There is a motor error are flashing POSSIBLE SOLUTION 1. Contact your vacuum to find the service outlet nearest you need further assistance: To...
.... Follow the service center link to Hoover,® Inc., Company in delay. TROUBLESHOOTING PROBLEM POSSIBLE REASON All three LED lights 1. If you . • For an automated referral of the vacuum.) PLEASE DO NOT RETURN THIS PRODUCT TO THE STORE. 17 There is a motor error are flashing POSSIBLE SOLUTION 1. Contact your vacuum to find the service outlet nearest you need further assistance: To...


