Product Manual
Page 3
YOUR GUIDE Important Safety Instructions...4 Getting started with your Cruise™ Cordless...6 Assembly...7 Attach the wall bracket...8 How to use...9 Before you begin cleaning...10 Using your machine...12 Using your machine as a Handheld vacuum 13 Using your machine to clean up high...14 Maintenance...16 How to order accessories...22 Need Help?...23 Service and Warranty...24
YOUR GUIDE Important Safety Instructions...4 Getting started with your Cruise™ Cordless...6 Assembly...7 Attach the wall bracket...8 How to use...9 Before you begin cleaning...10 Using your machine...12 Using your machine as a Handheld vacuum 13 Using your machine to clean up high...14 Maintenance...16 How to order accessories...22 Need Help?...23 Service and Warranty...24
Product Manual
Page 9
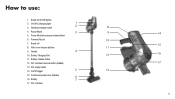
Powered Nozzle 10 7. Battery Charging Port 12 11. Dirt empty button 14. Reach Wand 3 9 5. Battery release button 12. Continuous power lever (hidden) 6 16. Handle 4 10. Dirt container removal button (hidden) 13. Brush roll On/Off button 2. Power Nozzle/accessory release button 6. Dirt container 14 15 16 17 9 Battery 7 17. Filter cover release buttons 11 9. On/Off & charging light 1 2 3. How to use: 1. On/Off trigger 5 13 15. Brush roll 8. Handheld release button 8 4.
Powered Nozzle 10 7. Battery Charging Port 12 11. Dirt empty button 14. Reach Wand 3 9 5. Battery release button 12. Continuous power lever (hidden) 6 16. Handle 4 10. Dirt container removal button (hidden) 13. Brush roll On/Off button 2. Power Nozzle/accessory release button 6. Dirt container 14 15 16 17 9 Battery 7 17. Filter cover release buttons 11 9. On/Off & charging light 1 2 3. How to use: 1. On/Off trigger 5 13 15. Brush roll 8. Handheld release button 8 4.

Product Manual
Page 13
The Reach Wand when attached to the Powered Nozzle/accessory is not free standing, place safely and securely to separate the Handheld from the Reach Wand . Push the chosen accessory into the Handheld until it clicks into place. (All available accessories can be used for grooming a pet. 13 Not to be attached directly onto the Handheld). 3 4 IMPORTANT ! Pull to one side. 1 2 Choose an accessory (all accessories not available on all models). Using your machine as a Handheld vacuum: Press the Handheld release button.
The Reach Wand when attached to the Powered Nozzle/accessory is not free standing, place safely and securely to separate the Handheld from the Reach Wand . Push the chosen accessory into the Handheld until it clicks into place. (All available accessories can be used for grooming a pet. 13 Not to be attached directly onto the Handheld). 3 4 IMPORTANT ! Pull to one side. 1 2 Choose an accessory (all accessories not available on all models). Using your machine as a Handheld vacuum: Press the Handheld release button.
Product Manual
Page 14
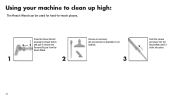
Press the Power Nozzle/ accessory release button and pull to -reach places. Choose an accessory (all accessories not available on all models). 1 2 3 Push the chosen accessory into the Reach Wand until it clicks into place. 14 Using your machine to clean up high: The Reach Wand can be used for hard-to remove the Powered Nozzle from the Reach Wand.
Press the Power Nozzle/ accessory release button and pull to -reach places. Choose an accessory (all accessories not available on all models). 1 2 3 Push the chosen accessory into the Reach Wand until it clicks into place. 14 Using your machine to clean up high: The Reach Wand can be used for hard-to remove the Powered Nozzle from the Reach Wand.
Product Manual
Page 18
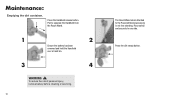
To reduce the risk of personal injury, remove battery before cleaning or servicing. 18 The Reach Wand when attached to separate the Handheld from the Reach Wand. 1 2 Ensure the battery has been removed and hold the Handheld over a trash bin. 3 4 WARNING ! Pull to the Powered Nozzle/accessory is not free standing. Maintenance: Emptying the dirt container. Press the Handheld release button. Press the dirt empty button. Place safely and securely to one side.
To reduce the risk of personal injury, remove battery before cleaning or servicing. 18 The Reach Wand when attached to separate the Handheld from the Reach Wand. 1 2 Ensure the battery has been removed and hold the Handheld over a trash bin. 3 4 WARNING ! Pull to the Powered Nozzle/accessory is not free standing. Maintenance: Emptying the dirt container. Press the Handheld release button. Press the dirt empty button. Place safely and securely to one side.
Product Manual
Page 22
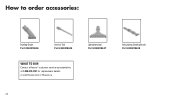
How to order accessories: Dusting Brush Part #440010636 Crevice Tool Part #440010635 WHAT TO BUY: Contact a Hoover® customer service representative at 1-888-679-2121 for replacement details or visit Hoover.com or Hoover.ca Upholstery tool Part #440010637 Articulating Dusting Brush Part #440010638 22
How to order accessories: Dusting Brush Part #440010636 Crevice Tool Part #440010635 WHAT TO BUY: Contact a Hoover® customer service representative at 1-888-679-2121 for replacement details or visit Hoover.com or Hoover.ca Upholstery tool Part #440010637 Articulating Dusting Brush Part #440010638 22

