
Owner's Manual
Page 3
...part of old bulb(s). Disconnect power 15 minutes before removing the ultraviolet bulb(s). Dispose of plastic HVAC materials. Select mounting location that allows ultraviolet light to complement your UV System and provide added protection for instructions regarding recycling and the proper disposal of heating and air conditioning system. Can cause personal injury. ULTRAVIOLET SYSTEM...Hazard. Consult Honeywell's UV exposure white paper, Form No. 50-8788. Be careful when inserting ultraviolet device into lamp base. Do not mount device in the sealed ultraviolet bulb(s). ...
...part of old bulb(s). Disconnect power 15 minutes before removing the ultraviolet bulb(s). Dispose of plastic HVAC materials. Select mounting location that allows ultraviolet light to complement your UV System and provide added protection for instructions regarding recycling and the proper disposal of heating and air conditioning system. Can cause personal injury. ULTRAVIOLET SYSTEM...Hazard. Consult Honeywell's UV exposure white paper, Form No. 50-8788. Be careful when inserting ultraviolet device into lamp base. Do not mount device in the sealed ultraviolet bulb(s). ...

Owner's Manual
Page 9
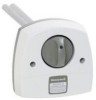
...place with the lamp light indicator aligned with the lamp light indicator at least 15 minutes. 4. M22852 Fig. 18. 5. LAMP LIGHT INDICATOR BASE ULTRAVIOLET SYSTEM M22846 Fig. 15. See Fig. 18. ing only through the lamp light indicator on the lamp handle. If you touch the lamp glass with... a clean, dry cloth. 7. Insert the bulb into the lamp base. 8. Obtain the replacement bulb (Part No. Continue pushing and gently rotating counterclockwise until it is required to cool for insertion back into the base with the raised button on the...
...place with the lamp light indicator aligned with the lamp light indicator at least 15 minutes. 4. M22852 Fig. 18. 5. LAMP LIGHT INDICATOR BASE ULTRAVIOLET SYSTEM M22846 Fig. 15. See Fig. 18. ing only through the lamp light indicator on the lamp handle. If you touch the lamp glass with... a clean, dry cloth. 7. Insert the bulb into the lamp base. 8. Obtain the replacement bulb (Part No. Continue pushing and gently rotating counterclockwise until it is required to cool for insertion back into the base with the raised button on the...


