

Owner's Manual
Page 1
Installation Instructions RCWL200A and RCWL210A Portable Chime (51375SL; 51376SL) With Push (51381SL) 69-2112EFS_D.indd 1 69-2112EFS-07 12/10/2009 12:05:44 PM
Installation Instructions RCWL200A and RCWL210A Portable Chime (51375SL; 51376SL) With Push (51381SL) 69-2112EFS_D.indd 1 69-2112EFS-07 12/10/2009 12:05:44 PM

Owner's Manual
Page 2
Installation Instructions FLASHING LIGHT (FOR RCWL210A ONLY) VOLUME CONTROL SWITCH LED PROGRAMMING BUTTON FLASHING LIGHT AND SOUND SELECTION SWITCH (FOR RCWL210A ONLY) M27177 69-2112EFS-07 ii 69-2112EFS_D.indd 2 LED INDICATES TRANSMITION PUSH BUTTON M27176 12/10/2009 12:05:44 PM
Installation Instructions FLASHING LIGHT (FOR RCWL210A ONLY) VOLUME CONTROL SWITCH LED PROGRAMMING BUTTON FLASHING LIGHT AND SOUND SELECTION SWITCH (FOR RCWL210A ONLY) M27177 69-2112EFS-07 ii 69-2112EFS_D.indd 2 LED INDICATES TRANSMITION PUSH BUTTON M27176 12/10/2009 12:05:44 PM

Owner's Manual
Page 3
..., etc. • Before drilling holes in walls, check for push • 2 x wall plugs • Adhesive pad You will need: • 3 X LR14 C size 1.5V Alkaline batteries • A #1 Philips-head screw driver • A small flat bladed screwdriver • A 1/4-in doubt. Checking Pack Contents • Chime • Bell push • CR2032 battery for bell push • 2 x screws for hidden electricity cables and water pipes...
..., etc. • Before drilling holes in walls, check for push • 2 x wall plugs • Adhesive pad You will need: • 3 X LR14 C size 1.5V Alkaline batteries • A #1 Philips-head screw driver • A small flat bladed screwdriver • A 1/4-in doubt. Checking Pack Contents • Chime • Bell push • CR2032 battery for bell push • 2 x screws for hidden electricity cables and water pipes...

Owner's Manual
Page 4
LR14 C SIZE - + + - Installing Batteries CR2032 + CR2032 + M27182 69-2112EFS-07 2 69-2112EFS_D.indd 2 - M27178 12/10/2009 12:05:44 PM + Installation Instructions 2.
LR14 C SIZE - + + - Installing Batteries CR2032 + CR2032 + M27182 69-2112EFS-07 2 69-2112EFS_D.indd 2 - M27178 12/10/2009 12:05:44 PM + Installation Instructions 2.

Owner's Manual
Page 5
To save the tune selected, press and release programming button. Change Tune or Program New Push Press and release programming button, LED will erase all memory. M27183 Note: Pressing the program button for more than 15 sec will illuminate, press push button to hear the tune. Follow step 3 to hear another tune. Press push button again to re-program. 3 69-2112EFS_D.indd 3 M27145 69-2112EFS-07 12/10/2009 12:05:44 PM RCWL200A and RCWL210A 3.
To save the tune selected, press and release programming button. Change Tune or Program New Push Press and release programming button, LED will erase all memory. M27183 Note: Pressing the program button for more than 15 sec will illuminate, press push button to hear the tune. Follow step 3 to hear another tune. Press push button again to re-program. 3 69-2112EFS_D.indd 3 M27145 69-2112EFS-07 12/10/2009 12:05:44 PM RCWL200A and RCWL210A 3.

Owner's Manual
Page 6
Install Back Cover Using Screws or Adhesive Pad Provided TOP 69-2112EFS-07 69-2112EFS_D.indd 4 Note: Before final installation adjust distance and posi- TOP tion between push and chime to optimize the chime within your environment. Dense walls and metal can reduce range. M27184 Wall Type Dry-lined partition wall Single-layer brick wall Double-layer brick wall Metal panel/radiator 4 Range Reduction 10-30% 20-40% 30-70% 90-100% 12/10/2009 12:05:44 PM Installation Instructions 4.
Install Back Cover Using Screws or Adhesive Pad Provided TOP 69-2112EFS-07 69-2112EFS_D.indd 4 Note: Before final installation adjust distance and posi- TOP tion between push and chime to optimize the chime within your environment. Dense walls and metal can reduce range. M27184 Wall Type Dry-lined partition wall Single-layer brick wall Double-layer brick wall Metal panel/radiator 4 Range Reduction 10-30% 20-40% 30-70% 90-100% 12/10/2009 12:05:44 PM Installation Instructions 4.
Owner's Manual
Page 8
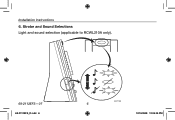
Strobe and Sound Selections Light and sound selection (applicable to RCWL210A only). 69-2112EFS-07 69-2112EFS_D.indd 6 M27180 6 12/10/2009 12:05:45 PM Installation Instructions 6.
Strobe and Sound Selections Light and sound selection (applicable to RCWL210A only). 69-2112EFS-07 69-2112EFS_D.indd 6 M27180 6 12/10/2009 12:05:45 PM Installation Instructions 6.

Owner's Manual
Page 9
RCWL200A and RCWL210A 7. Tune + 3 beeps + 3 LED flashes = change batteries in push. + - + BEEP2 + x 2 + BEEP3 + x 3 69-2112EFS_D.indd 7 - + + - CR2032 + 7 CR2032 + M27181 69-2112EFS-07 12/10/2009 12:05:45 PM Low Battery Indication Tune + 2 beeps + 2 LED flashes = change battery in chime.
RCWL200A and RCWL210A 7. Tune + 3 beeps + 3 LED flashes = change batteries in push. + - + BEEP2 + x 2 + BEEP3 + x 3 69-2112EFS_D.indd 7 - + + - CR2032 + 7 CR2032 + M27181 69-2112EFS-07 12/10/2009 12:05:45 PM Low Battery Indication Tune + 2 beeps + 2 LED flashes = change battery in chime.

Owner's Manual
Page 10
US Range (open field) Sound Level (typical) RF Power Battery Type Battery Life (5 operations/day) Water Proof Tunes Chime 32°F to 104°F 0°C to +40°C 345MHz 200 ft (61 m) 82dBA @ 3 ft (1m) LR14 C size 12 months Ding Dong 4 notes Modern 8 notes Westminster Saxophone Sound Bell Push 14°F to 104°F -10°C to +40°C 345MHz Installation Instructions Specification Operating Temperature RF Frequency -
US Range (open field) Sound Level (typical) RF Power Battery Type Battery Life (5 operations/day) Water Proof Tunes Chime 32°F to 104°F 0°C to +40°C 345MHz 200 ft (61 m) 82dBA @ 3 ft (1m) LR14 C size 12 months Ding Dong 4 notes Modern 8 notes Westminster Saxophone Sound Bell Push 14°F to 104°F -10°C to +40°C 345MHz Installation Instructions Specification Operating Temperature RF Frequency -

Owner's Manual
Page 11
... will delete all the memory! The chime does not work... • Check that batteries are heard and LED flashes three times after the normal chime sound... Try the chime in the chime. Three 'beep' sounds are not loose. • The chime could be out of range of the bell push. Install new batteries, type LR14 C size alkaline batteries. Follow the programming procedure in step 3.
... will delete all the memory! The chime does not work... • Check that batteries are heard and LED flashes three times after the normal chime sound... Try the chime in the chime. Three 'beep' sounds are not loose. • The chime could be out of range of the bell push. Install new batteries, type LR14 C size alkaline batteries. Follow the programming procedure in step 3.

Owner's Manual
Page 12
... the range. • Weak batteries will reduce range. Disposal & Recycling Batteries and waste electrical products should not be replaced more often. Check with household waste. The range is reduced... • Metal structures, including uPVC door frames can cause radio interference that the volume control is not at the minimum setting. Installation Instructions Troubleshooting The chime does not sound... •...
... the range. • Weak batteries will reduce range. Disposal & Recycling Batteries and waste electrical products should not be replaced more often. Check with household waste. The range is reduced... • Metal structures, including uPVC door frames can cause radio interference that the volume control is not at the minimum setting. Installation Instructions Troubleshooting The chime does not sound... •...

Owner's Manual
Page 13
.... this product for regulatory compliance could void the user's authority to the following two conditions: (1) This device may cause undesired operation. RCWL200A and RCWL210A Guarantee Honeywell guarantees this does not affect your product, call the Honeywell helpline at 1-800-468-1502. This device operation...received, including interference that this product complies with Part 15 of purchase is subject to operate the equipment. 69-2112EFS_D.indd 11 11 69-2112EFS-07 12/10/2009 12:05:45 PM Caution: Changes or modification not expressly approved by the party responsible...
.... this product for regulatory compliance could void the user's authority to the following two conditions: (1) This device may cause undesired operation. RCWL200A and RCWL210A Guarantee Honeywell guarantees this does not affect your product, call the Honeywell helpline at 1-800-468-1502. This device operation...received, including interference that this product complies with Part 15 of purchase is subject to operate the equipment. 69-2112EFS_D.indd 11 11 69-2112EFS-07 12/10/2009 12:05:45 PM Caution: Changes or modification not expressly approved by the party responsible...
Owner's Manual
Page 14
Registered Trademark. © 2009 Honeywell International Inc. 69-2112EFS-07 M.S. Honeywell International Inc. Rev. 12-09 69-2112EFS_D.indd 12 12/10/2009 12:05:45 PM ACS, Environmental and Combustion Controls 1985 Douglas Drive, Golden Valley, MN 55422 www.honeywell.com Printed in U.S.A. on recycled paper containing at least 10% post-consumer paper fibers. ® U.S.
Registered Trademark. © 2009 Honeywell International Inc. 69-2112EFS-07 M.S. Honeywell International Inc. Rev. 12-09 69-2112EFS_D.indd 12 12/10/2009 12:05:45 PM ACS, Environmental and Combustion Controls 1985 Douglas Drive, Golden Valley, MN 55422 www.honeywell.com Printed in U.S.A. on recycled paper containing at least 10% post-consumer paper fibers. ® U.S.


