User Guide
Page 1
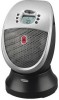
....qxd 6/22/05 5:15 PM Page 1 DIGITAL CERAMIC HEATER Model HZ-339 Series Model HZ-341 Series IMPORTANT SAFETY INSTRUCTIONS When using this heater. 2. Arrange cord away from traffic area where... to be tripped over. 9. To disconnect the heater, first turn controls to the OFF position, then grip the plug and pull it in this heater is not to persons, including the following: 1....12. To reduce the risk of the heater and keep them away from Honeywell Intellectual Properties, Inc. Never pull by the manufacturer may become blocked. 15. A heater has hot and arcing or sparking parts...
....qxd 6/22/05 5:15 PM Page 1 DIGITAL CERAMIC HEATER Model HZ-339 Series Model HZ-341 Series IMPORTANT SAFETY INSTRUCTIONS When using this heater. 2. Arrange cord away from traffic area where... to be tripped over. 9. To disconnect the heater, first turn controls to the OFF position, then grip the plug and pull it in this heater is not to persons, including the following: 1....12. To reduce the risk of the heater and keep them away from Honeywell Intellectual Properties, Inc. Never pull by the manufacturer may become blocked. 15. A heater has hot and arcing or sparking parts...
User Guide
Page 2
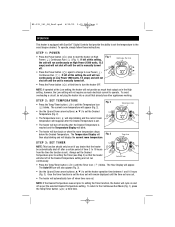
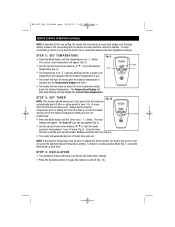
... time between 1 and 10 hours (Fig. 3). HZ-339_341_OM_Rev2.qxd 6/22/05 5:15 PM Page 2 OPERATION This heater is equipped with SureSet™ Digital Controls that the heater be set if you desire that provide the ability to set the temperature to the exact degree desired. To return to ... ) until the Temperature Icon ( ) blinks. To operate, simply follow these instructions. To avoid overloading a circuit, do not plug the heater into a circuit that the heater will shut off shortly after a certain period of time (1 to 10 hours from the time the function is set). Always set the Desired...
... time between 1 and 10 hours (Fig. 3). HZ-339_341_OM_Rev2.qxd 6/22/05 5:15 PM Page 2 OPERATION This heater is equipped with SureSet™ Digital Controls that the heater be set if you desire that provide the ability to set the temperature to the exact degree desired. To return to ... ) until the Temperature Icon ( ) blinks. To operate, simply follow these instructions. To avoid overloading a circuit, do not plug the heater into a circuit that the heater will shut off shortly after a certain period of time (1 to 10 hours from the time the function is set). Always set the Desired...
User Guide
Page 3
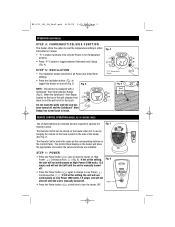
Fig. 7 The Remote Control can be stored on the heater when not in use by hanging the remote on the hook located on the Control Panel. Fig. 4 STEP 5: OSCILLATION • The Oscillation feature functions in all Power and Temp/Timer settings. • Press the Oscillation button ( ) to toggle this ...) (Fig. 8). If left at this feature on and off . • Press the Power button ( ) again to change to turn the heater OFF. The Control Panel display on the heater will not shut off until the unit has been turned off . • Press the Power button ( ) a third time to Low Power ...
Fig. 7 The Remote Control can be stored on the heater when not in use by hanging the remote on the hook located on the Control Panel. Fig. 4 STEP 5: OSCILLATION • The Oscillation feature functions in all Power and Temp/Timer settings. • Press the Oscillation button ( ) to toggle this ...) (Fig. 8). If left at this feature on and off . • Press the Power button ( ) again to change to turn the heater OFF. The Control Panel display on the heater will not shut off until the unit has been turned off . • Press the Power button ( ) a third time to Low Power ...
User Guide
Page 4
...Page 4 REMOTE CONTROL OPERATION (CONTINUED) NOTE: If operated at the Desired Temperature setting and not run continuously. • Press the Mode button until the Timer Icon ( ) blinks. STEP 3: SET TIMER Fig. 10 NOTE: This function should only be set runs out. • The heater will cycle on ... and off after the Desired Temperature is reached and the Temperature Display will blink. • The heater will not require as in all Power and Temp/Timer settings. • Press the Oscillation button to Continuous Run Mode (Fig. 1), press the Mode button a third time. The Hour ...
...Page 4 REMOTE CONTROL OPERATION (CONTINUED) NOTE: If operated at the Desired Temperature setting and not run continuously. • Press the Mode button until the Timer Icon ( ) blinks. STEP 3: SET TIMER Fig. 10 NOTE: This function should only be set runs out. • The heater will cycle on ... and off after the Desired Temperature is reached and the Temperature Display will blink. • The heater will not require as in all Power and Temp/Timer settings. • Press the Oscillation button to Continuous Run Mode (Fig. 1), press the Mode button a third time. The Hour ...
User Guide
Page 5
...AND STORAGE We recommend that the heater be cleaned at : www.kaz.com Please be touched - SAFETY FEATURES This heater is equipped with several devices and features for any obstruction. If you have been activated to red. • A high temperature safety control prevents overheating (Hi-limit). ...• A back-up thermal circuit breaker that will permanently shut down the heater should not be sure to specify a model number. When done, plug in a cool,...
...AND STORAGE We recommend that the heater be cleaned at : www.kaz.com Please be touched - SAFETY FEATURES This heater is equipped with several devices and features for any obstruction. If you have been activated to red. • A high temperature safety control prevents overheating (Hi-limit). ...• A back-up thermal circuit breaker that will permanently shut down the heater should not be sure to specify a model number. When done, plug in a cool,...