
Owners Manual
Page 7
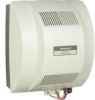
...the 10 ft (3.1m) of drain tubing is adequate to reach from the air entrance. (See Fig. 1-3 in S688 Installation Instructions.) Selecting Location for Humidistat • Select a location for the humidistat on the return plenum or on the return plenum is at...easiest installation for the control wiring circuit. Locate the control at least 3 in. (78 mm) above the humidifier so you install the Honeywell Whole House Drum or Disk Humidifier. HE360A,B POWERED FLOW-THROUGH HUMIDIFIER • Select a location that cannot damage the air conditioner A-coil during installation. • Do not ...
...the 10 ft (3.1m) of drain tubing is adequate to reach from the air entrance. (See Fig. 1-3 in S688 Installation Instructions.) Selecting Location for Humidistat • Select a location for the humidistat on the return plenum or on the return plenum is at...easiest installation for the control wiring circuit. Locate the control at least 3 in. (78 mm) above the humidifier so you install the Honeywell Whole House Drum or Disk Humidifier. HE360A,B POWERED FLOW-THROUGH HUMIDIFIER • Select a location that cannot damage the air conditioner A-coil during installation. • Do not ...
Owners Manual
Page 15
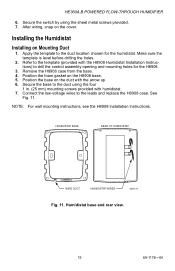
...11. Humidistat base and rear view. 15 69-1176-04 See Fig. 11. After wiring, snap on Mounting Duct 1. NOTE: For wall mounting instructions, see the H8908 Installation Instructions. Secure the switch by using the four 1 in. (25 mm) mounting screws provided with the arrow up. 6. Installing the Humidistat Installing on the... foam gasket on the duct with humidistat. 7. Remove the H8908 case from the base. 4. Make sure the template is level before drilling the holes. 2. HE360A,B POWERED FLOW-THROUGH HUMIDIFIER 6. Secure the base to the leads and replace the H8908 case.
...11. Humidistat base and rear view. 15 69-1176-04 See Fig. 11. After wiring, snap on Mounting Duct 1. NOTE: For wall mounting instructions, see the H8908 Installation Instructions. Secure the switch by using the four 1 in. (25 mm) mounting screws provided with the arrow up. 6. Installing the Humidistat Installing on the... foam gasket on the duct with humidistat. 7. Remove the H8908 case from the base. 4. Make sure the template is level before drilling the holes. 2. HE360A,B POWERED FLOW-THROUGH HUMIDIFIER 6. Secure the base to the leads and replace the H8908 case.
Owners Manual
Page 21
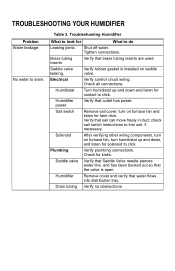
... cover and verify that brass tubing inserts are used. Check all connections. Verify that outlet has power. Table 3. check sail switch instructions to drain. Check for solenoid to look for faint click. Troubleshooting Humidifier What to click. Humidifier power Verify that sail can move freely in duct; turn humidistat up and down , and listen for...
... cover and verify that brass tubing inserts are used. Check all connections. Verify that outlet has power. Table 3. check sail switch instructions to drain. Check for solenoid to look for faint click. Troubleshooting Humidifier What to click. Humidifier power Verify that sail can move freely in duct; turn humidistat up and down , and listen for...
