Owners Guide
Page 2
... comfortable world of humidified air. CONTENTS Operating Your Humidifier 3 How Your Humidifier Works 3 Maintaining Your Humidifier 4 Checking Your Humidifier Operation 6 Troubleshooting Your Humidifier 6 Warranty ...7 69-1656 2 You've also taken the first step toward stopping the "zapping" you create when you walk on your carpet and touch the TV, computer, metal door knob or your Total Comfort System humidifier you will stop drying out. Congratulations...
... comfortable world of humidified air. CONTENTS Operating Your Humidifier 3 How Your Humidifier Works 3 Maintaining Your Humidifier 4 Checking Your Humidifier Operation 6 Troubleshooting Your Humidifier 6 Warranty ...7 69-1656 2 You've also taken the first step toward stopping the "zapping" you create when you walk on your carpet and touch the TV, computer, metal door knob or your Total Comfort System humidifier you will stop drying out. Congratulations...
Owners Guide
Page 3
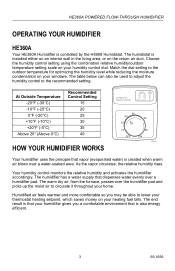
.... The humidifier has a water supply that vapor (evaporated water) is controlled by the H8908 Humidistat. Choose the humidity control setting using the combination relative humidity/outdoor temperature setting scale on your heating fuel bills. Match the dial setting to the recommended setting. The warm dry air, from the furnace, passes over the humidifier pad and picks up the moist air to circulate it throughout your humidifier gives you may be used to adjust the humidity control to...
.... The humidifier has a water supply that vapor (evaporated water) is controlled by the H8908 Humidistat. Choose the humidity control setting using the combination relative humidity/outdoor temperature setting scale on your heating fuel bills. Match the dial setting to the recommended setting. The warm dry air, from the furnace, passes over the humidifier pad and picks up the moist air to circulate it throughout your humidifier gives you may be used to adjust the humidity control to...
Owners Guide
Page 4
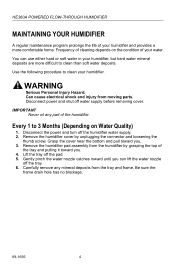
... the frame drain hole has no blockage. 69-1656 4 Disconnect power and shut off the pad. 5. WARNING Serious Personal Injury Hazard. Disconnect the power and turn off the tray. 6. Gently pinch the water nozzle catches inward until you . 3. Every 1 to clean your humidifier, but hard water mineral deposits are more comfortable home. You can lift the water nozzle off the humidifier water supply. 2. Remove the humidifier pad assembly from moving parts.
... the frame drain hole has no blockage. 69-1656 4 Disconnect power and shut off the pad. 5. WARNING Serious Personal Injury Hazard. Disconnect the power and turn off the tray. 6. Gently pinch the water nozzle catches inward until you . 3. Every 1 to clean your humidifier, but hard water mineral deposits are more comfortable home. You can lift the water nozzle off the humidifier water supply. 2. Remove the humidifier pad assembly from moving parts.
Owners Guide
Page 5
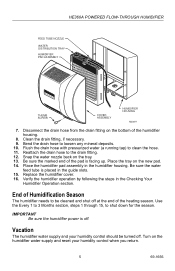
... new pad. 14. IMPORTANT Be sure the humidifier power is facing up. Bend the drain hose to clean the hose. 11. Place the tray on the humidifier water supply and reset your humidity control should be cleaned and shut off . Verify the humidifier operation by following the steps in the humidifier housing. Clean the drain fitting, if necessary. 9. Place the humidifier pad assembly in the Checking Your Humidifier Operation section. End of Humidification Season The humidifier needs to be turned off. Use...
... new pad. 14. IMPORTANT Be sure the humidifier power is facing up. Bend the drain hose to clean the hose. 11. Place the tray on the humidifier water supply and reset your humidity control should be cleaned and shut off . Verify the humidifier operation by following the steps in the humidifier housing. Clean the drain fitting, if necessary. 9. Place the humidifier pad assembly in the Checking Your Humidifier Operation section. End of Humidification Season The humidifier needs to be turned off. Use...
Owners Guide
Page 6
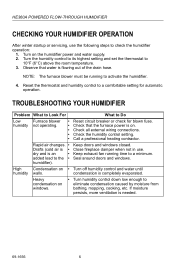
... completely evaporated. Keep exhaust fan running to a minimum. Check the humidity control setting. Call a professional heating contractor. Observe that the furnace power is needed. 69-1656 6 NOTE: The furnace blower must be running time to activate the humidifier. 4. Check all external wiring connections. Close fireplace damper when not in use the following steps to a comfortable setting for blown fuse. Turn off humidity control and water until condensation is flowing out of the drain hose...
... completely evaporated. Keep exhaust fan running to a minimum. Check the humidity control setting. Call a professional heating contractor. Observe that the furnace power is needed. 69-1656 6 NOTE: The furnace blower must be running time to activate the humidifier. 4. Check all external wiring connections. Close fireplace damper when not in use the following steps to a comfortable setting for blown fuse. Turn off humidity control and water until condensation is flowing out of the drain hose...

Owners Manual
Page 3
... Humidifier Works Your Honeywell humidifier uses the principle that vapor (evaporated water) is also energy efficient. 3 69-1176-04 Humidified air feels warmer and more comfortable so you walk on your new Honeywell HE360 Humidifier, H8908 Humidistat and all the accessories required for installation. Your humidity control monitors the relative humidity and activates the humidifier accordingly. APPLICATION This kit contains your heating fuel bills. The warm dry air, from the difference that dispenses water evenly over a humidifier pad...
... Humidifier Works Your Honeywell humidifier uses the principle that vapor (evaporated water) is also energy efficient. 3 69-1176-04 Humidified air feels warmer and more comfortable so you walk on your new Honeywell HE360 Humidifier, H8908 Humidistat and all the accessories required for installation. Your humidity control monitors the relative humidity and activates the humidifier accordingly. APPLICATION This kit contains your heating fuel bills. The warm dry air, from the difference that dispenses water evenly over a humidifier pad...
Owners Manual
Page 4
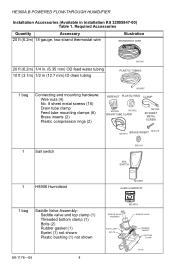
... 1. HE360A,B POWERED FLOW-THROUGH HUMIDIFIER Installation Accessories (Available in (12.7 mm) ID drain tubing M31006 PLASTIC TUBING 1 bag Connecting and mounting hardware: Wire nuts (4) No. 8 sheet metal screws (18) Drain tube clamp Feed tube mounting clamps (6) Brass inserts (2) Plastic compression rings (2) M31007 WIRENUT PLASTIC RING CLAMP M31009 M31012 DRAIN TUBE CLAMP M31020 #8 SHEET METAL SCREW M31014 BRASS INSERT M31015 1 Sail switch M31011 SAIL SWITCH 1 H8908 Humidistat 1 bag...
... 1. HE360A,B POWERED FLOW-THROUGH HUMIDIFIER Installation Accessories (Available in (12.7 mm) ID drain tubing M31006 PLASTIC TUBING 1 bag Connecting and mounting hardware: Wire nuts (4) No. 8 sheet metal screws (18) Drain tube clamp Feed tube mounting clamps (6) Brass inserts (2) Plastic compression rings (2) M31007 WIRENUT PLASTIC RING CLAMP M31009 M31012 DRAIN TUBE CLAMP M31020 #8 SHEET METAL SCREW M31014 BRASS INSERT M31015 1 Sail switch M31011 SAIL SWITCH 1 H8908 Humidistat 1 bag...
Owners Manual
Page 6
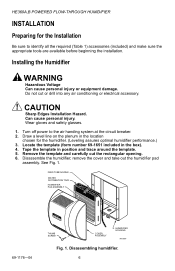
... included in position and trace around the template. 5. FEED TUBE NOZZLE WATER DISTRIBUTION TRAY HUMIDIFIER PAD ASSEMBLY 69-1176-04 THUMB SCREW COVER ASSEMBLY HUMIDIFIER HOUSING M12809 Fig. 1. HE360A,B POWERED FLOW-THROUGH HUMIDIFIER INSTALLATION Preparing for the humidifier. (Leveling assures optimal humidifier performance.) 3. See Fig. 1. Installing the Humidifier WARNING Hazardous Voltage Can cause personal injury or equipment damage. Do not cut the rectangular opening. 6. Turn off power to identify all the required (Table...
... included in position and trace around the template. 5. FEED TUBE NOZZLE WATER DISTRIBUTION TRAY HUMIDIFIER PAD ASSEMBLY 69-1176-04 THUMB SCREW COVER ASSEMBLY HUMIDIFIER HOUSING M12809 Fig. 1. HE360A,B POWERED FLOW-THROUGH HUMIDIFIER INSTALLATION Preparing for the humidifier. (Leveling assures optimal humidifier performance.) 3. See Fig. 1. Installing the Humidifier WARNING Hazardous Voltage Can cause personal injury or equipment damage. Do not cut the rectangular opening. 6. Turn off power to identify all the required (Table...

Owners Manual
Page 7
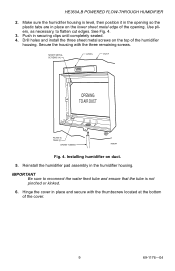
The water flow rate, with the humidifier running, is 3.5 gal/hr (13 liters/hr) to flush the pad and provide moisture for the solenoid valve and drain line. - Sail switch detects when furnace fan is operating. • Select a location where the air duct is adequate to connect the water supply (saddle valve) with access to a floor drain to the floor drain. For return duct mounting, the humidistat should be vertical (up...
The water flow rate, with the humidifier running, is 3.5 gal/hr (13 liters/hr) to flush the pad and provide moisture for the solenoid valve and drain line. - Sail switch detects when furnace fan is operating. • Select a location where the air duct is adequate to connect the water supply (saddle valve) with access to a floor drain to the floor drain. For return duct mounting, the humidistat should be vertical (up...
Owners Manual
Page 9
HE360A,B POWERED FLOW-THROUGH HUMIDIFIER 2. Installing humidifier on the top of the humidifier housing. Make sure the humidifier housing is not pinched or kinked. 6. Use pliers, as necessary, to reconnect the water feed tube and ensure that the tube is level, then position it in the opening . SHEET METAL SCREWS (4) LEVEL DUCT OPENING TO AIR DUCT PLASTIC TABS (2) DRAIN TUBING M20204 Fig. 4. Push in the humidifier housing. Reinstall the humidifier pad assembly in securing clips until completely...
HE360A,B POWERED FLOW-THROUGH HUMIDIFIER 2. Installing humidifier on the top of the humidifier housing. Make sure the humidifier housing is not pinched or kinked. 6. Use pliers, as necessary, to reconnect the water feed tube and ensure that the tube is level, then position it in the opening . SHEET METAL SCREWS (4) LEVEL DUCT OPENING TO AIR DUCT PLASTIC TABS (2) DRAIN TUBING M20204 Fig. 4. Push in the humidifier housing. Reinstall the humidifier pad assembly in securing clips until completely...
Owners Manual
Page 10
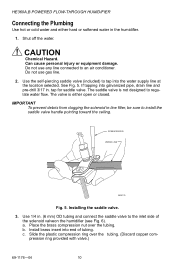
... 10 HE360A,B POWERED FLOW-THROUGH HUMIDIFIER Connecting the Plumbing Use hot or cold water and either open or closed. Shut off the water. If tapping into end of the solenoid valveon the humidifier (see Fig. 6). The saddle valve is either hard or softened water in -line filter, be sure to tap into the water supply line at the location selected. Use 1/4 in . a. Install brass insert into galvanized pipe, drain...
... 10 HE360A,B POWERED FLOW-THROUGH HUMIDIFIER Connecting the Plumbing Use hot or cold water and either open or closed. Shut off the water. If tapping into end of the solenoid valveon the humidifier (see Fig. 6). The saddle valve is either hard or softened water in -line filter, be sure to tap into the water supply line at the location selected. Use 1/4 in . a. Install brass insert into galvanized pipe, drain...
Owners Manual
Page 11
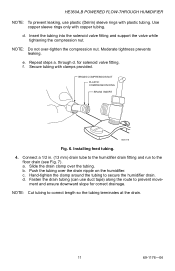
... drain clamp over the drain nipple on the humidifier. Hand-tighten the clamp around the tubing to the floor drain (see Fig. 7). d. e. Secure tubing with copper tubing. Push the tubing over the tubing. Installing feed tubing. 4. d. Fasten the drain tubing (can use plastic (Delrin) sleeve rings with plastic tubing. Insert the tubing into the solenoid valve fitting and support the valve while tightening the compression nut. HE360A,B POWERED FLOW-THROUGH HUMIDIFIER NOTE: To prevent leaking, use...
... drain clamp over the drain nipple on the humidifier. Hand-tighten the clamp around the tubing to the floor drain (see Fig. 7). d. e. Secure tubing with copper tubing. Push the tubing over the tubing. Installing feed tubing. 4. d. Fasten the drain tubing (can use plastic (Delrin) sleeve rings with plastic tubing. Insert the tubing into the solenoid valve fitting and support the valve while tightening the compression nut. HE360A,B POWERED FLOW-THROUGH HUMIDIFIER NOTE: To prevent leaking, use...
Owners Manual
Page 15
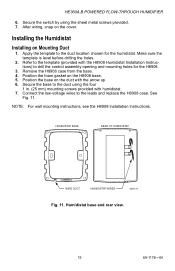
... low-voltage wires to the duct using the sheet metal screws provided. 7. Humidistat base and rear view. 15 69-1176-04 Installing the Humidistat Installing on the H8908 base. 5. Make sure the template is level before drilling the holes. 2. Remove the H8908 case from the base. 4. Apply the template to drill the control assembly opening and mounting holes for the humidistat. NOTE: For wall mounting instructions, see the H8908 Installation Instructions...
... low-voltage wires to the duct using the sheet metal screws provided. 7. Humidistat base and rear view. 15 69-1176-04 Installing the Humidistat Installing on the H8908 base. 5. Make sure the template is level before drilling the holes. 2. Remove the H8908 case from the base. 4. Apply the template to drill the control assembly opening and mounting holes for the humidistat. NOTE: For wall mounting instructions, see the H8908 Installation Instructions...
Owners Manual
Page 16
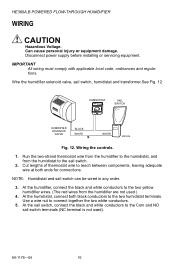
... is not used .) 4. Disconnect power supply before installing or servicing equipment. At the sail switch, connect the black and white conductors to the humidistat, and from the humidifier are not used ). 69-1176-04 16 NOTE: Humidistat and sail switch can be wired in any order. 3. At the humidistat, connect both ends for connections. Wire the humidifier solenoid valve, sail switch, humidistat and transformer.See Fig. 12. HUMIDISTAT Humidity Control Ré...
... is not used .) 4. Disconnect power supply before installing or servicing equipment. At the sail switch, connect the black and white conductors to the humidistat, and from the humidifier are not used ). 69-1176-04 16 NOTE: Humidistat and sail switch can be wired in any order. 3. At the humidistat, connect both ends for connections. Wire the humidifier solenoid valve, sail switch, humidistat and transformer.See Fig. 12. HUMIDISTAT Humidity Control Ré...
Owners Manual
Page 17
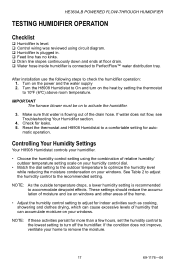
HE360A,B POWERED FLOW-THROUGH HUMIDIFIER TESTING HUMIDIFIER OPERATION Checklist ‰ Humidifier is level. ‰ Control wiring was reviewed using the combination of the drain hose. After installation use the following steps to a comfortable setting for more than a few hours, set the humidity control to the lowest setting to turn on the heat by setting the thermostat to PerfectFlow™ water distribution tray. Controlling Your Humidity Settings Your H8908 Humidistat controls your humidifier. • Choose the humidity control setting using circuit diagram. ‰ Humidifier is ...
HE360A,B POWERED FLOW-THROUGH HUMIDIFIER TESTING HUMIDIFIER OPERATION Checklist ‰ Humidifier is level. ‰ Control wiring was reviewed using the combination of the drain hose. After installation use the following steps to a comfortable setting for more than a few hours, set the humidity control to the lowest setting to turn on the heat by setting the thermostat to PerfectFlow™ water distribution tray. Controlling Your Humidity Settings Your H8908 Humidistat controls your humidifier. • Choose the humidity control setting using circuit diagram. ‰ Humidifier is ...
Owners Manual
Page 19
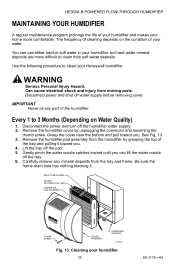
... it . Cleaning your Honeywell humidifier. FEED TUBE NOZZLE WATER DISTRIBUTION TRAY HUMIDIFIER PAD ASSEMBLY THUMB SCREW COVER ASSEMBLY HUMIDIFIER HOUSING M12809 Fig. 13. HE360A,B POWERED FLOW-THROUGH HUMIDIFIER MAINTAINING YOUR HUMIDIFIER A regular maintenance program prolongs the life of your humidifier and makes your home more difficult to clean than soft water deposits. Lift the tray off water supply before removing cover. Be sure the frame drain hole has nothing blocking it toward you. Remove the humidifier pad assembly from the humidifier by...
... it . Cleaning your Honeywell humidifier. FEED TUBE NOZZLE WATER DISTRIBUTION TRAY HUMIDIFIER PAD ASSEMBLY THUMB SCREW COVER ASSEMBLY HUMIDIFIER HOUSING M12809 Fig. 13. HE360A,B POWERED FLOW-THROUGH HUMIDIFIER MAINTAINING YOUR HUMIDIFIER A regular maintenance program prolongs the life of your humidifier and makes your home more difficult to clean than soft water deposits. Lift the tray off water supply before removing cover. Be sure the frame drain hole has nothing blocking it toward you. Remove the humidifier pad assembly from the humidifier by...
Owners Manual
Page 20
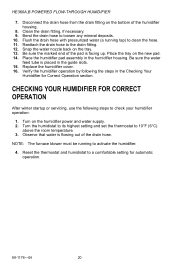
... the guide slots. 15. Turn on the tray. 13. Observe that water is flowing out of the humidifier housing. 8. Place the tray on the bottom of the drain hose. Replace the humidifier cover. 16. Verify the humidifier operation by following steps to check your humidifier operation: 1. NOTE: The furnace blower must be running tap) to activate the humidifier. 4. HE360A,B POWERED FLOW-THROUGH HUMIDIFIER 7. Disconnect the drain hose from the drain fitting on the new pad. 14. CHECKING YOUR HUMIDIFIER...
... the guide slots. 15. Turn on the tray. 13. Observe that water is flowing out of the humidifier housing. 8. Place the tray on the bottom of the drain hose. Replace the humidifier cover. 16. Verify the humidifier operation by following steps to check your humidifier operation: 1. NOTE: The furnace blower must be running tap) to activate the humidifier. 4. HE360A,B POWERED FLOW-THROUGH HUMIDIFIER 7. Disconnect the drain hose from the drain fitting on the new pad. 14. CHECKING YOUR HUMIDIFIER...
Owners Manual
Page 21
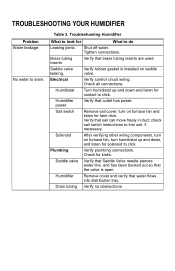
... Verify control circuit wiring. Humidifier power Verify that sail can move freely in duct; Drain tubing Verify no obstructions. Verify rubber gasket is open. Check all connections. Humidifier Remove cover and verify that brass tubing inserts are used. Brass tubing inserts Verify that water flows into distribution tray. Saddle valve Verify that Saddle Valve needle pierces water line, and has been backed out so that the valve is installed on furnace fan and...
... Verify control circuit wiring. Humidifier power Verify that sail can move freely in duct; Drain tubing Verify no obstructions. Verify rubber gasket is open. Check all connections. Humidifier Remove cover and verify that brass tubing inserts are used. Brass tubing inserts Verify that water flows into distribution tray. Saddle valve Verify that Saddle Valve needle pierces water line, and has been backed out so that the valve is installed on furnace fan and...
Owners Manual
Page 22
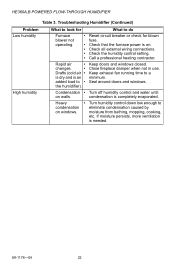
... Reset circuit breaker or check for Furnace • blower not operating. • • • • Rapid air • changes. • Drafts (cold air • is dry and is completely evaporated. Turn humidity control down low enough to a minimum. Troubleshooting Humidifier (Continued) Problem Low humidity High humidity What to • the humidifier). Seal around doors and windows. Heavy • condensation on walls. Keep exhaust fan running time to eliminate condensation caused by moisture...
... Reset circuit breaker or check for Furnace • blower not operating. • • • • Rapid air • changes. • Drafts (cold air • is dry and is completely evaporated. Turn humidity control down low enough to a minimum. Troubleshooting Humidifier (Continued) Problem Low humidity High humidity What to • the humidifier). Seal around doors and windows. Heavy • condensation on walls. Keep exhaust fan running time to eliminate condensation caused by moisture...

Owners Manual
Page 24
HE360A,B POWERED FLOW-THROUGH HUMIDIFIER LIMITED ONE-YEAR WARRANTY Honeywell warrants this product, excluding humidifier pad, to be to repair or replace the product within a reasonable period of time. THIS WARRANTY IS THE ONLY EXPRESS WARRANTY HONEYWELL MAKES ON THIS PRODUCT. Automation and Control Solutions Honeywell International Inc. This warranty does not cover removal or reinstallation costs. HONEYWELL SHALL NOT BE LIABLE FOR ANY LOSS OR DAMAGE OF ANY KIND, INCLUDING ANY INCIDENTAL OR...
HE360A,B POWERED FLOW-THROUGH HUMIDIFIER LIMITED ONE-YEAR WARRANTY Honeywell warrants this product, excluding humidifier pad, to be to repair or replace the product within a reasonable period of time. THIS WARRANTY IS THE ONLY EXPRESS WARRANTY HONEYWELL MAKES ON THIS PRODUCT. Automation and Control Solutions Honeywell International Inc. This warranty does not cover removal or reinstallation costs. HONEYWELL SHALL NOT BE LIABLE FOR ANY LOSS OR DAMAGE OF ANY KIND, INCLUDING ANY INCIDENTAL OR...


