
Owner's Manual
Page 2
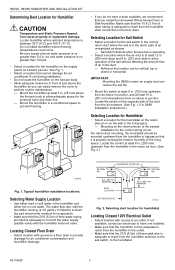
...air stream) plenum. Do not install humidifier where freezing temperatures could occur. Locating Closest Floor Drain • Select location with the humidifier solenoid valve. Airflow at least 12 in. (305 mm) deep and 8 in . (203 mm) upstream from the humidifier drain connection to... of air in . (78 mm) above the humidifier so you install the Honeywell Whole House Drum or Disk Humidifier. IMPORTANT Mounting the S688 in . (381 mm) MINIMUM RETURN AIR DUCT M12831 Fig. 2. HE220, HE260 HUMIDIFIER AND INSTALLATION KIT Determining Best Location for humidistat. See Fig. 1....
...air stream) plenum. Do not install humidifier where freezing temperatures could occur. Locating Closest Floor Drain • Select location with the humidifier solenoid valve. Airflow at least 12 in. (305 mm) deep and 8 in . (203 mm) upstream from the humidifier drain connection to... of air in . (78 mm) above the humidifier so you install the Honeywell Whole House Drum or Disk Humidifier. IMPORTANT Mounting the S688 in . (381 mm) MINIMUM RETURN AIR DUCT M12831 Fig. 2. HE220, HE260 HUMIDIFIER AND INSTALLATION KIT Determining Best Location for humidistat. See Fig. 1....
Owner's Manual
Page 4
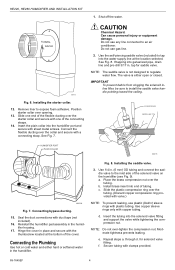
... pointing toward the ceiling. Use the self-piercing saddle valve (included) to regulate water flow. HE220, HE260 HUMIDIFIER AND INSTALLATION KIT 1. Slide one end of the solenoid valve on the humidifier (see Fig. 9). Insert the plain collar into the water supply line ... OD tubing and connect the saddle valve to expose foam adhesive. Use 1/4 in the humidifier housing. 17. Insert the tubing into the solenoid valve fitting and support the valve while tightening the compression nut. Moderate tightness prevents leaking. e. See Fig. 8. Repeat steps a. Remove liner...
... pointing toward the ceiling. Use the self-piercing saddle valve (included) to regulate water flow. HE220, HE260 HUMIDIFIER AND INSTALLATION KIT 1. Slide one end of the solenoid valve on the humidifier (see Fig. 9). Insert the plain collar into the water supply line ... OD tubing and connect the saddle valve to expose foam adhesive. Use 1/4 in the humidifier housing. 17. Insert the tubing into the solenoid valve fitting and support the valve while tightening the compression nut. Moderate tightness prevents leaking. e. See Fig. 8. Repeat steps a. Remove liner...
Owner's Manual
Page 6
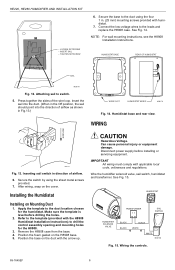
See Fig. 14. Press together the sides of airflow. 6. CAUTION Hazardous Voltage. See Fig. 15. HE220, HE260 HUMIDIFIER AND INSTALLATION KIT - HUMIDISTAT BASE REAR OF HUMIDISTAT SAIL M20181 Fig. 12. Insert the sail into the duct.... with the H8908 Humidistat Installation Instructions) to drill the control assembly opening and mounting holes for the humidistat. TIGHTEN SETSCREW 6. Wire the humidifier solenoid valve, sail switch, humidistat and transformer. LOOSEN SETSCREW - Inserting sail switch in Fig.13.) WIRE SLOT HUMIDISTAT WIRES M20179 Fig. 14. ...
See Fig. 14. Press together the sides of airflow. 6. CAUTION Hazardous Voltage. See Fig. 15. HE220, HE260 HUMIDIFIER AND INSTALLATION KIT - HUMIDISTAT BASE REAR OF HUMIDISTAT SAIL M20181 Fig. 12. Insert the sail into the duct.... with the H8908 Humidistat Installation Instructions) to drill the control assembly opening and mounting holes for the humidistat. TIGHTEN SETSCREW 6. Wire the humidifier solenoid valve, sail switch, humidistat and transformer. LOOSEN SETSCREW - Inserting sail switch in Fig.13.) WIRE SLOT HUMIDISTAT WIRES M20179 Fig. 14. ...
Owner's Manual
Page 9
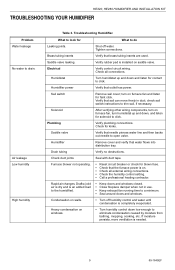
... cover and verify that brass tubing inserts are used. Drain tubing Verify no obstructions. Check duct joints Seal with duct tape. HE220, HE260 HUMIDIFIER AND INSTALLATION KIT TROUBLESHOOTING YOUR HUMIDIFIER Problem Water leakage No water to do Leaking joints. What to look for faint...(cold air is dry and is completely evaporated. Verify rubber pad is needed. 9 69-1645EF Electrical Verify control circuit wiring. Check for solenoid to trim sail, if necessary. Rapid air changes. Saddle valve Verify that the furnace power is on walls. • Turn off water...
... cover and verify that brass tubing inserts are used. Drain tubing Verify no obstructions. Check duct joints Seal with duct tape. HE220, HE260 HUMIDIFIER AND INSTALLATION KIT TROUBLESHOOTING YOUR HUMIDIFIER Problem Water leakage No water to do Leaking joints. What to look for faint...(cold air is dry and is completely evaporated. Verify rubber pad is needed. 9 69-1645EF Electrical Verify control circuit wiring. Check for solenoid to trim sail, if necessary. Rapid air changes. Saddle valve Verify that the furnace power is on walls. • Turn off water...

