User Manual
Page 11
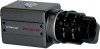
Lens connector When using an auto-iris lens, connect the lens cable to switch between DC and Video lenses. 2. Power indicator Indicator lights when the camera is powered. 5. Setup buttons Used when setting up and adjusting the camera with the on-screen menu. 6. B 11 HCMU000878 12/29/03 CONTROLS AND CONNECTIONS, CONTINUED Camera Back, continued 1. Video output connector BNC connector that outputs a composite video signal. 4. Power input terminal Use only 24Vac or 12Vdc UL listed class 2 power supply. REV. Lens switch Used to this connector. 3.
Lens connector When using an auto-iris lens, connect the lens cable to switch between DC and Video lenses. 2. Power indicator Indicator lights when the camera is powered. 5. Setup buttons Used when setting up and adjusting the camera with the on-screen menu. 6. B 11 HCMU000878 12/29/03 CONTROLS AND CONNECTIONS, CONTINUED Camera Back, continued 1. Video output connector BNC connector that outputs a composite video signal. 4. Power input terminal Use only 24Vac or 12Vdc UL listed class 2 power supply. REV. Lens switch Used to this connector. 3.

User Manual
Page 25
... power line frequency is of 50Hz (60Hz PAL), the line-lock sync operation is turned on the screen, and reversed the polarity of the power cable connected to L.L. 2. Press SET to adjust line-lock phase when the cursor is at SYNC MODE and the mode is from 0 to MAIN Menu. LINE...
... power line frequency is of 50Hz (60Hz PAL), the line-lock sync operation is turned on the screen, and reversed the polarity of the power cable connected to L.L. 2. Press SET to adjust line-lock phase when the cursor is at SYNC MODE and the mode is from 0 to MAIN Menu. LINE...
User Manual
Page 32
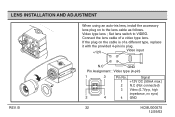
Connect the lens cable of a different type, replace it with the provided 4-pin iris plug. +12V Video input 1 3 2 4 N.C GND HCCM474M Pin Assignment : Video type (4-pin) 1 3 Pin No. Signal 1 +12V DC (50mA max.) 2 N.C (Not connected) 3 Video (0.7Vp-p, high impedance..., no sync) 2 4 4 GND REV. If the plug on to VIDEO. B 32 HCMU000878 12/29/03 Set lens switch to the lens cable as follows. ...
Connect the lens cable of a different type, replace it with the provided 4-pin iris plug. +12V Video input 1 3 2 4 N.C GND HCCM474M Pin Assignment : Video type (4-pin) 1 3 Pin No. Signal 1 +12V DC (50mA max.) 2 N.C (Not connected) 3 Video (0.7Vp-p, high impedance..., no sync) 2 4 4 GND REV. If the plug on to VIDEO. B 32 HCMU000878 12/29/03 Set lens switch to the lens cable as follows. ...

User Manual
Page 33
... lens ; Damping coil (-) Drive coil (+) 1 3 Damping coil (+) 2 4 Pin Assignment : DC type (4-pin) Drive coil (-) 1 3 Pin No. Set lens switch to the lens connector on the cable is of a different type, replace it to DC. If the plug on the rear panel of a DC (galvanometric) type lens. B 33 HCMU000878 12/29/03...
... lens ; Damping coil (-) Drive coil (+) 1 3 Damping coil (+) 2 4 Pin Assignment : DC type (4-pin) Drive coil (-) 1 3 Pin No. Set lens switch to the lens connector on the cable is of a different type, replace it to DC. If the plug on the rear panel of a DC (galvanometric) type lens. B 33 HCMU000878 12/29/03...
User Manual
Page 34
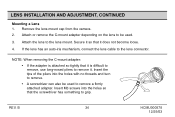
... connector. B 34 HCMU000878 12/29/03 Remove the lens mount cap from the camera. 2. If the lens has an auto-iris mechanism, connect the lens cable to remove it. NOTE: When removing the C-mount adapter: • If the adapter is attached so tightly that the screwdriver has something to remove a firmly...
... connector. B 34 HCMU000878 12/29/03 Remove the lens mount cap from the camera. 2. If the lens has an auto-iris mechanism, connect the lens cable to remove it. NOTE: When removing the C-mount adapter: • If the adapter is attached so tightly that the screwdriver has something to remove a firmly...
