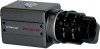
Honeywell HCCM474M Support and Manuals
Get Help and Manuals for this Honeywell item
View All Support Options Below
Free Honeywell HCCM474M manuals!
Problems with Honeywell HCCM474M?
Ask a Question
Free Honeywell HCCM474M manuals!
Problems with Honeywell HCCM474M?
Ask a Question
Popular Honeywell HCCM474M Manual Pages
User Manual - Page 2
.... NO USER-SERVICEABLE PARTS INSIDE.
We hereby declare that may be of sufficient magnitude to operate the equipment. REV. Changes or modifications not approved by Honeywell could void the user's authority to constitute a risk of important operating and maintenance (servicing) instruction in the user manual are fulfilled as laid out in the guideline set down by the...
User Manual - Page 3
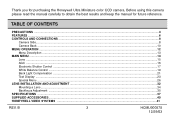
... ...23 Special Menu ...26 LENS INSTALLATION AND ADJUSTMENT ...32 Mounting a Lens...34 Backfocus Adjustment ...35 SPECIFICATIONS ...37 SUPPLIED ACCESSORIES ...40 HONEYWELL VIDEO SYSTEMS ...41
REV. Before using this camera please read the manual carefully to obtain the best results and keep the manual for purchasing the Honeywell Ultra Miniature color CCD camera. Thank you for future reference...
User Manual - Page 7
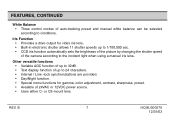
... to the incident light when using a manual iris lens.. Other versatile functions • Variable AGC function of up to 32dB. • Text display function of up to 1/100,000 sec. • CCD iris function automatically sets the brightness of the picture by changing the shutter speed of the camera according to 24 characters. •...
User Manual - Page 8
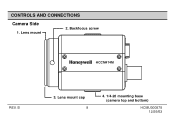
CONTROLS AND CONNECTIONS
Camera Side
1. Lens mount cap 8
4. 1/4-20 mounting base (camera top and bottom)
HCMU000878 12/29/03 Lens mount
2. Backfocus screw
HCCM474M
REV. B
3.
User Manual - Page 10
Lens Connector
LENS
SET PWR
3. B
10
12VDC/24VAC CLASS2
4. Setup buttons 6. Video output connector
VIDEO ~ ~ GND
REV. Power Indicator
5. Power Input
Terminal
HCMU000878 12/29/03 Lens Switch
DC VIDEO
2. CONTROLS AND CONNECTIONS, CONTINUED Camera Back
1.
User Manual - Page 11
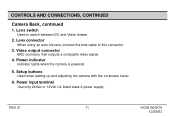
Setup buttons Used when setting up and adjusting the camera with the on-screen menu.
6. Video output connector
BNC connector that outputs a composite video signal. 4. REV. CONTROLS AND CONNECTIONS, CONTINUED
Camera Back, continued 1. Lens switch
Used to this connector. 3. B
11
HCMU000878
12/29/03 Lens connector
When using an auto-iris lens, connect the lens cable to switch between ...
User Manual - Page 12
... the list of commands.
• The complete set of the camera.
• The menus are used to the next item.
Moves cursor LEFT
Moves cursor
UP
DC VIDEO
Moves cursor RIGHT
LENS
SET PWR
12VDC/24VAC CLASS2
VIDEO ~ ~ GND
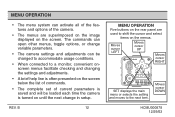
SET displays the main menu or selects the setting and moves to shift the cursor and select...
User Manual - Page 16
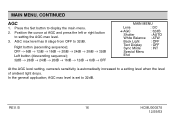
...; 20dB → 16dB → 12dB → 6dB → OFF
MAIN MENU
Lens
: DC
➔ AGC
: 32dB
Shutter
: AUTO
White Balance : ATW
Back Light
: OFF
Text Display : OFF
Sync Mode
: INT
Special Menu
End
At the AGC level setting, camera's sensitivity is set to display the main menu. 2. B
16
HCMU000878
12/29/03 REV. Press...
User Manual - Page 18
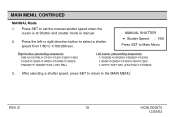
... direction button to select a shutter speed from 1/60 to the MAIN MENU. MANUAL SHUTTER ➔ Shutter Speed : 1/60 Press SET to set the manual shutter speed when the
cursor is at Shutter and shutter mode is manual.
2. B
18
HCMU000878
12/29/03 Press SET to Main Menu
Right button (ascending sequence): 1/60➔(1/50 PAL)➔...
User Manual - Page 19

Press SET to the MANUAL mode. ATW (Auto-Tracking White Balance)
MAIN MENU
Lens
: DC
AGC
: 32dB
Shutter
: AUTO
➔ White Balance : ATW
Back Light
: OFF
Text Display : OFF
Sync Mode
: INT
Special Menu
End
The white balance mode is occupied with a color temperature that exceeds the range of the camera.
• When a large part of...
User Manual - Page 20
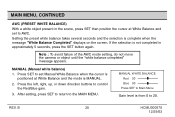
... Balance when the cursor is
positioned at White Balance and the mode is MANUAL.
2.
After setting, press SET to return to control the Red/Blue gain.
3. Note : To avoid failure of the AWC mode setting, do not move the camera or object until the "white balance completed" message appears. Press the left, right, up, or...
User Manual - Page 32
...2
4
N.C
GND
HCCM474M
Pin Assignment : Video type (4-pin)
1
3
Pin No.
If the plug on to VIDEO.
Signal
1 +12V DC (50mA max.)
2 N.C (Not connected)
3 Video (0.7Vp-p, high
impedance, no sync)
2
4
4 GND
REV. B
32
HCMU000878
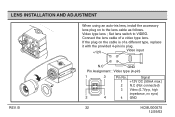
12/29/03 Video type lens ; Set lens switch to the lens cable as follows. LENS INSTALLATION AND ADJUSTMENT
DC VIDEO
LENS
PWR SET
VIDEO ~ ~ GND...
User Manual - Page 34
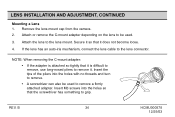
... pliers to grip. Attach or remove the C-mount adapter depending on the lens to be used to remove. • A screwdriver can also be used .
3. Insert the tips of the pliers into the holes so that it .
Attach the lens to the lens connector. LENS INSTALLATION AND ADJUSTMENT, CONTINUED
Mounting a Lens 1. Remove the lens mount cap from the camera. 2.
User Manual - Page 38
...menu
GAMMA Flickerless Lens mount Camera mount Power source
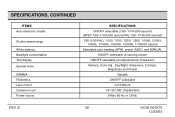
SPECIFICATIONS ON/OFF selectable... (1/60~1/100,000 second) (NTSC:1/60~1/100,000 second PAL:1/50~1/100,000 second) 1/60 (1/50 PAL), 1/100, 1/120, 1/250, 1/500, 1/1000, 1/2000, 1/4000, 1/10000, 1/30000, 1/50000, 1/100000 second Selectable auto-tracking (ATW), preset (AWC), and MANUAL...
User Manual - Page 40
B
40
HCMU000878
12/29/03
These numbers
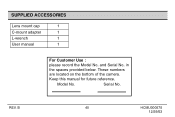
are located on the bottom of the camera. Keep this manual for future reference. Serial No. SUPPLIED ACCESSORIES
Lens mount cap
1
C-mount adapter
1
L-wrench
1
User manual
1
For Customer Use :
please record the Model No. REV.
in
the spaces provided below. and Serial No.
Model No.
Honeywell HCCM474M Reviews
We have not received any reviews for Honeywell yet.