User Manual
Page 2
... the presence of the FCC rules. The lightning flash with Part 15 of important operating and maintenance (servicing) instruction in the guideline set down by Honeywell could void the user's authority to possible change without prior notice. Information for USA: This device complies with arrowhead symbol, within an equilateral triangle, is... to constitute a risk of uninsulated "dangerous voltage" within an equilateral triangle is intended to alert the user to design modification, data given in the user manual are fulfilled as laid out in the literature accompanying the product.
... the presence of the FCC rules. The lightning flash with Part 15 of important operating and maintenance (servicing) instruction in the guideline set down by Honeywell could void the user's authority to possible change without prior notice. Information for USA: This device complies with arrowhead symbol, within an equilateral triangle, is... to constitute a risk of uninsulated "dangerous voltage" within an equilateral triangle is intended to alert the user to design modification, data given in the user manual are fulfilled as laid out in the literature accompanying the product.
User Manual
Page 3
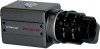
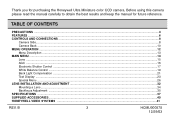
... ADJUSTMENT ...32 Mounting a Lens...34 Backfocus Adjustment ...35 SPECIFICATIONS ...37 SUPPLIED ACCESSORIES ...40 HONEYWELL VIDEO SYSTEMS ...41 REV. B 3 HCMU000878 12/29/03 Before using this camera please read the manual carefully to obtain the best results and keep the manual for purchasing the Honeywell Ultra Miniature color CCD camera. Thank you for future reference.
... ADJUSTMENT ...32 Mounting a Lens...34 Backfocus Adjustment ...35 SPECIFICATIONS ...37 SUPPLIED ACCESSORIES ...40 HONEYWELL VIDEO SYSTEMS ...41 REV. B 3 HCMU000878 12/29/03 Before using this camera please read the manual carefully to obtain the best results and keep the manual for purchasing the Honeywell Ultra Miniature color CCD camera. Thank you for future reference.
User Manual
Page 7
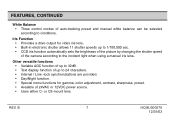
... power source. • Uses either C- Other versatile functions • Variable AGC function of up to 32dB. • Text display function of auto-tracking preset and manual white balance can be selected according to conditions. or CS-mount lens. REV. FEATURES, CONTINUED White Balance • Three control modes of up to the...
... power source. • Uses either C- Other versatile functions • Variable AGC function of up to 32dB. • Text display function of auto-tracking preset and manual white balance can be selected according to conditions. or CS-mount lens. REV. FEATURES, CONTINUED White Balance • Three control modes of up to the...

User Manual
Page 13
... BACK LIGHT (page 21) TEXT DISPLAY (page 23) SYNC MODE (page 24) SPECIAL MENU (page 26) Shutter mode select • Auto • Manual (1/60 ~ 1/100,000sec) Back light compensation • Off • On (Zone select) Sync mode control • INT • L.L (Phase ...adjust.) (PAL:1/50) White balance control • Auto-tracking (ATW) • Preset (AWC) • Manual (R/B adjust.) Text display control • Off • On (Text generation) Special menu • Gamma • Day/Night • Color adjustment • Sharpness ...
... BACK LIGHT (page 21) TEXT DISPLAY (page 23) SYNC MODE (page 24) SPECIAL MENU (page 26) Shutter mode select • Auto • Manual (1/60 ~ 1/100,000sec) Back light compensation • Off • On (Zone select) Sync mode control • INT • L.L (Phase ...adjust.) (PAL:1/50) White balance control • Auto-tracking (ATW) • Preset (AWC) • Manual (R/B adjust.) Text display control • Off • On (Text generation) Special menu • Gamma • Day/Night • Color adjustment • Sharpness ...

User Manual
Page 17
B 17 HCMU000878 12/29/03 Press SET to set the manual shutter. Position the cursor at Shutter, and press the left or right button to display the MAIN MENU. 2. REV. Note: Outdoor illumination levels may exceed ... Lens : DC AGC : 32dB ➔ Shutter : AUTO White Balance : ATW Back Light : OFF Text Display : OFF Sync Mode : INT Special Menu End When using the manual iris, the brightness of electronic shutter, if illumination levels exceed 10,000 lux, use an auto-iris lens. MAIN MENU, CONTINUED Electronic Shutter Control 1. For...
B 17 HCMU000878 12/29/03 Press SET to set the manual shutter. Position the cursor at Shutter, and press the left or right button to display the MAIN MENU. 2. REV. Note: Outdoor illumination levels may exceed ... Lens : DC AGC : 32dB ➔ Shutter : AUTO White Balance : ATW Back Light : OFF Text Display : OFF Sync Mode : INT Special Menu End When using the manual iris, the brightness of electronic shutter, if illumination levels exceed 10,000 lux, use an auto-iris lens. MAIN MENU, CONTINUED Electronic Shutter Control 1. For...
User Manual
Page 18
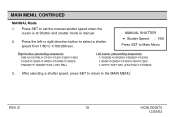
...;1/1000➔1/500➔1/250 1/120➔1/100➔1/60 (1/50 PAL)➔1/100000 3. MANUAL SHUTTER ➔ Shutter Speed : 1/60 Press SET to set the manual shutter speed when the cursor is at Shutter and shutter mode is manual. 2. After selecting a shutter speed, press SET to return to 1/100,000 sec. Press the...
...;1/1000➔1/500➔1/250 1/120➔1/100➔1/60 (1/50 PAL)➔1/100000 3. MANUAL SHUTTER ➔ Shutter Speed : 1/60 Press SET to set the manual shutter speed when the cursor is at Shutter and shutter mode is manual. 2. After selecting a shutter speed, press SET to return to 1/100,000 sec. Press the...

User Manual
Page 19
... shooting with non-standard lighting or lighting with a color temperature that exceeds the range of the camera. • When a large part of 2400K to the MANUAL mode. ATW (Auto-Tracking White Balance) MAIN MENU Lens : DC AGC : 32dB Shutter : AUTO ➔ White Balance : ATW Back Light : OFF Text Display : OFF Sync... different types of lighting using an automatic tracking system and automatically controls in the color tempera- In these situations, set to conditions: ATW, AWC, and Manual.
... shooting with non-standard lighting or lighting with a color temperature that exceeds the range of the camera. • When a large part of 2400K to the MANUAL mode. ATW (Auto-Tracking White Balance) MAIN MENU Lens : DC AGC : 32dB Shutter : AUTO ➔ White Balance : ATW Back Light : OFF Text Display : OFF Sync... different types of lighting using an automatic tracking system and automatically controls in the color tempera- In these situations, set to conditions: ATW, AWC, and Manual.
User Manual
Page 20
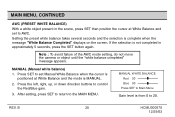
...After setting, press SET to return to AWC. Press the left, right, up, or down direction buttons to control the Red/Blue gain. 3. MANUAL (Manual white balance) 1. Setting the preset white balance takes several seconds and the selection is not completed in the scene, press SET then position the cursor... at White Balance and the mode is MANUAL. 2. If the selection is complete when the message "White Balance Completed" displays on the screen. Note : To avoid failure of the AWC...
...After setting, press SET to return to AWC. Press the left, right, up, or down direction buttons to control the Red/Blue gain. 3. MANUAL (Manual white balance) 1. Setting the preset white balance takes several seconds and the selection is not completed in the scene, press SET then position the cursor... at White Balance and the mode is MANUAL. 2. If the selection is complete when the message "White Balance Completed" displays on the screen. Note : To avoid failure of the AWC...
User Manual
Page 38
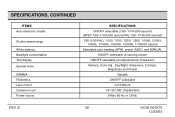
...~1/100,000 second) 1/60 (1/50 PAL), 1/100, 1/120, 1/250, 1/500, 1/1000, 1/2000, 1/4000, 1/10000, 1/30000, 1/50000, 1/100000 second Selectable auto-tracking (ATW), preset (AWC), and MANUAL ON/OFF selectable (6 sensing zones) ON/OFF selectable (24 alphanumeric characters) Gamma, Color Adj., Day/Night, Sharpness, Contrast, Brightness and Preset Variable ON/OFF selectable...
...~1/100,000 second) 1/60 (1/50 PAL), 1/100, 1/120, 1/250, 1/500, 1/1000, 1/2000, 1/4000, 1/10000, 1/30000, 1/50000, 1/100000 second Selectable auto-tracking (ATW), preset (AWC), and MANUAL ON/OFF selectable (6 sensing zones) ON/OFF selectable (24 alphanumeric characters) Gamma, Color Adj., Day/Night, Sharpness, Contrast, Brightness and Preset Variable ON/OFF selectable...
User Manual
Page 40
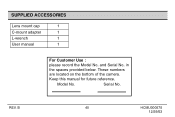
SUPPLIED ACCESSORIES Lens mount cap 1 C-mount adapter 1 L-wrench 1 User manual 1 For Customer Use : please record the Model No. Model No. and Serial No. Keep this manual for future reference. Serial No. in the spaces provided below. These numbers are located on the bottom of the camera. B 40 HCMU000878 12/29/03 REV.
SUPPLIED ACCESSORIES Lens mount cap 1 C-mount adapter 1 L-wrench 1 User manual 1 For Customer Use : please record the Model No. Model No. and Serial No. Keep this manual for future reference. Serial No. in the spaces provided below. These numbers are located on the bottom of the camera. B 40 HCMU000878 12/29/03 REV.