

User Manual
Page 1
SAVE THIS MANUAL FOR FUTURE REFERENCE OPERATOR'S MANUAL 20 in. 24 VOLT CORDLESS LAWN MOWER UT13122 Your lawn mower has been engineered and manufactured to our high standard for your purchase. WARNING: To reduce the risk of operation, and operator safety. Properly cared for, it will give you for dependability, ease of injury, the user must read and understand the operator's manual before using this product. Thank you years of rugged, trouble-free performance.
SAVE THIS MANUAL FOR FUTURE REFERENCE OPERATOR'S MANUAL 20 in. 24 VOLT CORDLESS LAWN MOWER UT13122 Your lawn mower has been engineered and manufactured to our high standard for your purchase. WARNING: To reduce the risk of operation, and operator safety. Properly cared for, it will give you for dependability, ease of injury, the user must read and understand the operator's manual before using this product. Thank you years of rugged, trouble-free performance.
User Manual
Page 3
... When not in use . They are marked to a complete stop before each mowing. Only use common sense when operating the lawn mower. Failure to the machine and the mowing activity. Stop machine if anyone . Do not overreach. Also, avoid discharging material against a wall or ...medication. Overreaching can cause severe injuries to avoid discharge of rubber gloves and footwear is intended. Do not force the lawn mower. Wear protective footwear that are NOT safety glasses. Keep clear of the discharge opening at frequent intervals for which can be carefully ...
... When not in use . They are marked to a complete stop before each mowing. Only use common sense when operating the lawn mower. Failure to the machine and the mowing activity. Stop machine if anyone . Do not overreach. Also, avoid discharging material against a wall or ...medication. Overreaching can cause severe injuries to avoid discharge of rubber gloves and footwear is intended. Do not force the lawn mower. Wear protective footwear that are NOT safety glasses. Keep clear of the discharge opening at frequent intervals for which can be carefully ...
User Manual
Page 4
...can damage, weaken, or destroy plastic. An extension cord should start to vibrate abnormally, stop before restarting and continuing to operate the mower. Stop the motor, remove the switch key, and wait until you loan someone this rule will not be stepped on plug of extension...61550; If electrolyte contacts the skin, wash it will reduce the risk of electric shock, fire, or serious personal injury. Do not service mower with water. This will reduce the risk of accidental falls, which could cause injury, and damage to the cord, which could result in a risk...
...can damage, weaken, or destroy plastic. An extension cord should start to vibrate abnormally, stop before restarting and continuing to operate the mower. Stop the motor, remove the switch key, and wait until you loan someone this rule will not be stepped on plug of extension...61550; If electrolyte contacts the skin, wash it will reduce the risk of electric shock, fire, or serious personal injury. Do not service mower with water. This will reduce the risk of accidental falls, which could cause injury, and damage to the cord, which could result in a risk...
User Manual
Page 8
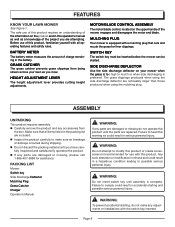
...insert switch key until the parts are attempting. GRASS CATCHER The grass catcher prevents grass clippings from the box. MULCHING PLUG Your mower is complete. HEIGHT ADJUSTMENT LEVER The height adjustment lever provides cutting height adjustments. BATTERY METER The battery meter measures the amount ...leading to heed this operator's manual as well as you are replaced. SWITCH KEY The switch key must be inserted before the mower can be started. The grass clippings produced when using the mulching plug. Failure to possible serious personal injury. Any such alteration or...
...insert switch key until the parts are attempting. GRASS CATCHER The grass catcher prevents grass clippings from the box. MULCHING PLUG Your mower is complete. HEIGHT ADJUSTMENT LEVER The height adjustment lever provides cutting height adjustments. BATTERY METER The battery meter measures the amount ...leading to heed this operator's manual as well as you are replaced. SWITCH KEY The switch key must be inserted before the mower can be started. The grass clippings produced when using the mulching plug. Failure to possible serious personal injury. Any such alteration or...
User Manual
Page 9
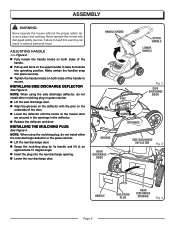
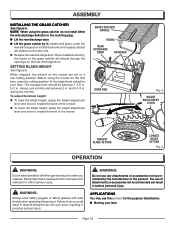
...GROOVE REAR DISCHARGE DOOR SIDE DISCHARGE DEFLECTOR Fig. 3 HANDLE MULCHING PLUG REAR DISCHARGE OPENING Fig. 4 Page 9 ASSEMBLY WARNING: Never operate the mower without the proper safety devices in serious personal injury. NOTE: When using the side discharge deflector, do not install either mulching plug or ...HANDLE See Figure 2. Fully loosen the handle knobs on both sides of the handle. Pull up and back on the mower deck are secured in the openings in the deflector. Release the deflector and door. Failure to raise the handle into operating position....
...GROOVE REAR DISCHARGE DOOR SIDE DISCHARGE DEFLECTOR Fig. 3 HANDLE MULCHING PLUG REAR DISCHARGE OPENING Fig. 4 Page 9 ASSEMBLY WARNING: Never operate the mower without the proper safety devices in serious personal injury. NOTE: When using the side discharge deflector, do not install either mulching plug or ...HANDLE See Figure 2. Fully loosen the handle knobs on both sides of the handle. Pull up and back on the mower deck are secured in the openings in the deflector. Release the deflector and door. Failure to raise the handle into operating position....
User Manual
Page 10
... 6. To adjust the blade height: To raise the blade height, grasp the height adjustment lever and move it toward the back of the mower. To lower the blade height, grasp the height adjustment lever and move it toward the front of a second is sufficient to make you ... not recommended by its handle and place under the rear discharge door so that a careless fraction of the mower. When shipped, the wheels on the rear discharge door. NOTE: When using the mower for the first time, raise the cutting position to 2 in possible serious injury. Before using the grass ...
... 6. To adjust the blade height: To raise the blade height, grasp the height adjustment lever and move it toward the back of the mower. To lower the blade height, grasp the height adjustment lever and move it toward the front of a second is sufficient to make you ... not recommended by its handle and place under the rear discharge door so that a careless fraction of the mower. When shipped, the wheels on the rear discharge door. NOTE: When using the mower for the first time, raise the cutting position to 2 in possible serious injury. Before using the grass ...
User Manual
Page 11
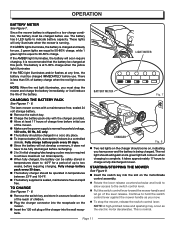
...will come on the motor/blade control assembly. Rotate the lever release counterclockwise and hold the switch control lever against the mower handle as the electric motor decelerates. The battery is being charged. The red light should be charged at least 17 hours of ... 60 Hz, AC only. The battery should extinguish and a green light will soon require charging. OPERATION BATTERY METER See Figure 7. The lawn mower comes with a maintenance free, sealed 24 volt storage battery. Remove the switch key. Charge the battery pack only with the charger...
...will come on the motor/blade control assembly. Rotate the lever release counterclockwise and hold the switch control lever against the mower handle as the electric motor decelerates. The battery is being charged. The red light should be charged at least 17 hours of ... 60 Hz, AC only. The battery should extinguish and a green light will soon require charging. OPERATION BATTERY METER See Figure 7. The lawn mower comes with a maintenance free, sealed 24 volt storage battery. Remove the switch key. Charge the battery pack only with the charger...
User Manual
Page 12
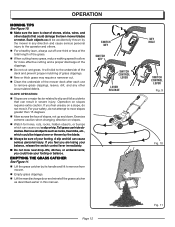
...slopes. Watch for more effective cutting and a proper discharge of the clippings. Do not cut . Clean the underside of the mower deck after each use to remove grass clippings, leaves, dirt, and any other objects that can hide obstacles. Remove all objects such as rocks, tree... the switch control lever immediately. Do not mow near drop-offs, ditches, or embankments; If you feel you could damage the lawn mower blades or motor. Tall grass can result in severe injury. you are a major factor related to the underside of the deck and prevent proper ...
...slopes. Watch for more effective cutting and a proper discharge of the clippings. Do not cut . Clean the underside of the mower deck after each use to remove grass clippings, leaves, dirt, and any other objects that can hide obstacles. Remove all objects such as rocks, tree... the switch control lever immediately. Do not mow near drop-offs, ditches, or embankments; If you feel you could damage the lawn mower blades or motor. Tall grass can result in severe injury. you are a major factor related to the underside of the deck and prevent proper ...
User Manual
Page 13
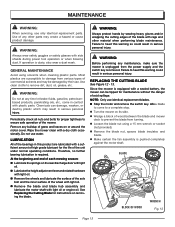
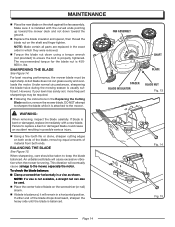
...wearing heavy gloves and/or wrapping the cutting edges of the blade with plastic parts. Most plastics are lubricated with a sealed battery, the mower can damage, weaken, or destroy plastic which may create a hazard or cause product damage. Remove any other material when performing blade maintenance...BLADE BLOCK OF WOOD WRENCH Fig. 12 Page 13 If operation is required. NOTE: Only use only identical replacement parts. Wipe the mower clean with side shields during power tool operation or when blowing dust. Do not use . See Replacing the Cutting Blade for proper ...
...wearing heavy gloves and/or wrapping the cutting edges of the blade with plastic parts. Most plastics are lubricated with a sealed battery, the mower can damage, weaken, or destroy plastic which may create a hazard or cause product damage. Remove any other material when performing blade maintenance...BLADE BLOCK OF WOOD WRENCH Fig. 12 Page 13 If operation is required. NOTE: Only use only identical replacement parts. Wipe the mower clean with side shields during power tool operation or when blowing dust. Do not use . See Replacing the Cutting Blade for proper ...
User Manual
Page 14
...blade is properly tightened. NOTE: Make certain all parts are replaced in the exact order in a horizontal position. For best mowing performance, the mower blade must be taken to ensure the bolt is balanced. Under normal circumstances, sharpening the blade twice during the mowing season is 450600 in ... ends of the blade, removing equal amounts of blade on the screwdriver (or nail) shank. If blade is attached to the mower, especially the motor. To check the blade balance: Clamp a screwdriver horizontally in the Replacing the Cutting Blade section, remove the...
...blade is properly tightened. NOTE: Make certain all parts are replaced in the exact order in a horizontal position. For best mowing performance, the mower blade must be taken to ensure the bolt is balanced. Under normal circumstances, sharpening the blade twice during the mowing season is 450600 in ... ends of the blade, removing equal amounts of blade on the screwdriver (or nail) shank. If blade is attached to the mower, especially the motor. To check the blade balance: Clamp a screwdriver horizontally in the Replacing the Cutting Blade section, remove the...
User Manual
Page 15
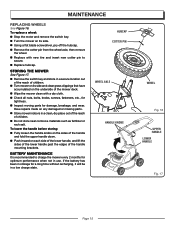
...the handle knobs on the sides of the handle and fold the upper handle down. Push inward on the underside of children. Turn mower on its side. Using a flat blade screwdriver, pry off the hubcap. Remove the cotter pin from the wheel axle, then ..., knobs, screws, fasteners, etc., for tightness. � Inspect moving parts for a long time without recharging, it will be in use. STORING THE MOWER See Figure 17. Remove the switch key and store in a clean, dry place out of the reach of the handle mounting brackets. MAINTENANCE REPLACING...
...the handle knobs on the sides of the handle and fold the upper handle down. Push inward on the underside of children. Turn mower on its side. Using a flat blade screwdriver, pry off the hubcap. Remove the cotter pin from the wheel axle, then ..., knobs, screws, fasteners, etc., for tightness. � Inspect moving parts for a long time without recharging, it will be in use. STORING THE MOWER See Figure 17. Remove the switch key and store in a clean, dry place out of the reach of the handle mounting brackets. MAINTENANCE REPLACING...
User Manual
Page 16
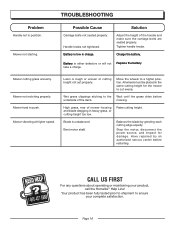
... the grass dries before restarting. Bent motor shaft. take a charge. Mower hard to a higher position. Stop the motor, disconnect the power source, and inspect for the mower to ensure your product, call the Homelite® Help Line! Have repaired by grinding each cutting edge equally. ...Page 16 Solution Adjust the height of mower housing and blade dragging in the same cutting height for damage. Mower not mulching properly. Move...
... the grass dries before restarting. Bent motor shaft. take a charge. Mower hard to a higher position. Stop the motor, disconnect the power source, and inspect for the mower to ensure your product, call the Homelite® Help Line! Have repaired by grinding each cutting edge equally. ...Page 16 Solution Adjust the height of mower housing and blade dragging in the same cutting height for damage. Mower not mulching properly. Move...
User Manual
Page 17
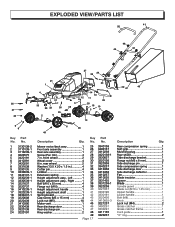
... guard 1 Blade nut (M10 x 1.25 mm 1 Upper handle 1 Lower handle 1 Bolt (M8 2 Knob 4 Lock nut (M4 2 Grass catcher 1 Grass catcher frame 1 Cord guide 1 "O" ring 2 No. Mower motor/deck assy 1 25 Front axle assembly 1 26 Rear axle assembly 1 27 Screw (Pan Hd 4 28 7 in . EXPLODED VIEW/PARTS LIST 41 26 48 44...
... guard 1 Blade nut (M10 x 1.25 mm 1 Upper handle 1 Lower handle 1 Bolt (M8 2 Knob 4 Lock nut (M4 2 Grass catcher 1 Grass catcher frame 1 Cord guide 1 "O" ring 2 No. Mower motor/deck assy 1 25 Front axle assembly 1 26 Rear axle assembly 1 27 Screw (Pan Hd 4 28 7 in . EXPLODED VIEW/PARTS LIST 41 26 48 44...

User Manual
Page 18
... modification, or the use . Cosmetic defects that each new product and service part is manufactured for the Great States Corporation lawn mower company under this warranty any defective product or part from the original date of products or parts determined not to vendor. Repair... or limitation on how long an implied warranty lasts, so the above limitations may not apply to homelite@reelin.com. Some states do not interfere with questions about operating or maintaining your lawn mower at 1-866-457-5888 between 7:30 a.m. - 4:30 p.m. THIS WARRANTY IS NOT TRANSFERABLE AND ...
... modification, or the use . Cosmetic defects that each new product and service part is manufactured for the Great States Corporation lawn mower company under this warranty any defective product or part from the original date of products or parts determined not to vendor. Repair... or limitation on how long an implied warranty lasts, so the above limitations may not apply to homelite@reelin.com. Some states do not interfere with questions about operating or maintaining your lawn mower at 1-866-457-5888 between 7:30 a.m. - 4:30 p.m. THIS WARRANTY IS NOT TRANSFERABLE AND ...

User Manual
Page 20
... you call 1-866-457-5888 or visit us online at www.homelite.com. Please record the serial number in . 24 VOLT CORDLESS LAWN MOWER UT13122 SERVICE For parts or service, contact your nearest Homelite authorized service dealer. MODEL NUMBER ______U_T_1_3_1_2__2______ SERIAL NUMBER HOMELITE CONSUMER PRODUCTS, INC. 1428 Pearman Dairy Road Anderson, SC 29625 Phone...
... you call 1-866-457-5888 or visit us online at www.homelite.com. Please record the serial number in . 24 VOLT CORDLESS LAWN MOWER UT13122 SERVICE For parts or service, contact your nearest Homelite authorized service dealer. MODEL NUMBER ______U_T_1_3_1_2__2______ SERIAL NUMBER HOMELITE CONSUMER PRODUCTS, INC. 1428 Pearman Dairy Road Anderson, SC 29625 Phone...


