

User Manual
Page 1
SAVE THIS MANUAL FOR FUTURE REFERENCE WARNING: To reduce the risk of rugged, trouble-free performance. Properly cared for, it will give you for dependability, ease of operation, and operator safety. OPERATOR'S MANUAL 20 in. 24 VOLT CORDLESS LAWN MOWER UT13122 Your lawn mower has been engineered and manufactured to our high standard for your purchase. Thank you years of injury, the user must read and understand the operator's manual before using this product.
SAVE THIS MANUAL FOR FUTURE REFERENCE WARNING: To reduce the risk of rugged, trouble-free performance. Properly cared for, it will give you for dependability, ease of operation, and operator safety. OPERATOR'S MANUAL 20 in. 24 VOLT CORDLESS LAWN MOWER UT13122 Your lawn mower has been engineered and manufactured to our high standard for your purchase. Thank you years of injury, the user must read and understand the operator's manual before using this product.
User Manual
Page 2
... pleasant and enjoyable. TABLE OF CONTENTS Introduction ...2 General Safety Rules...3 Specific Safety Rules ...3-4 Symbols ...5-6 Features...7-8 Assembly...8-10 Operation...10-12 Maintenance...13-15 Troubleshooting...16 Exploded View/Parts List ...17 Warranty ...18 Parts Ordering / Service ...Back Page INTRODUCTION This product has many features for making it easy to maintain and...
... pleasant and enjoyable. TABLE OF CONTENTS Introduction ...2 General Safety Rules...3 Specific Safety Rules ...3-4 Symbols ...5-6 Features...7-8 Assembly...8-10 Operation...10-12 Maintenance...13-15 Troubleshooting...16 Exploded View/Parts List ...17 Warranty ...18 Parts Ordering / Service ...Back Page INTRODUCTION This product has many features for making it easy to maintain and...
User Manual
Page 3
... blade.Stay behind to a complete stop before each mowing. Use face mask if operation is running . Keep hands and feet away from a wall or obstruction, first look down . A moment of balance. Do not operate the equipment while barefoot or when wearing sandals or similar lightweight footwear. SPECIFIC SAFETY RULES Do not operate the mower without the entire grass catcher, discharge guard, rear guard...
... blade.Stay behind to a complete stop before each mowing. Use face mask if operation is running . Keep hands and feet away from a wall or obstruction, first look down . A moment of balance. Do not operate the equipment while barefoot or when wearing sandals or similar lightweight footwear. SPECIFIC SAFETY RULES Do not operate the mower without the entire grass catcher, discharge guard, rear guard...
User Manual
Page 4
... the user, or damage to the product. Use only identical replacement parts when servicing the product. Released electrolyte is properly wired and in electric shock. Keep cord and charger away from outlet before restarting and continuing to operate the mower. Stop the motor, remove the switch key, and wait until you loan someone this product. Never use the cord for electrical check to instruct...
... the user, or damage to the product. Use only identical replacement parts when servicing the product. Released electrolyte is properly wired and in electric shock. Keep cord and charger away from outlet before restarting and continuing to operate the mower. Stop the motor, remove the switch key, and wait until you loan someone this product. Never use the cord for electrical check to instruct...
User Manual
Page 5
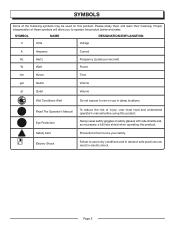
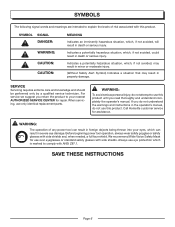
... Protection Safety Alert Electric Shock To reduce the risk of the following symbols may be used on this product. Precautions that involve your safety. SYMBOLS Some of injury, user must read and understand operator's manual before using this product. SYMBOL NAME DESIGNATION/EXPLANATION V Volts Voltage A Amperes Hz Hertz W Watt Current Frequency (cycles per second) Power hrs Hours Time gal...
... Protection Safety Alert Electric Shock To reduce the risk of the following symbols may be used on this product. Precautions that involve your safety. SYMBOLS Some of injury, user must read and understand operator's manual before using this product. SYMBOL NAME DESIGNATION/EXPLANATION V Volts Voltage A Amperes Hz Hertz W Watt Current Frequency (cycles per second) Power hrs Hours Time gal...
User Manual
Page 6
... for repair. When servicing, use this product. SAVE THESE INSTRUCTIONS Page 6 SYMBOLS The following signal words and meanings are intended to explain the levels of any power tool can result in the operator's manual, do not attempt to use only identical replacement parts. Indicates a potentially hazardous situation, which , if not avoided, may result in minor or moderate injury. (Without Safety Alert Symbol...
... for repair. When servicing, use this product. SAVE THESE INSTRUCTIONS Page 6 SYMBOLS The following signal words and meanings are intended to explain the levels of any power tool can result in the operator's manual, do not attempt to use only identical replacement parts. Indicates a potentially hazardous situation, which , if not avoided, may result in minor or moderate injury. (Without Safety Alert Symbol...
User Manual
Page 7
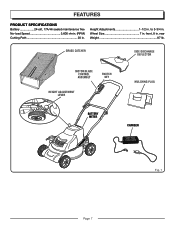
front, 8 in . Height Adjustments 1-1/2 in . rear Weight 87 lb. GRASS CATCHER SIDE DISCHARGE DEFLECTOR MOTOR/BLADE CONTROL ASSEMBLY SWITCH KEY HEIGHT ADJUSTMENT LEVER MULCHING PLUG BATTERY METER CHARGER Fig. 1 Page 7 Wheel Size 7 in . to 3-3/4 in . FEATURES PRODUCT SPECIFICATIONS Battery 24volt, 17A/Hr sealed maintenance free No-load Speed 3,600 r/min. (RPM) Cutting Path 20 in.
front, 8 in . Height Adjustments 1-1/2 in . rear Weight 87 lb. GRASS CATCHER SIDE DISCHARGE DEFLECTOR MOTOR/BLADE CONTROL ASSEMBLY SWITCH KEY HEIGHT ADJUSTMENT LEVER MULCHING PLUG BATTERY METER CHARGER Fig. 1 Page 7 Wheel Size 7 in . to 3-3/4 in . FEATURES PRODUCT SPECIFICATIONS Battery 24volt, 17A/Hr sealed maintenance free No-load Speed 3,600 r/min. (RPM) Cutting Path 20 in.
User Manual
Page 8
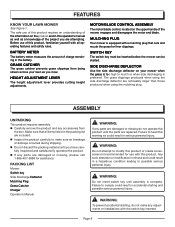
... motor/blade control, located on the product and in serious personal injury. PACKING LIST Mower Switch key Side Discharge Deflector Mulching Plug Grass Catcher Charger Operator's Manual WARNING: If any parts are replaced. Any such alteration or modification is equipped with all items listed in accidental starting , do not operate this operator's manual as well as you mow. HEIGHT ADJUSTMENT LEVER The height adjustment lever provides cutting height adjustments. Before use of this product requires an understanding of the information on the upper handle of charge...
... motor/blade control, located on the product and in serious personal injury. PACKING LIST Mower Switch key Side Discharge Deflector Mulching Plug Grass Catcher Charger Operator's Manual WARNING: If any parts are replaced. Any such alteration or modification is equipped with all items listed in accidental starting , do not operate this operator's manual as well as you mow. HEIGHT ADJUSTMENT LEVER The height adjustment lever provides cutting height adjustments. Before use of this product requires an understanding of the information on the upper handle of charge...
User Manual
Page 9
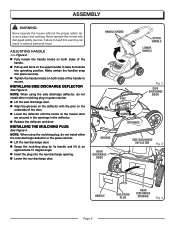
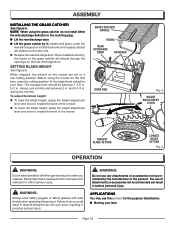
... using the side discharge deflector, do not install either mulching plug or grass catcher. Lift the side discharge door. Align the grooves on the deflector with damaged safety devices. ADJUSTING HANDLE See Figure 2. Fully loosen the handle knobs on both sides of the handle. Pull up and back on both sides of the door. Lower the deflector until the hooks on the mower deck...
... using the side discharge deflector, do not install either mulching plug or grass catcher. Lift the side discharge door. Align the grooves on the deflector with damaged safety devices. ADJUSTING HANDLE See Figure 2. Fully loosen the handle knobs on both sides of the handle. Pull up and back on both sides of the door. Lower the deflector until the hooks on the mower deck...
User Manual
Page 10
... cutting position to the height best suited for the purpose listed below: Mowing your lawn Page 10 SETTING BLADE HEIGHT See Figure 6. GRASS CATCHER HANDLE HOOKS REAR DISCHARGE DOOR OPENINGS DOOR ROD Fig. 5 HEIGHT ADJUSTMENT LEVER HIGHEST BLADE SETTING OPERATION LOWEST BLADE SETTING Fig. 6 WARNING: Do not allow familiarity with side shields when operating this type of a second is sufficient to make you careless. Failure to do not install either the side discharge deflector or the mulching plug...
... cutting position to the height best suited for the purpose listed below: Mowing your lawn Page 10 SETTING BLADE HEIGHT See Figure 6. GRASS CATCHER HANDLE HOOKS REAR DISCHARGE DOOR OPENINGS DOOR ROD Fig. 5 HEIGHT ADJUSTMENT LEVER HIGHEST BLADE SETTING OPERATION LOWEST BLADE SETTING Fig. 6 WARNING: Do not allow familiarity with side shields when operating this type of a second is sufficient to make you careless. Failure to do not install either the side discharge deflector or the mulching plug...
User Manual
Page 11
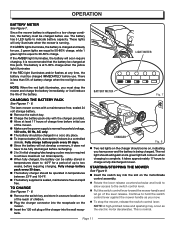
... life of the lever release. The red light should be operated in temperatures down to the switch control lever. � Pull the switch control lever toward the mower handle and let go of the battery. The battery is sealed, maintenance free and spill free. CHARGER Fig. 8 Two red lights on the charger should be fully discharged before initial use . 2 green lights are equal to 30-50% charge. Continue to hold...
... life of the lever release. The red light should be operated in temperatures down to the switch control lever. � Pull the switch control lever toward the mower handle and let go of the battery. The battery is sealed, maintenance free and spill free. CHARGER Fig. 8 Two red lights on the charger should be fully discharged before initial use . 2 green lights are equal to 30-50% charge. Continue to hold...
User Manual
Page 12
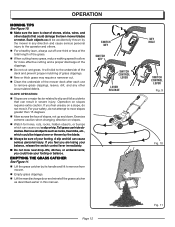
... to the underside of the deck and prevent proper mulching of stones, sticks, wires, and other accumulated debris. OPERATION MOWING TIPS See Figure 10. Make sure the lawn is clear of grass clippings. New or thick grass may require a narrower cut wet grass. Remove all objects such as described earlier in severe injury. SWITCH KEY SWITCH KEY SWITCH CONTROL LEVER LEVER RELEASE KEY HOLE SWITCH CONTROL LEVER Fig. 9 Fig. 10 Page 12...
... to the underside of the deck and prevent proper mulching of stones, sticks, wires, and other accumulated debris. OPERATION MOWING TIPS See Figure 10. Make sure the lawn is clear of grass clippings. New or thick grass may require a narrower cut wet grass. Remove all objects such as described earlier in severe injury. SWITCH KEY SWITCH KEY SWITCH CONTROL LEVER LEVER RELEASE KEY HOLE SWITCH CONTROL LEVER Fig. 9 Fig. 10 Page 12...
User Manual
Page 13
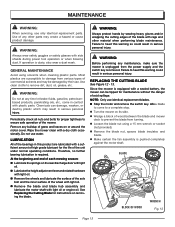
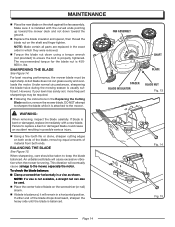
... any maintenance, make sure the mower is removed. BLADE BLOCK OF WOOD WRENCH Fig. 12 Page 13 Use of any buildup of grass and leaves on the rear discharge door with light oil. � Lubricate the height adjustment lever and related hardware with light oil. � Remove the wheels and lubricate the surface of the axle bolt and the inner surface of the mower. See Replacing the Cutting Blade for instructions...
... any maintenance, make sure the mower is removed. BLADE BLOCK OF WOOD WRENCH Fig. 12 Page 13 Use of any buildup of grass and leaves on the rear discharge door with light oil. � Lubricate the height adjustment lever and related hardware with light oil. � Remove the wheels and lubricate the surface of the axle bolt and the inner surface of the mower. See Replacing the Cutting Blade for instructions...
User Manual
Page 14
... mower, especially the motor. This vibration will eventually cause damage to sharpen the blade while it will cause excessive vibration when the mower is attached to ensure the bolt is properly tightened. lbs. NOTE: Make certain all parts are replaced in the exact order in a vise as shown. MAINTENANCE Place the new blade on the shaft and finger tighten. A dull blade does not cut grass...
... mower, especially the motor. This vibration will eventually cause damage to sharpen the blade while it will cause excessive vibration when the mower is attached to ensure the bolt is properly tightened. lbs. NOTE: Make certain all parts are replaced in the exact order in a vise as shown. MAINTENANCE Place the new blade on the shaft and finger tighten. A dull blade does not cut grass...
User Manual
Page 15
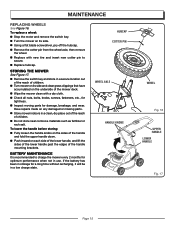
... or rock salt. Have repairs made on the underside of the mower deck. Wipe the mower clean with new tire and insert new cotter pin to charge the mower every 2 months for a long time without recharging, it will be in a secure location out of the reach of the handle mounting brackets. BATTERY MAINTENANCE It is recommended to secure. Replace hubcap. MAINTENANCE REPLACING WHEELS See Figure 16.
... or rock salt. Have repairs made on the underside of the mower deck. Wipe the mower clean with new tire and insert new cotter pin to charge the mower every 2 months for a long time without recharging, it will be in a secure location out of the reach of the handle mounting brackets. BATTERY MAINTENANCE It is recommended to secure. Replace hubcap. MAINTENANCE REPLACING WHEELS See Figure 16.
User Manual
Page 16
Charge the battery. Mower cutting grass unevenly. Blade is rough or uneven or cutting height not set properly. Stop the motor, disconnect the power source, and inspect for the mower to push. Handle knobs not tightened. Tighten handle knobs. Mower not mulching properly. Mower hard to cut evenly. Lawn is unbalanced. All wheels must be placed in charge. mowing. Have repaired by grinding each cutting edge equally. TROUBLESHOOTING Problem Handle not in heavy grass, or cutting height too low. take a charge. Wet grass clippings sticking to ensure your...
Charge the battery. Mower cutting grass unevenly. Blade is rough or uneven or cutting height not set properly. Stop the motor, disconnect the power source, and inspect for the mower to push. Handle knobs not tightened. Tighten handle knobs. Mower not mulching properly. Mower hard to cut evenly. Lawn is unbalanced. All wheels must be placed in charge. mowing. Have repaired by grinding each cutting edge equally. TROUBLESHOOTING Problem Handle not in heavy grass, or cutting height too low. take a charge. Wet grass clippings sticking to ensure your...
User Manual
Page 17
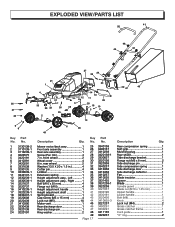
...-1 3320238 3221037 3330190 3330191 3220436 3410835-3 3221237 3490291 3330291 3411135 3320237 22 47 46 Description Qty. Rear compression spring 1 Soft grip 1 Mulching plug 1 Rear shield 1 Side discharge bracket 1 Flange nut (M6 x 8 mm 2 Side discharge pin 1 Side compression spring 1 Side discharge door 1 Side discharge deflector 1 Fan 1 Blade insulator 1 Spacer 1 Blade 1 Spindle guard 1 Blade nut (M10 x 1.25 mm 1 Upper handle 1 Lower handle 1 Bolt (M8 2 Knob 4 Lock nut (M4 2 Grass catcher 1 Grass catcher frame 1 Cord guide 1 "O" ring 2 No.
...-1 3320238 3221037 3330190 3330191 3220436 3410835-3 3221237 3490291 3330291 3411135 3320237 22 47 46 Description Qty. Rear compression spring 1 Soft grip 1 Mulching plug 1 Rear shield 1 Side discharge bracket 1 Flange nut (M6 x 8 mm 2 Side discharge pin 1 Side compression spring 1 Side discharge door 1 Side discharge deflector 1 Fan 1 Blade insulator 1 Spacer 1 Blade 1 Spindle guard 1 Blade nut (M10 x 1.25 mm 1 Upper handle 1 Lower handle 1 Bolt (M8 2 Knob 4 Lock nut (M4 2 Grass catcher 1 Grass catcher frame 1 Cord guide 1 "O" ring 2 No.

User Manual
Page 18
..., installation or normal adjustments explained in the operator's manual. Damage or liability caused by shipping, improper handling, improper installation, incorrect voltage or improper wiring, improper maintenance, improper modification, or the use of accessories and/or attachments not specifically recommended. Repairs necessary because of operator abuse or negligence, or the failure to install, operate, maintain and store the product according to the instructions in the operator's manual. ...
..., installation or normal adjustments explained in the operator's manual. Damage or liability caused by shipping, improper handling, improper installation, incorrect voltage or improper wiring, improper maintenance, improper modification, or the use of accessories and/or attachments not specifically recommended. Repairs necessary because of operator abuse or negligence, or the failure to install, operate, maintain and store the product according to the instructions in the operator's manual. ...

User Manual
Page 20
...-5888 or visit us online at www.homelite.com. Please record the serial number in . 24 VOLT CORDLESS LAWN MOWER UT13122 SERVICE For parts or service, contact your nearest Homelite authorized service dealer. MODEL NUMBER ______U_T_1_3_1_2__2______ SERIAL NUMBER HOMELITE CONSUMER PRODUCTS, INC. 1428 Pearman Dairy Road Anderson, SC 29625 Phone 1-866-457-5888 www.homelite.com 987000-039 11-27-06 (REV:00) OPERATOR'S MANUAL 20 in the...
...-5888 or visit us online at www.homelite.com. Please record the serial number in . 24 VOLT CORDLESS LAWN MOWER UT13122 SERVICE For parts or service, contact your nearest Homelite authorized service dealer. MODEL NUMBER ______U_T_1_3_1_2__2______ SERIAL NUMBER HOMELITE CONSUMER PRODUCTS, INC. 1428 Pearman Dairy Road Anderson, SC 29625 Phone 1-866-457-5888 www.homelite.com 987000-039 11-27-06 (REV:00) OPERATOR'S MANUAL 20 in the...


