

User Manual
Page 8
...) HEIGHT ADJUSTMENT LEVER MOTOR/BLADE CONTROL ASSEMBLY SIDE DISCHARGE DEFLECTOR MULCHING PLUG (MODEL UT13120 ONLY) Page 8 Fig. 2 Weight 42 lb. UT13120 Input 120 V, 60 Hz, AC only, 12 Amps No-load Speed 3,600 r/min. (RPM) Cutting Path 20 in . Height Adjustments 1-3/4 in . Height Adjustments 1-1/2 in . rear ...
...) HEIGHT ADJUSTMENT LEVER MOTOR/BLADE CONTROL ASSEMBLY SIDE DISCHARGE DEFLECTOR MULCHING PLUG (MODEL UT13120 ONLY) Page 8 Fig. 2 Weight 42 lb. UT13120 Input 120 V, 60 Hz, AC only, 12 Amps No-load Speed 3,600 r/min. (RPM) Cutting Path 20 in . Height Adjustments 1-3/4 in . Height Adjustments 1-1/2 in . rear ...
User Manual
Page 9
...to comply could result in accidental starting and possible serious personal injury. Failure to possible serious personal injury. GRASS CATCHER (MODEL UT13120 ONLY) The grass catcher prevents grass clippings being strewn across your mower when the grass is complete. The grass clippings ...that all operating features and safety rules. HEIGHT ADJUSTMENT LEVER The height adjustment lever provides cutting height adjustments. MULCHING PLUG (MODEL UT13120 ONLY) Your mower is preferred. SIDE DISCHARGE DEFLECTOR Use the side discharge deflector on the product and in the packing ...
...to comply could result in accidental starting and possible serious personal injury. Failure to possible serious personal injury. GRASS CATCHER (MODEL UT13120 ONLY) The grass catcher prevents grass clippings being strewn across your mower when the grass is complete. The grass clippings ...that all operating features and safety rules. HEIGHT ADJUSTMENT LEVER The height adjustment lever provides cutting height adjustments. MULCHING PLUG (MODEL UT13120 ONLY) Your mower is preferred. SIDE DISCHARGE DEFLECTOR Use the side discharge deflector on the product and in the packing ...
User Manual
Page 10
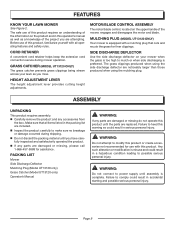
Failure to heed this warning can result in place and working. INSTALLING THE MULCHING PLUG (MODEL UT13120 ONLY) See Figure 5. NOTE: When using the mulching plug, do not install either the side discharge deflector or the grass catcher. ... Lower the rear discharge door. HANDLE KNOBS UPPER HANDLE LOWER HANDLE PINS Fig. 3 SIDE DISCHARGE DOOR GROOVE HOOKS OPENINGS GROOVE SIDE DISCHARGE DEFLECTOR MODEL UT13120 ONLY REAR DISCHARGE DOOR Fig. 4 HANDLE Page 10 REAR DISCHARGE OPENING MULCHING PLUG Fig. 5 ADJUSTING HANDLE See Figure 3. Fully loosen the ...
Failure to heed this warning can result in place and working. INSTALLING THE MULCHING PLUG (MODEL UT13120 ONLY) See Figure 5. NOTE: When using the mulching plug, do not install either the side discharge deflector or the grass catcher. ... Lower the rear discharge door. HANDLE KNOBS UPPER HANDLE LOWER HANDLE PINS Fig. 3 SIDE DISCHARGE DOOR GROOVE HOOKS OPENINGS GROOVE SIDE DISCHARGE DEFLECTOR MODEL UT13120 ONLY REAR DISCHARGE DOOR Fig. 4 HANDLE Page 10 REAR DISCHARGE OPENING MULCHING PLUG Fig. 5 ADJUSTING HANDLE See Figure 3. Fully loosen the ...
User Manual
Page 11
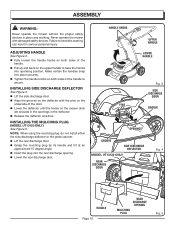
When shipped, the wheels on the mower are seated on the door rod. Release the rear discharge door. MODEL UT13120 ONLY GRASS CATCHER HANDLE HOOKS REAR DISCHARGE DOOR OPENINGS DOOR ROD Fig. 6 HEIGHT ADJUSTMENT LEVER HIGHEST BLADE SETTING LOWEST BLADE SETTING Fig. 7 Page 11 When ... the rear discharge door so that the hooks on the rear discharge door. SETTING BLADE HEIGHT See Figure 7. and 3-1/4 in . ASSEMBLY INSTALLING THE GRASS CATCHER (MODEL UT13120 ONLY) See Figure 6. NOTE: When using the mower for your lawn.
When shipped, the wheels on the mower are seated on the door rod. Release the rear discharge door. MODEL UT13120 ONLY GRASS CATCHER HANDLE HOOKS REAR DISCHARGE DOOR OPENINGS DOOR ROD Fig. 6 HEIGHT ADJUSTMENT LEVER HIGHEST BLADE SETTING LOWEST BLADE SETTING Fig. 7 Page 11 When ... the rear discharge door so that the hooks on the rear discharge door. SETTING BLADE HEIGHT See Figure 7. and 3-1/4 in . ASSEMBLY INSTALLING THE GRASS CATCHER (MODEL UT13120 ONLY) See Figure 6. NOTE: When using the mower for your lawn.
User Manual
Page 13
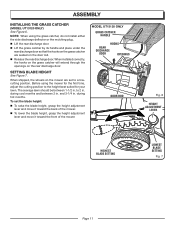
... do not attempt to mow slopes greater than 15 degrees. Mow across the face of your footing or balance. EMPTYING THE GRASS CATCHER (MODEL UT13120 ONLY) See Figure 11. Lift the grass catcher by the blade. Always be sure of slopes, not up and down. SLOPE... this manual. Exercise extreme caution when changing direction on slopes requires extra caution. A slip and fall accidents that can cause serious personal injury. MODEL UT13120 ONLY Fig. 10 Page 13 Fig. 11 For your balance, release the switch control lever immediately. Do not mow near drop-offs...
... do not attempt to mow slopes greater than 15 degrees. Mow across the face of your footing or balance. EMPTYING THE GRASS CATCHER (MODEL UT13120 ONLY) See Figure 11. Lift the grass catcher by the blade. Always be sure of slopes, not up and down. SLOPE... this manual. Exercise extreme caution when changing direction on slopes requires extra caution. A slip and fall accidents that can cause serious personal injury. MODEL UT13120 ONLY Fig. 10 Page 13 Fig. 11 For your balance, release the switch control lever immediately. Do not mow near drop-offs...
User Manual
Page 18
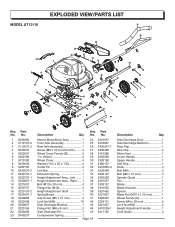
... 1 24 Front Axle Assembly 1 25 Rear Axle Assembly 1 26 Screw (M5 x 10 mm Pan Hd.)......... 4 27 Wheel Cover Ferrule (B 3 28 7 in. EXPLODED VIEW49/PARTS LIST MODEL UT13118 31 28 1 25 24 20 22 23 13 4 11 10 12 14 2 5 37 34 38 40 35 21 36 42 39 3 43 45 15...
... 1 24 Front Axle Assembly 1 25 Rear Axle Assembly 1 26 Screw (M5 x 10 mm Pan Hd.)......... 4 27 Wheel Cover Ferrule (B 3 28 7 in. EXPLODED VIEW49/PARTS LIST MODEL UT13118 31 28 1 25 24 20 22 23 13 4 11 10 12 14 2 5 37 34 38 40 35 21 36 42 39 3 43 45 15...
User Manual
Page 19
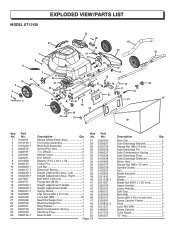
... Grip 1 Bolt (M8 2 Screw (M4 x 20 mm pan hd 2 Grass Catcher Frame 1 Knob 4 Lock Nut (M4 2 Grass Catcher 1 Cord Guide 3 "O" ring 2 EXPLODED VIEW/PARTS LIST MODEL UT13120 34 11 10 5 6 8 9 1 4 2 35 52 36 37 40 15 14 7 38 41 32 28 44 30 33 31 13 45 43 51 18 29 3 22...
... Grip 1 Bolt (M8 2 Screw (M4 x 20 mm pan hd 2 Grass Catcher Frame 1 Knob 4 Lock Nut (M4 2 Grass Catcher 1 Cord Guide 3 "O" ring 2 EXPLODED VIEW/PARTS LIST MODEL UT13120 34 11 10 5 6 8 9 1 4 2 35 52 36 37 40 15 14 7 38 41 32 28 44 30 33 31 13 45 43 51 18 29 3 22...

User Manual
Page 20
... of products or parts determined not to you. ANY NON-RESIDENTIAL USE OR COMMERCIAL USE VOIDS ALL WARRANTIES. WARRANTY LIMITED WARRANTY FOR CORDED ELECTRIC MODELS. Some states do not interfere with questions about operating or maintaining your lawn mower at 1-866-457-5888 between 7:30 a.m. - 4:30 p.m. Page 20 THIS ...abuse or negligence, or the failure to install, operate, maintain, and store the product according to the instructions in material and workmanship and agrees to homelite@reelin.com. This product is free from Homelite Consumer Products, Inc. CALL US FIRST !!
... of products or parts determined not to you. ANY NON-RESIDENTIAL USE OR COMMERCIAL USE VOIDS ALL WARRANTIES. WARRANTY LIMITED WARRANTY FOR CORDED ELECTRIC MODELS. Some states do not interfere with questions about operating or maintaining your lawn mower at 1-866-457-5888 between 7:30 a.m. - 4:30 p.m. Page 20 THIS ...abuse or negligence, or the failure to install, operate, maintain, and store the product according to the instructions in material and workmanship and agrees to homelite@reelin.com. This product is free from Homelite Consumer Products, Inc. CALL US FIRST !!

User Manual
Page 22
...-457-5888 or visit us online at www.homelite.com. UT13118 20 in the space provided below. UT13120 SERVICE For parts or service, contact your nearest Homelite authorized service dealer. Please record the serial number in . - MODEL NUMBER SERIAL NUMBER 987000-034 11-8-06 (REV:00) HOMELITE CONSUMER PRODUCTS, INC. 1428 Pearman Dairy Road Anderson...
...-457-5888 or visit us online at www.homelite.com. UT13118 20 in the space provided below. UT13120 SERVICE For parts or service, contact your nearest Homelite authorized service dealer. Please record the serial number in . - MODEL NUMBER SERIAL NUMBER 987000-034 11-8-06 (REV:00) HOMELITE CONSUMER PRODUCTS, INC. 1428 Pearman Dairy Road Anderson...
