
Instruction Manual
Page 1
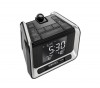
Register Your Product At: wwwhomedics com/register Your valuable input regarding this product will help us create the products you will want in the future. year I limited warranty lav,e A Moine N. SS-5050 DUAL ALARM CLOCK RADIO DIGITAL PROJECTION CLOCK WITH TEMPERATURE r~ L,\ c)"' '4" El manual en Espanol Instruction Manual and empieza a la pagina 9. Warranty Information Le manuel en frangais commence a la page 17. Distributed by MEDICS® sleep solutions-
Register Your Product At: wwwhomedics com/register Your valuable input regarding this product will help us create the products you will want in the future. year I limited warranty lav,e A Moine N. SS-5050 DUAL ALARM CLOCK RADIO DIGITAL PROJECTION CLOCK WITH TEMPERATURE r~ L,\ c)"' '4" El manual en Espanol Instruction Manual and empieza a la pagina 9. Warranty Information Le manuel en frangais commence a la page 17. Distributed by MEDICS® sleep solutions-

Instruction Manual
Page 2
This like the entire HoMedics product line, is used by HoMedics. • DO NOT place or store this manual. We hope that you will find it to be dropped into a tub or sink. • DO NOT ...
This like the entire HoMedics product line, is used by HoMedics. • DO NOT place or store this manual. We hope that you will find it to be dropped into a tub or sink. • DO NOT ...
Instruction Manual
Page 3
alkaline with carbon-zinc or old batteries with new ones). • If the unit is not going to be used by children without adult supervision. • Always keep other power source may explode or leak. • Dispose of used for a long period of time, remove batteries to prevent damage due to possible battery leakage. • Do not dispose of batteries in accordance with an AC adaptor; Unwind the power cord of batteries specified. • When installing batteries, observe proper +/- Batteries may cause damage to the system. ASSEMBLY & INSTRUCTION FOR USE Before setting up ...
alkaline with carbon-zinc or old batteries with new ones). • If the unit is not going to be used by children without adult supervision. • Always keep other power source may explode or leak. • Dispose of used for a long period of time, remove batteries to prevent damage due to possible battery leakage. • Do not dispose of batteries in accordance with an AC adaptor; Unwind the power cord of batteries specified. • When installing batteries, observe proper +/- Batteries may cause damage to the system. ASSEMBLY & INSTRUCTION FOR USE Before setting up ...
Instruction Manual
Page 4
Select the hour using the TUNER selector button (or the volume up /down button) to HIGH setting for 10 seconds. • Hit SNOOZE/DIM/SLEEP and LCD will begin to select. 5. Press TIME SET button again, now time is in 12 hour mode). 3. Press and hold (3 seconds) the TIME SET button on back of unit, the hour will illuminate to adjust. 4. Use the TUNER selector button (or the volume up /down button) to adjust the hour, paying attention to set , press the desired ALARM button (ALARM 1 or ALARM 2) located on the LCD. NOTE: The Sleep Solutions Projection clock is equipped with ...
Select the hour using the TUNER selector button (or the volume up /down button) to HIGH setting for 10 seconds. • Hit SNOOZE/DIM/SLEEP and LCD will begin to select. 5. Press TIME SET button again, now time is in 12 hour mode). 3. Press and hold (3 seconds) the TIME SET button on back of unit, the hour will illuminate to adjust. 4. Use the TUNER selector button (or the volume up /down button) to adjust the hour, paying attention to set , press the desired ALARM button (ALARM 1 or ALARM 2) located on the LCD. NOTE: The Sleep Solutions Projection clock is equipped with ...

Instruction Manual
Page 5
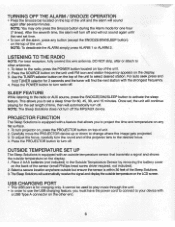
SLEEP SOLUTIONS PROJECTION CLOCK & WEATHER CONTROLS AND CONNECTIONS: FRONT OF UNIT Source Projector Power Projector ON/OFF Alarm 1 Alarm 2 Snooze/Dim/Sleep FM Tuner Scan Up/Down Source k Tuner Alarm 1 Power Alarm 2 Volume Snooze I Dim Sleep Volume Up/Down BACK OF UNIT 3.5MM AUX Cable USB PROJECTOR Tim< Sex Time set DCSV input Fm antenna 5 Celsius and fahrenheit
SLEEP SOLUTIONS PROJECTION CLOCK & WEATHER CONTROLS AND CONNECTIONS: FRONT OF UNIT Source Projector Power Projector ON/OFF Alarm 1 Alarm 2 Snooze/Dim/Sleep FM Tuner Scan Up/Down Source k Tuner Alarm 1 Power Alarm 2 Volume Snooze I Dim Sleep Volume Up/Down BACK OF UNIT 3.5MM AUX Cable USB PROJECTOR Tim< Sex Time set DCSV input Fm antenna 5 Celsius and fahrenheit
Instruction Manual
Page 6
NOTE: You may only press the Snooze button during the Alarm mode for 2 seconds and the tuner will find the next station with the strongest frequency. 4. fully unwind the wire antenna. DO NOT strip, alter or attach to turn off . PROJECTOR FUNCTION The Sleep Solutions is equipped with a USB Type A connector on the other antennas. 1. Press the SOURCE button on the unit until the next set time. • To turn radio off the alarm, press any flat surface. 1. For auto seek press and hold TUNER selector for one hour (7 times). Press the POWER button to other end. ...
NOTE: You may only press the Snooze button during the Alarm mode for 2 seconds and the tuner will find the next station with the strongest frequency. 4. fully unwind the wire antenna. DO NOT strip, alter or attach to turn off . PROJECTOR FUNCTION The Sleep Solutions is equipped with a USB Type A connector on the other antennas. 1. Press the SOURCE button on the unit until the next set time. • To turn radio off the alarm, press any flat surface. 1. For auto seek press and hold TUNER selector for one hour (7 times). Press the POWER button to other end. ...

Instruction Manual
Page 7
Push power button on the unit, then push the source button and select AUX mode (AUX icon will not occur in a particular installation. NEVER use the volume buttons located on LCD). 4. However, there is encouraged to try to radio communications. If this device must accept any interference received, including interference that may cause undesired operation. When finished, press the power button to turn OFF your music device to operate the equipment. NOTE: You must turn off and on, the user is no guarantee that to which can be displayed on the top of an iPod/MP3 ...
Push power button on the unit, then push the source button and select AUX mode (AUX icon will not occur in a particular installation. NEVER use the volume buttons located on LCD). 4. However, there is encouraged to try to radio communications. If this device must accept any interference received, including interference that may cause undesired operation. When finished, press the power button to turn OFF your music device to operate the equipment. NOTE: You must turn off and on, the user is no guarantee that to which can be displayed on the top of an iPod/MP3 ...

Instruction Manual
Page 8
...You may have additional rights which are repaired, replaced, altered, or modified, without the prior express and written consent of HoMedics. improper installation; unauthorized repairs or modifications; This warranty is effective only if the product is purchased and operated in the country...otherwise awaiting parts or repair; Any and all warranties or guarantees shall immediately cease and terminate as noted below. IB-SS5050A HOMEDICS SHALL HAVE NO LIABILITY FOR ANY INCIDENTAL, CONSEQUENTIAL OR SPECIAL DAMAGES. All rights reserved. For more information regarding our product ...
...You may have additional rights which are repaired, replaced, altered, or modified, without the prior express and written consent of HoMedics. improper installation; unauthorized repairs or modifications; This warranty is effective only if the product is purchased and operated in the country...otherwise awaiting parts or repair; Any and all warranties or guarantees shall immediately cease and terminate as noted below. IB-SS5050A HOMEDICS SHALL HAVE NO LIABILITY FOR ANY INCIDENTAL, CONSEQUENTIAL OR SPECIAL DAMAGES. All rights reserved. For more information regarding our product ...