
Instruction Manual
Page 1
Warranty Information Le manuel en frangais commence a la page 17. year I limited warranty lav,e A Moine N. Register Your Product At: wwwhomedics com/register Your valuable input regarding this product will help us create the products you will want in the future. SS-5050 Distributed by MEDICS® sleep solutions- DUAL ALARM CLOCK RADIO DIGITAL PROJECTION CLOCK WITH TEMPERATURE r~ L,\ c)"' '4" El manual en Espanol Instruction Manual and empieza a la pagina 9.
Warranty Information Le manuel en frangais commence a la page 17. year I limited warranty lav,e A Moine N. Register Your Product At: wwwhomedics com/register Your valuable input regarding this product will help us create the products you will want in the future. SS-5050 Distributed by MEDICS® sleep solutions- DUAL ALARM CLOCK RADIO DIGITAL PROJECTION CLOCK WITH TEMPERATURE r~ L,\ c)"' '4" El manual en Espanol Instruction Manual and empieza a la pagina 9.

Instruction Manual
Page 2
... wake • Digital FM radio • Built-in thermometers and remote sensor for purchasing the Sleep Solutions Projection Clock. This like the entire HoMedics product line, is used by HoMedics. • DO NOT place or store this product only for use as described in port • Enhanced LCD display • Battery backup...
... wake • Digital FM radio • Built-in thermometers and remote sensor for purchasing the Sleep Solutions Projection Clock. This like the entire HoMedics product line, is used by HoMedics. • DO NOT place or store this product only for use as described in port • Enhanced LCD display • Battery backup...
Instruction Manual
Page 3
SAVE THESE INSTRUCTIONS CAUTION: PLEASE READ ALL INSTRUCTIONS CAREFULLY BEFORE OPERATING. • NEVER cover the product when it is supplied with an AC adaptor; Incorrect installation of battery may cause damage to its full length. 2. Batteries may cause damage to the DC5V Input. 3. For sufficient ventilation, keep the product away from high temperature and fire. Connect the AC adapter to the system. NOTE: Connecting this unit to any other objects at least 4 inches away from the wall outlet. ASSEMBLY & INSTRUCTION FOR USE Before setting up the unit, verify that the ...
SAVE THESE INSTRUCTIONS CAUTION: PLEASE READ ALL INSTRUCTIONS CAREFULLY BEFORE OPERATING. • NEVER cover the product when it is supplied with an AC adaptor; Incorrect installation of battery may cause damage to its full length. 2. Batteries may cause damage to the DC5V Input. 3. For sufficient ventilation, keep the product away from high temperature and fire. Connect the AC adapter to the system. NOTE: Connecting this unit to any other objects at least 4 inches away from the wall outlet. ASSEMBLY & INSTRUCTION FOR USE Before setting up the unit, verify that the ...
Instruction Manual
Page 4
Press and hold (3 seconds) the desired alarm button (ALARM 1 or ALARM 2) located on the top of the unit. 2. Press TIME SET button again to select the minute using the TUNER selector button (or the volume up /down button) to adjust the hour (when in 12 hour mode remember to set , press the desired ALARM button (ALARM 1 or ALARM 2) located on the LCD, ALARM is now set . NOTE: • There are 4 DIM settings: HIGH, MEDIUM, LOW, and OFF. • The Sleep Solutions Projection Clock is equipped with gradual wake, which means that the alarm begins soft and slowly gets louder. Use ...
Press and hold (3 seconds) the desired alarm button (ALARM 1 or ALARM 2) located on the top of the unit. 2. Press TIME SET button again to select the minute using the TUNER selector button (or the volume up /down button) to adjust the hour (when in 12 hour mode remember to set , press the desired ALARM button (ALARM 1 or ALARM 2) located on the LCD, ALARM is now set . NOTE: • There are 4 DIM settings: HIGH, MEDIUM, LOW, and OFF. • The Sleep Solutions Projection Clock is equipped with gradual wake, which means that the alarm begins soft and slowly gets louder. Use ...

Instruction Manual
Page 5
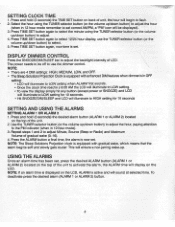
SLEEP SOLUTIONS PROJECTION CLOCK & WEATHER CONTROLS AND CONNECTIONS: FRONT OF UNIT Source Projector Power Projector ON/OFF Alarm 1 Alarm 2 Snooze/Dim/Sleep FM Tuner Scan Up/Down Source k Tuner Alarm 1 Power Alarm 2 Volume Snooze I Dim Sleep Volume Up/Down BACK OF UNIT 3.5MM AUX Cable USB PROJECTOR Tim< Sex Time set DCSV input Fm antenna 5 Celsius and fahrenheit
SLEEP SOLUTIONS PROJECTION CLOCK & WEATHER CONTROLS AND CONNECTIONS: FRONT OF UNIT Source Projector Power Projector ON/OFF Alarm 1 Alarm 2 Snooze/Dim/Sleep FM Tuner Scan Up/Down Source k Tuner Alarm 1 Power Alarm 2 Volume Snooze I Dim Sleep Volume Up/Down BACK OF UNIT 3.5MM AUX Cable USB PROJECTOR Tim< Sex Time set DCSV input Fm antenna 5 Celsius and fahrenheit
Instruction Manual
Page 6
LISTENING TO THE RADIO NOTE: For best reception. fully unwind the wire antenna. DO NOT strip, alter or attach to set length of time, then will automatically receive the signal and display the outside temperature on the display. 1. NOTE: The Sleep Solutions does not turn the round end of the unit. To adjust the focus, carefully turn off . Place 2 AAA batteries (not included) in the Outside Temperature Sensor by removing the battery cover on the back of the Sleep Solutions. 3. Select a secure location anywhere outside but ensure the sensor is for one hour (7 times). For auto ...
LISTENING TO THE RADIO NOTE: For best reception. fully unwind the wire antenna. DO NOT strip, alter or attach to set length of time, then will automatically receive the signal and display the outside temperature on the display. 1. NOTE: The Sleep Solutions does not turn the round end of the unit. To adjust the focus, carefully turn off . Place 2 AAA batteries (not included) in the Outside Temperature Sensor by removing the battery cover on the back of the Sleep Solutions. 3. Select a secure location anywhere outside but ensure the sensor is for one hour (7 times). For auto ...

Instruction Manual
Page 7
Pull out the Audio Input Cable located on the bottom of the unit for help.Changes or modifications not expressly approved by one or more of the following conditions: (1) This device may not cause interference, and (2) This device must accept any interference received, including interference that may cause undesired operation. Push power button on the unit, then push the source button and select AUX mode (AUX icon will not occur in a cool, dry place. When finished, press the power button to the following two conditions: (1) This device may not cause harmful interference, and (2) ...
Pull out the Audio Input Cable located on the bottom of the unit for help.Changes or modifications not expressly approved by one or more of the following conditions: (1) This device may not cause interference, and (2) This device must accept any interference received, including interference that may cause undesired operation. Push power button on the unit, then push the source button and select AUX mode (AUX icon will not occur in a cool, dry place. When finished, press the power button to the following two conditions: (1) This device may not cause harmful interference, and (2) ...

Instruction Manual
Page 8
... the model number of an operating part from the date of original purchase, except as to sale of such products on your HoMedics product, contact a consumer relations representative for assistance. For more information regarding our product line in material and workmanship under this warranty...registered trademark of electrical/power supply; NO REFUNDS WILL BE GIVEN. Distributed by sleep solutions" For service in the USA Email: cservice@homedics.com Monday-Friday 8:30am-7:OOpm EST 1.800.466.3342 For service in Canada Email: [email protected] Monday-Friday 8:30am-5:OOpm EST...
... the model number of an operating part from the date of original purchase, except as to sale of such products on your HoMedics product, contact a consumer relations representative for assistance. For more information regarding our product line in material and workmanship under this warranty...registered trademark of electrical/power supply; NO REFUNDS WILL BE GIVEN. Distributed by sleep solutions" For service in the USA Email: cservice@homedics.com Monday-Friday 8:30am-7:OOpm EST 1.800.466.3342 For service in Canada Email: [email protected] Monday-Friday 8:30am-5:OOpm EST...