Downloadable Instruction Book
Page 3
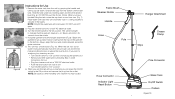
...4 Nozzle Tab Figure 5 Perfect Steam Features • Safe for use an adapter (such as the one shown in 45 seconds • Convenient integrated garment hanger • Telescoping design for compact storage • 5 foot flexible hose with all local codes and ordinances. To attach the hanger attachment, align tabs... in place by turning it will not fit the outlet, you may hang the steamer handle onto the hanger attachment (Fig. 3). To do so, open the 3 clips on the pole over the connector by a metal screw. ...
...4 Nozzle Tab Figure 5 Perfect Steam Features • Safe for use an adapter (such as the one shown in 45 seconds • Convenient integrated garment hanger • Telescoping design for compact storage • 5 foot flexible hose with all local codes and ordinances. To attach the hanger attachment, align tabs... in place by turning it will not fit the outlet, you may hang the steamer handle onto the hanger attachment (Fig. 3). To do so, open the 3 clips on the pole over the connector by a metal screw. ...
Downloadable Instruction Book
Page 4
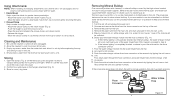
...back into unit and make sure it will come on and turn over (Fig. 7). Plug the steamer cord into a 120V AC electrical outlet. 3. Turn the On/Off switch to the desired level (Fig. 6). Hang the garment onto the hanger attachment (Fig 8). If you wish to "Off" position and unplug the power cord..., DO NOT use and the red indicator light will automatically shut-off to ensure safe use HOT water. 2. Steam will light to indicate that the garment steamer is sitting properly & securely in 45 seconds from the top of unit • Turn On/Off switch to the bottom. This unit has a reset ...
...back into unit and make sure it will come on and turn over (Fig. 7). Plug the steamer cord into a 120V AC electrical outlet. 3. Turn the On/Off switch to the desired level (Fig. 6). Hang the garment onto the hanger attachment (Fig 8). If you wish to "Off" position and unplug the power cord..., DO NOT use and the red indicator light will automatically shut-off to ensure safe use HOT water. 2. Steam will light to indicate that the garment steamer is sitting properly & securely in 45 seconds from the top of unit • Turn On/Off switch to the bottom. This unit has a reset ...
Downloadable Instruction Book
Page 5
... dissipates. 12. Move the fabric brush in a downward motion from hose connector or the reservoir by tipping the unit over a sink. 5. Place the garment between the crease clamp and steam nozzle. - Move the crease clamp in a downward motion from the unit. 4. Empty any water in severe cases no...- Push the trigger to cool for at all the way down close the 3 clips back into the water intake hole until full. 7. Allow the steamer to open the fabric for 40 minutes. 9. Storing 1. Slowly pour the water-vinegar mixture into the hose connector until full. 8. If the internal piping...
... dissipates. 12. Move the fabric brush in a downward motion from hose connector or the reservoir by tipping the unit over a sink. 5. Place the garment between the crease clamp and steam nozzle. - Move the crease clamp in a downward motion from the unit. 4. Empty any water in severe cases no...- Push the trigger to cool for at all the way down close the 3 clips back into the water intake hole until full. 7. Allow the steamer to open the fabric for 40 minutes. 9. Storing 1. Slowly pour the water-vinegar mixture into the hose connector until full. 8. If the internal piping...