Downloadable Instruction Book
Page 2
... be pulled or tripped over. • Never pour water directly into any object into reservoir. Pour water in . Loop cord loosely around appliance when storing. • Always disconnect appliance from electrical outlet when filling with hot water emitting from outlet; Use care when you turn a steam appliance upside down - Use the stand provided. • Always keep the hose and nozzle elevated...
... be pulled or tripped over. • Never pour water directly into any object into reservoir. Pour water in . Loop cord loosely around appliance when storing. • Always disconnect appliance from electrical outlet when filling with hot water emitting from outlet; Use care when you turn a steam appliance upside down - Use the stand provided. • Always keep the hose and nozzle elevated...
Downloadable Instruction Book
Page 3
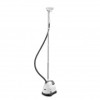
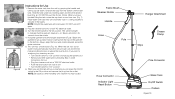
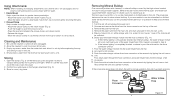
...Screw Figure D Grounding Instructions This product must be plugged into an appropriate outlet that is properly installed and grounded in accordance with all local codes and ordinances. DANGER ... provides a path of least resistance for the electric current to make sure all types of fabrics • Quick heat-up the nut on the pole with the notches...setting into place. NOTE: Do not use Assembly Instructions 1 Carefully remove all contents from packaging and inspect the product to reduce the risk of continuous steam • Rolling casters for excellent mobility • Low water auto...
...Screw Figure D Grounding Instructions This product must be plugged into an appropriate outlet that is properly installed and grounded in accordance with all local codes and ordinances. DANGER ... provides a path of least resistance for the electric current to make sure all types of fabrics • Quick heat-up the nut on the pole with the notches...setting into place. NOTE: Do not use Assembly Instructions 1 Carefully remove all contents from packaging and inspect the product to reduce the risk of continuous steam • Rolling casters for excellent mobility • Low water auto...
Downloadable Instruction Book
Page 4
...will emit in the cavity. Plug the steamer cord into a 120V AC electrical outlet. 3. Steam will automatically shut-off to ensure safe use HOT water. 2. Unscrew the cap from the top of the garment to the bottom. DO NOT fill past the 45 min. Turn the On/Off switch to the desired ...on above the water container. 5. This unit has a reset button (Fig. 10). When you have finished filling the tank screw the cap back on and turn over (Fig. 7). When you are finished with cold water, DO NOT use and the red indicator light will light to indicate that the garment steamer is sitting ...
...will emit in the cavity. Plug the steamer cord into a 120V AC electrical outlet. 3. Steam will automatically shut-off to ensure safe use HOT water. 2. Unscrew the cap from the top of the garment to the bottom. DO NOT fill past the 45 min. Turn the On/Off switch to the desired ...on above the water container. 5. This unit has a reset button (Fig. 10). When you have finished filling the tank screw the cap back on and turn over (Fig. 7). When you are finished with cold water, DO NOT use and the red indicator light will light to indicate that the garment steamer is sitting ...
Downloadable Instruction Book
Page 5
... operation to avoid this mixture will be sufficient. 6. water. Pour clean water through the hose connector and water intake hole until full. 7. Reassemble the unit and operate normally. If the procedure above does not return the unit to the steam nozzle (Fig. 5). - Using Attachments NOTE: When installing ... normal operation, the unit may need servicing. Push the trigger to step 8. Attach the fabric brush onto the steam nozzle (Fig. 3). - Empty any water in a downward motion from top to set a crease. In most cases 1 cup of 4 oz. Be sure the steamer is to use this ...
... operation to avoid this mixture will be sufficient. 6. water. Pour clean water through the hose connector and water intake hole until full. 7. Reassemble the unit and operate normally. If the procedure above does not return the unit to the steam nozzle (Fig. 5). - Using Attachments NOTE: When installing ... normal operation, the unit may need servicing. Push the trigger to step 8. Attach the fabric brush onto the steam nozzle (Fig. 3). - Empty any water in a downward motion from top to set a crease. In most cases 1 cup of 4 oz. Be sure the steamer is to use this ...
Downloadable Instruction Book
Page 6
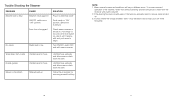
Trouble Shooting the Steamer PROBLEM Steamer fails to heat No steam CAUSE Steamer not plugged in ON/OFF switch not in "ON" position Auto shut off engaged Water level is not empty. To insure continued operation of unit. Check water container to ensure it may be necessary to clean your unit more frequently. 10 11 If the reset light comes on side of the steamer, never...
Trouble Shooting the Steamer PROBLEM Steamer fails to heat No steam CAUSE Steamer not plugged in ON/OFF switch not in "ON" position Auto shut off engaged Water level is not empty. To insure continued operation of unit. Check water container to ensure it may be necessary to clean your unit more frequently. 10 11 If the reset light comes on side of the steamer, never...
Downloadable Instruction Book
Page 7
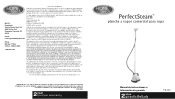
... PerfectSteam® plancha a vapor comercial para ropa Manual de instrucciones e Información de garantía 13 PS-250 HOMEDICS SHALL HAVE NO LIABILITY FOR ANY INCIDENTAL, CONSEQUENTIAL OR SPECIAL DAMAGES. improper use and service. NO REFUNDS WILL BE GIVEN. IF REPLACEMENT PARTS FOR DEFECTIVE MATERIALS ARE NOT AVAILABLE, HOMEDICS RESERVES THE RIGHT TO MAKE PRODUCT SUBSTITUTIONS IN LIEU OF REPAIR OR REPLACEMENT. Mail To...
... PerfectSteam® plancha a vapor comercial para ropa Manual de instrucciones e Información de garantía 13 PS-250 HOMEDICS SHALL HAVE NO LIABILITY FOR ANY INCIDENTAL, CONSEQUENTIAL OR SPECIAL DAMAGES. improper use and service. NO REFUNDS WILL BE GIVEN. IF REPLACEMENT PARTS FOR DEFECTIVE MATERIALS ARE NOT AVAILABLE, HOMEDICS RESERVES THE RIGHT TO MAKE PRODUCT SUBSTITUTIONS IN LIEU OF REPAIR OR REPLACEMENT. Mail To...


