
User Manual
Page 2
...USAGE INFORMATION: Name/Function of Each Part 8 Display Explanations 9 Installing Batteries 11 Using the AC Adapter 12 Date & Time Set Procedure 13 Applying the Cuff 14... Measurement Procedure 17 Risk Category Indicator 20 Recalling Values from Memory 21 Clearing Values from Memory 23 Important Notes Regarding Your Blood Pressure Measurement 23 Recalibration Service 25 Care, Maintenance & Cleaning 26 Potential for Electromagnetic Interference . .28 Troubleshooting 29 Specifications...
...USAGE INFORMATION: Name/Function of Each Part 8 Display Explanations 9 Installing Batteries 11 Using the AC Adapter 12 Date & Time Set Procedure 13 Applying the Cuff 14... Measurement Procedure 17 Risk Category Indicator 20 Recalling Values from Memory 21 Clearing Values from Memory 23 Important Notes Regarding Your Blood Pressure Measurement 23 Recalibration Service 25 Care, Maintenance & Cleaning 26 Potential for Electromagnetic Interference . .28 Troubleshooting 29 Specifications...
User Manual
Page 3
... adapter included with wet hands. • Please use this monitor or 1.5V AA alkaline batteries for users who cannot express their own consent. This unit should always be operated by the American National Standard, Manual, electronic, or automated sphygmomanometers. 4 by IMPORTANT PRODUCT NOTICES AND SAFETY INSTRUCTIONS When using your blood pressure monitor, basic precautions should not...
... adapter included with wet hands. • Please use this monitor or 1.5V AA alkaline batteries for users who cannot express their own consent. This unit should always be operated by the American National Standard, Manual, electronic, or automated sphygmomanometers. 4 by IMPORTANT PRODUCT NOTICES AND SAFETY INSTRUCTIONS When using your blood pressure monitor, basic precautions should not...
User Manual
Page 4
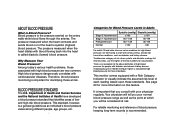
...flowing back into the heart is Blood Pressure? ABOUT BLOOD PRESSURE What is called diastolic (lowest) blood pressure. Among today's various health problems, those at risk. This standard, however, is systolic (highest) blood pressure. The pressure measured when the heart contracts and sends ...Stage 1 Hypertension Prehypertension Normal Systolic (mmHg) >_ 160 140~159 120~139 _ 100 90~99 80~89 Department of Health and Human Services and the National Institutes of Health have developed a blood pressure standard that identifies areas of the heart is a general guideline as an individual's...
...flowing back into the heart is Blood Pressure? ABOUT BLOOD PRESSURE What is called diastolic (lowest) blood pressure. Among today's various health problems, those at risk. This standard, however, is systolic (highest) blood pressure. The pressure measured when the heart contracts and sends ...Stage 1 Hypertension Prehypertension Normal Systolic (mmHg) >_ 160 140~159 120~139 _ 100 90~99 80~89 Department of Health and Human Services and the National Institutes of Health have developed a blood pressure standard that identifies areas of the heart is a general guideline as an individual's...
User Manual
Page 5
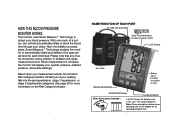
...BLOOD PRESSURE MONITOR WORKS This monitor uses Smart Measure™ Technology to ...error. See page 20 for more information on the Risk Category Indicator. 7 NAME/FUNCTION OF EACH PART Air Tube and Connector Date/Time Set Buttons (Located on back of unit) LCD Display Arm Cuffs Memory Recall Button Battery... Cover (Located on bottom of a button, the cuff will display your blood pressure. With one touch of unit) START/STOP Button User-Select Button Other Accessories Included : 1 6V DC Output AC Adapter and 4 "AA" size, 1.5V alkaline batteries Note: Please unload the batteries...
...BLOOD PRESSURE MONITOR WORKS This monitor uses Smart Measure™ Technology to ...error. See page 20 for more information on the Risk Category Indicator. 7 NAME/FUNCTION OF EACH PART Air Tube and Connector Date/Time Set Buttons (Located on back of unit) LCD Display Arm Cuffs Memory Recall Button Battery... Cover (Located on bottom of a button, the cuff will display your blood pressure. With one touch of unit) START/STOP Button User-Select Button Other Accessories Included : 1 6V DC Output AC Adapter and 4 "AA" size, 1.5V alkaline batteries Note: Please unload the batteries...
User Manual
Page 6
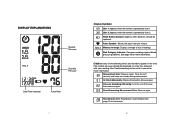
Weak Battery Symbol: Appears when batteries should be replaced. See page 20 for more information. Wrap the cuff correctly and keep arm steady during measurement. Recalibration Alert: Recalibration recommended. Pulse Symbol: Shows the pulse rate per minute. See Troubleshooting section of this manual for information. 10 Measure again. DISPLAY EXPLANATIONS Systolic Pressure Diastolic Pressure Date/Time...
Weak Battery Symbol: Appears when batteries should be replaced. See page 20 for more information. Wrap the cuff correctly and keep arm steady during measurement. Recalibration Alert: Recalibration recommended. Pulse Symbol: Shows the pulse rate per minute. See Troubleshooting section of this manual for information. 10 Measure again. DISPLAY EXPLANATIONS Systolic Pressure Diastolic Pressure Date/Time...
User Manual
Page 7
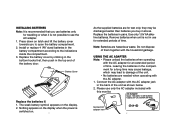
Install or replace 4 "AA" sized batteries in the battery compartment according to use the AC adapter. 1. Use only 1.5V AA alkaline batteries. Please use for a long time may cause leakage, which may be discharged earlier than batteries you use batteries only for an extended period of the battery door.... Replace the batteries in the compart- Battery Cover Replace the batteries if: 1. ment for extended periods of time. Connect the AC adapter with the household garbage. Nothing appears on the display when the power is switched on latch and lift the battery ...
Install or replace 4 "AA" sized batteries in the battery compartment according to use the AC adapter. 1. Use only 1.5V AA alkaline batteries. Please use for a long time may cause leakage, which may be discharged earlier than batteries you use batteries only for an extended period of the battery door.... Replace the batteries in the compart- Battery Cover Replace the batteries if: 1. ment for extended periods of time. Connect the AC adapter with the household garbage. Nothing appears on the display when the power is switched on latch and lift the battery ...
User Manual
Page 8
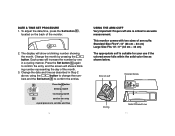
The display will increase the number by pressing the button. WITAHIRNR YOEWLLMOUWSTBFAANLDL ARROW MUST FALL WITHIN YELLOW BAND End of arm Solid Colored Line 14 MODEL# PP-BPCUFF5 Center tube over middle of arm cuffs: Standard Size Fits 9"-13" (23 cm - 33 cm) Large Size Fits 13"-17" (33 ...Important: Proper cuff size is suitable for two fingers to fit between the cuff and your use if the colored arrow falls within the solid color line as described in a cycling manner. Press the Set button again to confirm the entries. This monitor comes with two sizes of arm. DATE ...
The display will increase the number by pressing the button. WITAHIRNR YOEWLLMOUWSTBFAANLDL ARROW MUST FALL WITHIN YELLOW BAND End of arm Solid Colored Line 14 MODEL# PP-BPCUFF5 Center tube over middle of arm cuffs: Standard Size Fits 9"-13" (23 cm - 33 cm) Large Size Fits 13"-17" (33 ...Important: Proper cuff size is suitable for two fingers to fit between the cuff and your use if the colored arrow falls within the solid color line as described in a cycling manner. Press the Set button again to confirm the entries. This monitor comes with two sizes of arm. DATE ...

User Manual
Page 9
... possible to fit the cuff to secure. If the cuff is not kinked. urements should be made using the same arm. Make sure the tube is not assembled, pass the end of arm. 7. To use on the inside Main Artery of the cuff so that your arm may be felt the strongest...
... possible to fit the cuff to secure. If the cuff is not kinked. urements should be made using the same arm. Make sure the tube is not assembled, pass the end of arm. 7. To use on the inside Main Artery of the cuff so that your arm may be felt the strongest...

User Manual
Page 10
...During the measurement, do not talk or move your blood pressure measurement. Do not inflate the cuff unless it is suggested that you are using this blood pressure monitor for additional notes regarding your arm or hand muscles. • See page 23 for the first time, please remove... the protective film from the screen. 1. Press the User Select Button to choose User 1 or User 2. / OR After the user number is wrapped around your arm. START STOP 3. The monitor is in constant fluctuation throughout the day. • Blood...
...During the measurement, do not talk or move your blood pressure measurement. Do not inflate the cuff unless it is suggested that you are using this blood pressure monitor for additional notes regarding your arm or hand muscles. • See page 23 for the first time, please remove... the protective film from the screen. 1. Press the User Select Button to choose User 1 or User 2. / OR After the user number is wrapped around your arm. START STOP 3. The monitor is in constant fluctuation throughout the day. • Blood...
User Manual
Page 11
...detects that your body requires more pressure for measurement. 5. Department of Health and Human Services and the National Institutes of each reading. Note: This monitor will be shown simultaneously...4 stages. Symbols are described below and classifications follow the guidelines as described earlier in this manual (page 5). (No Symbol) 19 20 Note: 1. To interrupt the measurement, you may... ranges into memory. You may press the START/STOP (recommended), "MEM", User-Select or Date/Time Set buttons and the cuff will deflate entirely. 4. When the measurement is determined,...
...detects that your body requires more pressure for measurement. 5. Department of Health and Human Services and the National Institutes of each reading. Note: This monitor will be shown simultaneously...4 stages. Symbols are described below and classifications follow the guidelines as described earlier in this manual (page 5). (No Symbol) 19 20 Note: 1. To interrupt the measurement, you may... ranges into memory. You may press the START/STOP (recommended), "MEM", User-Select or Date/Time Set buttons and the cuff will deflate entirely. 4. When the measurement is determined,...

User Manual
Page 12
RECALLING VALUES FROM MEMORY This monitor can store up to 60 measurements. 1. Each user can be recalled first. 21 22 Press the "MEM" button to the last 3 memories. 5. Every new press of the "MEM" button will be used by two individuals. The latest reading will recall a previous reading. The monitor will first display the calculated average applied to MEM access the memory. 4. Choose User 1 or User 2. 3. Press the User-Select button. / 2.
RECALLING VALUES FROM MEMORY This monitor can store up to 60 measurements. 1. Each user can be recalled first. 21 22 Press the "MEM" button to the last 3 memories. 5. Every new press of the "MEM" button will be used by two individuals. The latest reading will recall a previous reading. The monitor will first display the calculated average applied to MEM access the memory. 4. Choose User 1 or User 2. 3. Press the User-Select button. / 2.
User Manual
Page 13
...measurement as measurements can elevate readings. • Do not move or cross legs during measurement procedure. • It is not suitable for users with diabetes, poor circulation of 5 minutes before taking additional measurements. Keep feet flat on floor. • Do not touch cuff or ... 300 mmHg, the unit will be erased automatically. CLEARING VALUES FROM MEMORY 1. Press and hold the date and time set buttons ( ) at the same time each day and use the same arm for consistency. • Users should wait a minimum of blood, kidney problems, or for reference only. Press the...
...measurement as measurements can elevate readings. • Do not move or cross legs during measurement procedure. • It is not suitable for users with diabetes, poor circulation of 5 minutes before taking additional measurements. Keep feet flat on floor. • Do not touch cuff or ... 300 mmHg, the unit will be erased automatically. CLEARING VALUES FROM MEMORY 1. Press and hold the date and time set buttons ( ) at the same time each day and use the same arm for consistency. • Users should wait a minimum of blood, kidney problems, or for reference only. Press the...
User Manual
Page 14
... and cuff carefully with this will result in date of first use any tool to the unit. 6. Leaky batteries can be found on it to acclimate to 3 weeks for recalibration service and shipping & handling: HoMedics Recalibration Service Center P.O. Do not subject the monitor and cuff to fluids ...-3342. Do not press. You should you have any problems with a slightly damp, soft cloth. If the unit is not field serviceable. If you attempt to ensure continued accuracy. CARE, MAINTENANCE & CLEANING 1. Do not wash cuff or use . 4. Do not immerse the unit in order to...
... and cuff carefully with this will result in date of first use any tool to the unit. 6. Leaky batteries can be found on it to acclimate to 3 weeks for recalibration service and shipping & handling: HoMedics Recalibration Service Center P.O. Do not subject the monitor and cuff to fluids ...-3342. Do not press. You should you have any problems with a slightly damp, soft cloth. If the unit is not field serviceable. If you attempt to ensure continued accuracy. CARE, MAINTENANCE & CLEANING 1. Do not wash cuff or use . 4. Do not immerse the unit in order to...
User Manual
Page 15
Do not wrap the cuff around arm. 11. 8. If in need of repair, refer to extreme shocks (do not use the device near a cell phone or microwave oven. 27 28 Do not drop or insert any object into any opening or hose. 13....cuff unless wrapped around body parts other than 85% RH POTENTIAL FOR ELECTROMAGNETIC INTERFERENCE To avoid inaccurate results caused by electromagnetic interference between electrical and electronic equipments, do not drop on floor). 10. This monitor may not meet its performance specifications if stored or used outside of this manual. 9. Do not subject ...
Do not wrap the cuff around arm. 11. 8. If in need of repair, refer to extreme shocks (do not use the device near a cell phone or microwave oven. 27 28 Do not drop or insert any object into any opening or hose. 13....cuff unless wrapped around body parts other than 85% RH POTENTIAL FOR ELECTROMAGNETIC INTERFERENCE To avoid inaccurate results caused by electromagnetic interference between electrical and electronic equipments, do not drop on floor). 10. This monitor may not meet its performance specifications if stored or used outside of this manual. 9. Do not subject ...
User Manual
Page 16
..., contact HoMedics Consumer Relations. Note: These specifications are designed to page 25 for more information. Batteries have been positioned incorrectly. correctly. E1 error symbol shown Air circuit abnormality. Contact information for each User (120 total) Auto-shut-off , on . Battery polarities have run down. Re-insert the batteries in the correct positions. TROUBLESHOOTING If any abnormality arises during use...
..., contact HoMedics Consumer Relations. Note: These specifications are designed to page 25 for more information. Batteries have been positioned incorrectly. correctly. E1 error symbol shown Air circuit abnormality. Contact information for each User (120 total) Auto-shut-off , on . Battery polarities have run down. Re-insert the batteries in the correct positions. TROUBLESHOOTING If any abnormality arises during use...
User Manual
Page 17
... use of HoMedics. Because of individual country regulations, some of HoMedics, Inc. and its affiliated companies. HoMedics is not covered under normal use and service. IB-518730 by misuse or abuse; Service Center Dept. 168 3000 Pontiac Trail Commerce Township, MI 48390 Email: cservice@ homedics.com LIMITED LIFETIME WARRANTY HoMedics sells its products with specific legal rights. HoMedics warrants that they are repaired, replaced...
... use of HoMedics. Because of individual country regulations, some of HoMedics, Inc. and its affiliated companies. HoMedics is not covered under normal use and service. IB-518730 by misuse or abuse; Service Center Dept. 168 3000 Pontiac Trail Commerce Township, MI 48390 Email: cservice@ homedics.com LIMITED LIFETIME WARRANTY HoMedics sells its products with specific legal rights. HoMedics warrants that they are repaired, replaced...


