User Guide
Page 6
... operated according to form.) 6 English NOTICE Do not use this product within the ranges specified in a location with them WARNING In the following cases, unplug the product from the AC Adaptor socket and ask the technical support of this product changes and repair by a service ...service representative is spilled onto the main unit. After the functionality of Hitachi Software. This product's usage environment conditions: Temp.: 50 °F to 95 °F (10°C to 35 °C) Humidity: 30% to 80% (But no condensation may be allowed to the instruction manual. a. Do not make...
... operated according to form.) 6 English NOTICE Do not use this product within the ranges specified in a location with them WARNING In the following cases, unplug the product from the AC Adaptor socket and ask the technical support of this product changes and repair by a service ...service representative is spilled onto the main unit. After the functionality of Hitachi Software. This product's usage environment conditions: Temp.: 50 °F to 95 °F (10°C to 35 °C) Humidity: 30% to 80% (But no condensation may be allowed to the instruction manual. a. Do not make...

User Guide
Page 7
StarBoard T-19WX Safe Handling Careful thought was given to the cautions on this device and in this product, users themselves must exercise caution as well as follow instructions. When operating this user's guide. Use only AC Adaptor or power cables specified by the manufacturer. WARNING Warning Details Page Use the AC Adaptor supplied with this product. CAUTION Caution Details Page Hold the body...
StarBoard T-19WX Safe Handling Careful thought was given to the cautions on this device and in this product, users themselves must exercise caution as well as follow instructions. When operating this user's guide. Use only AC Adaptor or power cables specified by the manufacturer. WARNING Warning Details Page Use the AC Adaptor supplied with this product. CAUTION Caution Details Page Hold the body...
User Guide
Page 8
... 1.3.1 Front Screen ...1-3 1.3.2 Front Switch Panel ...1-4 1.3.3 Connector Panel ...1-5 1.3.4 Function Buttons ...1-6 1.4 Assembly and Setup 1-7 1.4.1 Adjusting the Stand 1-7 1.4.2 How to Take Care of the StarBoard 3-6 3.4 Consumables...3-6 3.5 LCD Panel ...3-6 3.6 Provisions of Product Warranty 3-7 8 English Usage Procedures 2-1 2.1 Turning the StarBoard On 2-1 2.2 Using the Stylus Pen 2-2 2.2.1 How to Use the Stylus Pen 2-2 2.2.2 Basic Stylus Pen Operations 2-2 2.2.3 Stylus Pen Settings ...2-3 2.2.4 Changing the Battery in the Stylus Pen 2-4 2.2.5 Replacing the Stylus Pen Tip...
... 1.3.1 Front Screen ...1-3 1.3.2 Front Switch Panel ...1-4 1.3.3 Connector Panel ...1-5 1.3.4 Function Buttons ...1-6 1.4 Assembly and Setup 1-7 1.4.1 Adjusting the Stand 1-7 1.4.2 How to Take Care of the StarBoard 3-6 3.4 Consumables...3-6 3.5 LCD Panel ...3-6 3.6 Provisions of Product Warranty 3-7 8 English Usage Procedures 2-1 2.1 Turning the StarBoard On 2-1 2.2 Using the Stylus Pen 2-2 2.2.1 How to Use the Stylus Pen 2-2 2.2.2 Basic Stylus Pen Operations 2-2 2.2.3 Stylus Pen Settings ...2-3 2.2.4 Changing the Battery in the Stylus Pen 2-4 2.2.5 Replacing the Stylus Pen Tip...
User Guide
Page 9
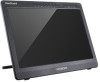
... use tablet-type interactive electronic board that lets you to screens of video materials in classes and presentations. {Eight function buttons Standard functions used as soon as shortcuts when using the StarBoard. That allows for the first time. 1.1.1 Product Overview StarBoard T-19WX is started up on a PC connected to the StarBoard. 1.1.2 Features {Write directly to the PC screen Use the stylus pen just like a mouse to the eight function buttons located...
... use tablet-type interactive electronic board that lets you to screens of video materials in classes and presentations. {Eight function buttons Standard functions used as soon as shortcuts when using the StarBoard. That allows for the first time. 1.1.1 Product Overview StarBoard T-19WX is started up on a PC connected to the StarBoard. 1.1.2 Features {Write directly to the PC screen Use the stylus pen just like a mouse to the eight function buttons located...
User Guide
Page 10
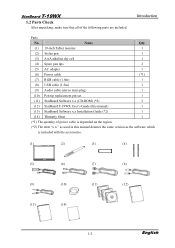
...Qty. (1) 19-inch Tablet monitor 1 (2) Stylus pen 1 (3) AAA alkaline dry cell 1 (4) Spare pen tips 2 (5) AC adapter 1 (6) Power cable (*1) (7) RGB cable (1.8m) 1 (8) USB cable (1.5m) 1 (9) Audio cable (stereo mini-plug) 1 (10) Pen tip replacement pin set 1 (11) StarBoard Software x.x (CD-ROM) (*2) 3 (12) StarBoard T-19WX User's Guide (this manual denotes the same version as used in this manual) 1 (13) StarBoard Software x.x Installation Guide (*2) 1 (14) Warranty Sheet 1 (*1) The quantity of the following parts are included. as the software which is depended...
...Qty. (1) 19-inch Tablet monitor 1 (2) Stylus pen 1 (3) AAA alkaline dry cell 1 (4) Spare pen tips 2 (5) AC adapter 1 (6) Power cable (*1) (7) RGB cable (1.8m) 1 (8) USB cable (1.5m) 1 (9) Audio cable (stereo mini-plug) 1 (10) Pen tip replacement pin set 1 (11) StarBoard Software x.x (CD-ROM) (*2) 3 (12) StarBoard T-19WX User's Guide (this manual denotes the same version as used in this manual) 1 (13) StarBoard Software x.x Installation Guide (*2) 1 (14) Warranty Sheet 1 (*1) The quantity of the following parts are included. as the software which is depended...
User Guide
Page 11
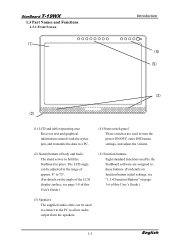
... Screen (1) Introduction (4) (5) (3) (2) (1) LCD and tablet operating area Receives text and graphical information entered with the stylus pen, and transmits the data to a PC. (4) Front switch panel These switches are assigned to these buttons. (For details on function button initial settings, see "1.3.4 Function Buttons" on page 1-6 of this User's Guide.) (3) Speakers The supplied audio cable can be used to turn the power ON/OFF, enter OSD menu settings, and adjust the volume. (2) Stand (bottom of this User's Guide.) (5) Function buttons Eight standard functions used...
... Screen (1) Introduction (4) (5) (3) (2) (1) LCD and tablet operating area Receives text and graphical information entered with the stylus pen, and transmits the data to a PC. (4) Front switch panel These switches are assigned to these buttons. (For details on function button initial settings, see "1.3.4 Function Buttons" on page 1-6 of this User's Guide.) (3) Speakers The supplied audio cable can be used to turn the power ON/OFF, enter OSD menu settings, and adjust the volume. (2) Stand (bottom of this User's Guide.) (5) Function buttons Eight standard functions used...

User Guide
Page 12
... change settings. (6) button Brightness can be adjusted by the (+) and (-) buttons after making menu selections to apply those. (5) button This button is also used to the StarBoard and an image signal is detected. It is used to select OSD menu options and change setting values. „ For details on using the OSD menu, see "2.3 Using the OSD Menu" on page 2-6 of this User's Guide. 1-4 English StarBoard T-19WX 1.3.2 Front Switch Panel (4) (3) Introduction (6) (5) (1) (2) (1) Power button This button turns the StarBoard LCD monitor...
... change settings. (6) button Brightness can be adjusted by the (+) and (-) buttons after making menu selections to apply those. (5) button This button is also used to the StarBoard and an image signal is detected. It is used to select OSD menu options and change setting values. „ For details on using the OSD menu, see "2.3 Using the OSD Menu" on page 2-6 of this User's Guide. 1-4 English StarBoard T-19WX 1.3.2 Front Switch Panel (4) (3) Introduction (6) (5) (1) (2) (1) Power button This button turns the StarBoard LCD monitor...
User Guide
Page 13
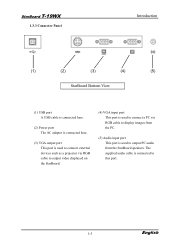
The supplied audio cable is used to connect a PC via RGB cable to output video displayed on the StarBoard. (4) VGA input port This port is used to this port. 1-5 English StarBoard T-19WX 1.3.3 Connector Panel Introduction (5) (4) (1) (2) (3) (4) (5) StarBoard Bottom View (1) USB port A USB cable is connected here. (2) Power port The AC adapter is connected here. (3) VGA output port This port is used to connect external devices such as a projector via RGB cable to display images from the PC. (5) Audio input port This port is connected to output PC audio from...
The supplied audio cable is used to connect a PC via RGB cable to output video displayed on the StarBoard. (4) VGA input port This port is used to this port. 1-5 English StarBoard T-19WX 1.3.3 Connector Panel Introduction (5) (4) (1) (2) (3) (4) (5) StarBoard Bottom View (1) USB port A USB cable is connected here. (2) Power port The AC adapter is connected here. (3) VGA output port This port is used to connect external devices such as a projector via RGB cable to display images from the PC. (5) Audio input port This port is connected to output PC audio from...
User Guide
Page 14
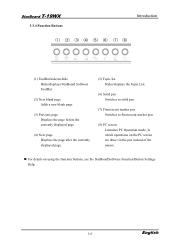
... before the currently displayed page. (4) Next page Displays the page after the currently displayed page. (5) Topic list Hides/displays the Topic List. (6) Solid pen Switches to solid pen. (7) Fluorescent marker pen Switches to fluorescent marker pen. (8) PC screen Launches PC Operation mode, in which operations on the PC screen are done via the pen instead of the mouse. „ For details on using the function buttons, see the StarBoardSoftware Function Button Settings Help. 1-6 English
... before the currently displayed page. (4) Next page Displays the page after the currently displayed page. (5) Topic list Hides/displays the Topic List. (6) Solid pen Switches to solid pen. (7) Fluorescent marker pen Switches to fluorescent marker pen. (8) PC screen Launches PC Operation mode, in which operations on the PC screen are done via the pen instead of the mouse. „ For details on using the function buttons, see the StarBoardSoftware Function Button Settings Help. 1-6 English

User Guide
Page 18
... Software x.x User's Guide 1-10 English Connect the other end of the cable to the PC VGA port, and tighten the screws to fasten. (2) Connect the USB cable to the USB port on how to install StarBoard software, see "StarBoard Software Installation" in speakers.) (4) Connect the AC adapter connector to the StarBoard power connector. (5) Connect the power cable to the AC adapter, then plug the power plug into power socket. (6) If outputting the StarBoard screen to external equipment, connect the RGB cable...
... Software x.x User's Guide 1-10 English Connect the other end of the cable to the PC VGA port, and tighten the screws to fasten. (2) Connect the USB cable to the USB port on how to install StarBoard software, see "StarBoard Software Installation" in speakers.) (4) Connect the AC adapter connector to the StarBoard power connector. (5) Connect the power cable to the AC adapter, then plug the power plug into power socket. (6) If outputting the StarBoard screen to external equipment, connect the RGB cable...
User Guide
Page 19
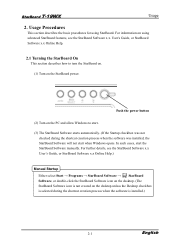
Push the power button (2) Turn on the PC and allow Windows to turn the StarBoard on. (1) Turn on the StarBoard power. In such cases, start when Windows opens. Usage Procedures This section describes the basic procedures for using advanced StarBoard features, see the StarBoard Software x.x User's Guide, or StarBoard Software x.x Online Help.) Manual Startup Either select Start → Programs → StarBoard Software → StarBoard Software, or double-click the StarBoard Software icon on...
Push the power button (2) Turn on the PC and allow Windows to turn the StarBoard on. (1) Turn on the StarBoard power. In such cases, start when Windows opens. Usage Procedures This section describes the basic procedures for using advanced StarBoard features, see the StarBoard Software x.x User's Guide, or StarBoard Software x.x Online Help.) Manual Startup Either select Start → Programs → StarBoard Software → StarBoard Software, or double-click the StarBoard Software icon on...

User Guide
Page 20
... describes how to use . The permitted stylus pen input angle range is 30° in a row. • Dragging Press the pen tip against the display with a suitable amount of force and then release it, two times in any direction from the display). Battery life can be input correctly. 2-2 English To draw characters and figures using the stylus pen, set to correspond to Use the Stylus Pen The stylus pen has a power switch.
... describes how to use . The permitted stylus pen input angle range is 30° in a row. • Dragging Press the pen tip against the display with a suitable amount of force and then release it, two times in any direction from the display). Battery life can be input correctly. 2-2 English To draw characters and figures using the stylus pen, set to correspond to Use the Stylus Pen The stylus pen has a power switch.

User Guide
Page 21
... table. Corresponding mouse action Mouse left-click Mouse left double-click Mouse right-click Pen tip Side Button No. 1 Side Button No. 0 For details on changing the button settings, see the StarBoard Software x.x Online Help. 2-3 English Same as above. Press the button with the pen tip slightly removed from the screen (5 mm or less). Button Pen tip Side Button No. 0 Side Button No. 1 User action Press the pen tip against the display...
... table. Corresponding mouse action Mouse left-click Mouse left double-click Mouse right-click Pen tip Side Button No. 1 Side Button No. 0 For details on changing the button settings, see the StarBoard Software x.x Online Help. 2-3 English Same as above. Press the button with the pen tip slightly removed from the screen (5 mm or less). Button Pen tip Side Button No. 0 Side Button No. 1 User action Press the pen tip against the display...

User Guide
Page 27
... VOLUME MODE MESSAGE : Used to set the amount of time before the OSD menu closes automatically. (0-60) : Used to adjust the speaker volume. (0-100) : Used to turn OSD window background transparency ON/OFF. StarBoard T-19WX (7) OTHER SETUP Usage SMOOTH : Used to adjust the smoothness of the image. (0-3) Use is not possible at a resolution of OSD window. (0-100) OSD TRANSPARENCY : Used to turn the screen resolution display ON/OFF. OSD H.POSITION : Used...
... VOLUME MODE MESSAGE : Used to set the amount of time before the OSD menu closes automatically. (0-60) : Used to adjust the speaker volume. (0-100) : Used to turn OSD window background transparency ON/OFF. StarBoard T-19WX (7) OTHER SETUP Usage SMOOTH : Used to adjust the smoothness of the image. (0-3) Use is not possible at a resolution of OSD window. (0-100) OSD TRANSPARENCY : Used to turn the screen resolution display ON/OFF. OSD H.POSITION : Used...
User Guide
Page 29
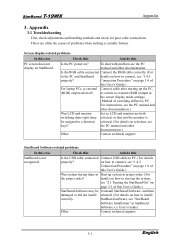
... 1-9 of switching differs by PC. details on how to connect, see key)? StarBoard Software-related problems In this case Check this And do this User's Guide.) For laptop PCs, is actually broken. Connection Procedure" on page 1-9 of problems when nothing is external Connect cable after starting up the PC, (RGB) output selected? StarBoard software, see the PC manual and other documentation.) Other Contact technical support. Screen display-related problems In...
... 1-9 of switching differs by PC. details on how to connect, see key)? StarBoard Software-related problems In this case Check this And do this User's Guide.) For laptop PCs, is actually broken. Connection Procedure" on page 1-9 of problems when nothing is external Connect cable after starting up the PC, (RGB) output selected? StarBoard software, see the PC manual and other documentation.) Other Contact technical support. Screen display-related problems In...
User Guide
Page 30
... to replace the stylus pen tip, see "2.2.5 Replacing the Stylus Pen Tip" on how to calibrate the pen, see "StarBoard Software Installation " in the StarBoard Software x.x User's Guide) Contact technical support. 3-2 English transmitters that microwave ovens or radio emit noise. Other Restart Windows and StarBoard Software. install StarBoard software, see "Calibration" in StarBoard Software x.x User's Guide) Is battery worn out? Other Calibrate the pen position correctly. (For details on how to devices located nearby the electromagnetic noise, so use...
... to replace the stylus pen tip, see "2.2.5 Replacing the Stylus Pen Tip" on how to calibrate the pen, see "StarBoard Software Installation " in the StarBoard Software x.x User's Guide) Contact technical support. 3-2 English transmitters that microwave ovens or radio emit noise. Other Restart Windows and StarBoard Software. install StarBoard software, see "Calibration" in StarBoard Software x.x User's Guide) Is battery worn out? Other Calibrate the pen position correctly. (For details on how to devices located nearby the electromagnetic noise, so use...

User Guide
Page 31
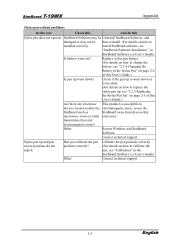
... StarBoard Software running ? Contact technical support. 3-3 English Is the USB cable connected Connect USB cable to PC. (For details properly? Other Restart Windows and StarBoard Software. StarBoard Software. install StarBoard software, see the StarBoard Software x.x User's Guide.) StarBoard Software may be Uninstall StarBoard Software, and damaged or may not be then reinstall. (For details on how to installed correctly. on how to connect, see "1.4.3 Connection Procedure" on page 1-9 of this Function buttons don't operate. transmitters...
... StarBoard Software running ? Contact technical support. 3-3 English Is the USB cable connected Connect USB cable to PC. (For details properly? Other Restart Windows and StarBoard Software. StarBoard Software. install StarBoard software, see the StarBoard Software x.x User's Guide.) StarBoard Software may be Uninstall StarBoard Software, and damaged or may not be then reinstall. (For details on how to installed correctly. on how to connect, see "1.4.3 Connection Procedure" on page 1-9 of this Function buttons don't operate. transmitters...

User Guide
Page 32
... 15-pin VGA out Dsub 15-pin Stereo mini-jack (stereo audio) USB Power consumption 50 W or less (2W or less in power saving mode) Power supply (AC adapter) Input AC 100 - 240 V, 50/60 Hz, 1.5 A Output DC 12 V, 5.0 A External dimensions 462.0 (W)×348.4 (H)×60.0 (D) mm (without stand) Weight Approx. 4.6 kg Stand adjustment Adjustable in this manual denotes the model No...
... 15-pin VGA out Dsub 15-pin Stereo mini-jack (stereo audio) USB Power consumption 50 W or less (2W or less in power saving mode) Power supply (AC adapter) Input AC 100 - 240 V, 50/60 Hz, 1.5 A Output DC 12 V, 5.0 A External dimensions 462.0 (W)×348.4 (H)×60.0 (D) mm (without stand) Weight Approx. 4.6 kg Stand adjustment Adjustable in this manual denotes the model No...

User Guide
Page 35
... customer during normal use, the malfunction will be a repair charge in the following table: Product Name Part Name Warranty Coverage StarBoard 19-inch LCD monitor + Stylus pen + RGB cable + USB cable + AC adapter + Power cable + Audio cable + Stand + Replacement tip for Stylus pen - The warranty coverage is not presented. (3) If specified fields on the registration card accompanying the warranty are not completed, or if the wording has been changed without authorization...
... customer during normal use, the malfunction will be a repair charge in the following table: Product Name Part Name Warranty Coverage StarBoard 19-inch LCD monitor + Stylus pen + RGB cable + USB cable + AC adapter + Power cable + Audio cable + Stand + Replacement tip for Stylus pen - The warranty coverage is not presented. (3) If specified fields on the registration card accompanying the warranty are not completed, or if the wording has been changed without authorization...

User Guide
Page 36
... and tear, wear, deterioration, etc., of consumables, even during normal use of this product) is outside the scope of this user's guide. This warranty does not cover labour fees for repair, etc. StarBoard T-19WX Appendix (8) In the event of a malfunction in this product caused by the connection to this product of equipment other than the equipment specified...
... and tear, wear, deterioration, etc., of consumables, even during normal use of this product) is outside the scope of this user's guide. This warranty does not cover labour fees for repair, etc. StarBoard T-19WX Appendix (8) In the event of a malfunction in this product caused by the connection to this product of equipment other than the equipment specified...
