
Instruction Manual
Page 9
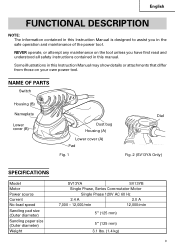
... tool. NAME OF PARTS Switch Housing (B) Nameplate Lower cover (B) Dust bug Housing (A) Lower cover (A) Pad Fig. 1 Dial Fig. 2 (SV13YA Only) SPECIFICATIONS Model Motor Power source Current No-load speed Sanding pad size (Outer diameter) Sanding paper size (Outer diameter) Weight SV13YA SV13YB Single Phase, Series Commutator Motor Single Phase 120V AC 60 Hz 2.4 A 2.0 A 7,000...
... tool. NAME OF PARTS Switch Housing (B) Nameplate Lower cover (B) Dust bug Housing (A) Lower cover (A) Pad Fig. 1 Dial Fig. 2 (SV13YA Only) SPECIFICATIONS Model Motor Power source Current No-load speed Sanding pad size (Outer diameter) Sanding paper size (Outer diameter) Weight SV13YA SV13YB Single Phase, Series Commutator Motor Single Phase 120V AC 60 Hz 2.4 A 2.0 A 7,000...
Instruction Manual
Page 11
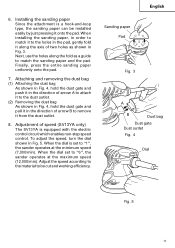
... shown in Fig. 5. When the dial set to be installed easily by just pressing it onto the pad. Next, use the holes along the axis of speed (SV13YA only) The SV13YA is equipped with the electric control circuit which enables non-step speed control. Adjustment of two holes as... a guide to "6", the sander operates at the minimum speed (7,000/min). Adjust the speed according to the material to "1", the sander operates at the maximum speed (12,000/min). Sanding paper Pad...
... shown in Fig. 5. When the dial set to be installed easily by just pressing it onto the pad. Next, use the holes along the axis of speed (SV13YA only) The SV13YA is equipped with the electric control circuit which enables non-step speed control. Adjustment of two holes as... a guide to "6", the sander operates at the minimum speed (7,000/min). Adjust the speed according to the material to "1", the sander operates at the maximum speed (12,000/min). Sanding paper Pad...
Instruction Manual
Page 13
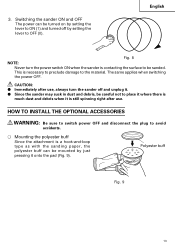
...spinning right after use , always turn the power switch ON when the sander is much dust and debris when it onto the pad (Fig. 9). The same applies when switching the power OFF. 3. Polyester buff Fig. 9 13 Switching the sander ON and OFF The power can be mounted by just pressing it ...is necessary to preclude damage to ON (1) and turned off and unplug it. ⅷ Since the sander may suck ...
...spinning right after use , always turn the power switch ON when the sander is much dust and debris when it onto the pad (Fig. 9). The same applies when switching the power OFF. 3. Polyester buff Fig. 9 13 Switching the sander ON and OFF The power can be mounted by just pressing it ...is necessary to preclude damage to ON (1) and turned off and unplug it. ⅷ Since the sander may suck ...

Instruction Manual
Page 14
... the carbon brushes For your continued safety and electrical shock protection, carbon brush inspection and replacement on this random orbit sander with the tool to the HITACHI AUTHORIZED SERVICE CENTER when requesting repair or other maintenance. Service and repairs All quality power tools will degrade efficiency... cause possible damage to the pad, replace the sanding paper as soon as excessive abrasion is extremely dangerous. 4. English MAINTENANCE AND INSPECTION WARNING: Be sure to switch power OFF and disconnect the plug from normal use of Hitachi Power Tools must be loosened,...
... the carbon brushes For your continued safety and electrical shock protection, carbon brush inspection and replacement on this random orbit sander with the tool to the HITACHI AUTHORIZED SERVICE CENTER when requesting repair or other maintenance. Service and repairs All quality power tools will degrade efficiency... cause possible damage to the pad, replace the sanding paper as soon as excessive abrasion is extremely dangerous. 4. English MAINTENANCE AND INSPECTION WARNING: Be sure to switch power OFF and disconnect the plug from normal use of Hitachi Power Tools must be loosened,...
