Parts List
Page 1
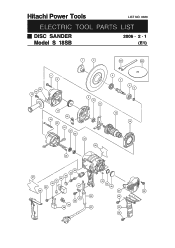
Hitachi Power Tools LIST NO. 0360 ELECTRIC TOOL PARTS LIST DISC SANDER Model S 18SB 2006 • 2 • 1 (E1) 1 2 501 502 7 8 16 15 14 17 19 20 18 21 22 23 9 10 11 24 25 26 3 4 5 6 12 13 35 34 33 27 32 31 30 37 29 44 45 46 28 47 48 42 48 41 40 39 38 43 49 48
Hitachi Power Tools LIST NO. 0360 ELECTRIC TOOL PARTS LIST DISC SANDER Model S 18SB 2006 • 2 • 1 (E1) 1 2 501 502 7 8 16 15 14 17 19 20 18 21 22 23 9 10 11 24 25 26 3 4 5 6 12 13 35 34 33 27 32 31 30 37 29 44 45 46 28 47 48 42 48 41 40 39 38 43 49 48
Instruction Manual
Page 10
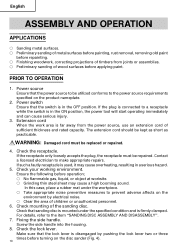
... be utilized conforms to the power source requirements specified on the environment by pushing the lock lever two or three times before turning on the disc sander (Fig. 4). 10 In this case, place a rubber mat under the specified condition and is disengaged by electrical noise. ⅜ Clear the area ... 6. Make sure that the power source to be replaced or repaired. 4. If the plug is in the OFF position. Check mounting of the sanding disc. Check that the switch is used, it may cause a high booming sound. If such a fautly receptacle is in the ON position, the power ...
... be utilized conforms to the power source requirements specified on the environment by pushing the lock lever two or three times before turning on the disc sander (Fig. 4). 10 In this case, place a rubber mat under the specified condition and is disengaged by electrical noise. ⅜ Clear the area ... 6. Make sure that the power source to be replaced or repaired. 4. If the plug is in the OFF position. Check mounting of the sanding disc. Check that the switch is used, it may cause a high booming sound. If such a fautly receptacle is in the ON position, the power ...
Instruction Manual
Page 11
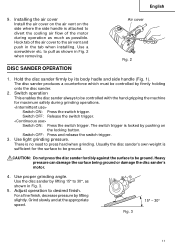
...cover to be controlled with the hand gripping the machine for the surface to pull as shown in Fig. 2 when removing. Usually the disc sander's own weight is locked by pushing on the side where the side handle is no need to desired finish. to be controlled by ...lifting 15° to 30°, as shown in Fig. 3. 5. English 9. The disc sander produces a counterforce which must be ground. Switch ON: Press the switch trigger. Switch OFF: Release the switch trigger. The switch trigger is sufficient for...
...cover to be controlled with the hand gripping the machine for the surface to pull as shown in Fig. 2 when removing. Usually the disc sander's own weight is locked by pushing on the side where the side handle is no need to desired finish. to be controlled by ...lifting 15° to 30°, as shown in Fig. 3. 5. English 9. The disc sander produces a counterforce which must be ground. Switch ON: Press the switch trigger. Switch OFF: Release the switch trigger. The switch trigger is sufficient for...
Instruction Manual
Page 12
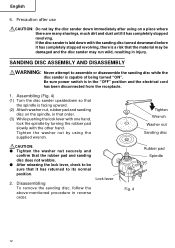
...has returned to assemble or disassemble the sanding disc while the disc sander is in reverse order. Tighten Wrench Washer nut Sanding disc CAUTION: ⅷ Tighten the washer nut securely and confirm that the rubber pad and sanding disc does not wobble. ⅷ After releasing the...6. Precaution after using the supplied wrench. Assembling (Fig. 4) (1) Turn the disc sander upsidedown so that the material may be sure that order. (3) While pushing the lock lever with the other hand. SANDING DISC ASSEMBLY AND DISASSEMBLY WARNING: Never attempt to its normal position. 2. Tighten the...
...has returned to assemble or disassemble the sanding disc while the disc sander is in reverse order. Tighten Wrench Washer nut Sanding disc CAUTION: ⅷ Tighten the washer nut securely and confirm that the rubber pad and sanding disc does not wobble. ⅷ After releasing the...6. Precaution after using the supplied wrench. Assembling (Fig. 4) (1) Turn the disc sander upsidedown so that the material may be sure that order. (3) While pushing the lock lever with the other hand. SANDING DISC ASSEMBLY AND DISASSEMBLY WARNING: Never attempt to its normal position. 2. Tighten the...
Instruction Manual
Page 13
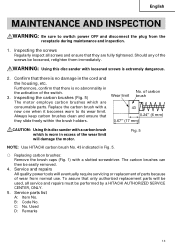
... OFF and disconnect the plug from normal use. Fig. 5 NOTE: Use HITACHI carbon brush No. 43 indicated in the activation of wear from the receptacle during maintenance and inspection. 1. WARNING: Using this disc sander with a carbon brush which are fully tightened. Service and repairs All quality ...screws be loosened, retighten them immediately. of carbon Wear limit brush 43 0.24" (6 mm) 0.67" (17 mm) CAUTION: Using this disc sander with a slotted screwdriver. To assure that they are consumable parts. Should any of the wear limit will be used, all screws and ensure ...
... OFF and disconnect the plug from normal use. Fig. 5 NOTE: Use HITACHI carbon brush No. 43 indicated in the activation of wear from the receptacle during maintenance and inspection. 1. WARNING: Using this disc sander with a carbon brush which are fully tightened. Service and repairs All quality ...screws be loosened, retighten them immediately. of carbon Wear limit brush 43 0.24" (6 mm) 0.67" (17 mm) CAUTION: Using this disc sander with a slotted screwdriver. To assure that they are consumable parts. Should any of the wear limit will be used, all screws and ensure ...