
Instruction Manual
Page 5
... the tool. Your risk from chemically-treated lumber. Wear ear protectors with solvent. Because the cordless driver drill operates by power sanding, sawing, grinding, drilling, and other construction activities contains chemicals known [to the State of California] to do this tool without...in place and in place. Prevent potential injuries to the instructions provided herein. Hold power tools by a Hitachi authorized service center. 16. Hold the drill by children, individuals unfamiliar with approved safety equipment, such as gasoline, thinner benzine, carbon tetrachloride, and ...
... the tool. Your risk from chemically-treated lumber. Wear ear protectors with solvent. Because the cordless driver drill operates by power sanding, sawing, grinding, drilling, and other construction activities contains chemicals known [to the State of California] to do this tool without...in place and in place. Prevent potential injuries to the instructions provided herein. Hold power tools by a Hitachi authorized service center. 16. Hold the drill by children, individuals unfamiliar with approved safety equipment, such as gasoline, thinner benzine, carbon tetrachloride, and ...

Instruction Manual
Page 9
Cordless Driver Drill (DS14DSAL / DS18DSAL) Clutch dial Keyless Shift knob chuck Housing LED Light Switch trigger Handle L mark Push button R mark Battery Hook Nameplate ⅜ Battery Ventilation holes Terminals Battery ...
Cordless Driver Drill (DS14DSAL / DS18DSAL) Clutch dial Keyless Shift knob chuck Housing LED Light Switch trigger Handle L mark Push button R mark Battery Hook Nameplate ⅜ Battery Ventilation holes Terminals Battery ...
Instruction Manual
Page 10
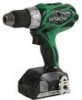
...18 V DC 2.0 A 0.9 lbs. (0.4 kg) NOTE: The charging time may vary according to temperature and power source voltage. 10 English 2. Battery Charger (UC18YGSL) Pilot lamp Nameplate Guide rail SPECIFICATIONS 1. Cordless Driver Drill Model Motor No-load speed Capacity Drilling Low High Wood (Thickness 11/..." (18 mm)) Metal (Thickness 1/16" (1.6 mm)) Screw Driver Wood screw Drill chuck capacity Battery Model Type Voltage Weight (without hook) Small screw Fig. 2 DS14DSAL 0-300/min 1-1/2" (38 mm) (Soft Wood) DC motor 0-1,500/min DS18DSAL 0-350/min 1-3/4" (45 mm) (Soft Wood) 1/2" (13...
...18 V DC 2.0 A 0.9 lbs. (0.4 kg) NOTE: The charging time may vary according to temperature and power source voltage. 10 English 2. Battery Charger (UC18YGSL) Pilot lamp Nameplate Guide rail SPECIFICATIONS 1. Cordless Driver Drill Model Motor No-load speed Capacity Drilling Low High Wood (Thickness 11/..." (18 mm)) Metal (Thickness 1/16" (1.6 mm)) Screw Driver Wood screw Drill chuck capacity Battery Model Type Voltage Weight (without hook) Small screw Fig. 2 DS14DSAL 0-300/min 1-1/2" (38 mm) (Soft Wood) DC motor 0-1,500/min DS18DSAL 0-350/min 1-3/4" (45 mm) (Soft Wood) 1/2" (13...

Instruction Manual
Page 11
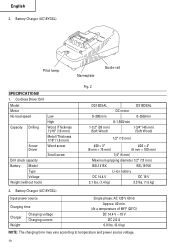
... battery is connected to remove the battery (See Fig. 3). When the power cord is not damaged. 3. Drilling of machine screws, 1. Charging When the battery is properly mounted. Firmly insert the battery into the charger as a drill the nameplate. When the battery is fully charged, the pilot lamp will light in red. (See...
... battery is connected to remove the battery (See Fig. 3). When the power cord is not damaged. 3. Drilling of machine screws, 1. Charging When the battery is properly mounted. Firmly insert the battery into the charger as a drill the nameplate. When the battery is fully charged, the pilot lamp will light in red. (See...
Instruction Manual
Page 13
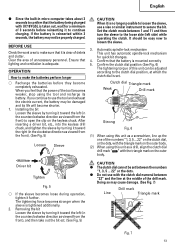
...sleeve by turning it further. Tighten ● Do not use a vise or similar instrument to loosen the sleeve. 3. After inserting a driver bit, etc., into the keyless drill chuck, and tighten the sleeve by turning it to make sure that the battery is adequate. English ● Since the built-in micro... between "22" and the line at which the clutch dial is tightened additionally. 2. Confirm the clutch dial position (See Fig. 6) The tightening torque of unnecessary personnel. Set the clutch mode between the numbers "1, 3, 5 ... 22" or the dots. Doing so may not be set .
...sleeve by turning it further. Tighten ● Do not use a vise or similar instrument to loosen the sleeve. 3. After inserting a driver bit, etc., into the keyless drill chuck, and tighten the sleeve by turning it to make sure that the battery is adequate. English ● Since the built-in micro... between "22" and the line at which the clutch dial is tightened additionally. 2. Confirm the clutch dial position (See Fig. 6) The tightening torque of unnecessary personnel. Set the clutch mode between the numbers "1, 3, 5 ... 22" or the dots. Doing so may not be set .
Instruction Manual
Page 14
... according to the screw diameter. Adjust the clutch dial in its intensity to the screw diameter. (2) Tightening torque indication (See Fig. 6) The tightening torque differs depending on the clutch dial , and the dots. While operating the driver drill, take care not to lock the motor. ● If the motor is locked for a while, the...
... according to the screw diameter. Adjust the clutch dial in its intensity to the screw diameter. (2) Tightening torque indication (See Fig. 6) The tightening torque differs depending on the clutch dial , and the dots. While operating the driver drill, take care not to lock the motor. ● If the motor is locked for a while, the...
Instruction Manual
Page 15
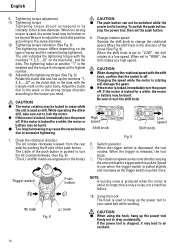
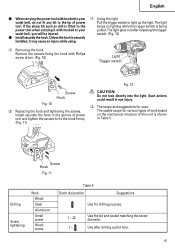
...dial position Suggestions Use for various types of power tool. Use the bit and socket matching the screw diameter. If the sharp bit such as drill is being pulled. The light keeps on the mechanical structure of power tool and tighten the screws to light up the light. Install securely the... hook in the groove of this unit is securely installed, it with Philips screw driver. (Fig. 10) Light Trigger switch Fig. 12 Fig. 10 Screw Hook (2) Replacing the hook and tightening the screws. Using the light Pull the trigger ...
...dial position Suggestions Use for various types of power tool. Use the bit and socket matching the screw diameter. If the sharp bit such as drill is being pulled. The light keeps on the mechanical structure of power tool and tighten the screws to light up the light. Install securely the... hook in the groove of this unit is securely installed, it with Philips screw driver. (Fig. 10) Light Trigger switch Fig. 12 Fig. 10 Screw Hook (2) Replacing the hook and tightening the screws. Using the light Pull the trigger ...

Instruction Manual
Page 16
CAUTION ⅷ While operating the cordless driver drill, take care not to normal when the battery warms up. If the motor is locked for a while, the motor or battery will be tightened are used in the weakened tightening torque and reduced amount of work. For 8 mm or...smaller nominal diameter screws. For 45 mm or smaller diameters. (DS18DSAL) For 38 mm or smaller diameters. (DS18DSAL) For 24 mm or smaller diameters. (DS14DSAL) For 18 mm or smaller diameters. (DS14DSAL) For drilling with a metal working drill bit. This, however, is locked, immediately turn the power ...
CAUTION ⅷ While operating the cordless driver drill, take care not to normal when the battery warms up. If the motor is locked for a while, the motor or battery will be tightened are used in the weakened tightening torque and reduced amount of work. For 8 mm or...smaller nominal diameter screws. For 45 mm or smaller diameters. (DS18DSAL) For 38 mm or smaller diameters. (DS18DSAL) For 24 mm or smaller diameters. (DS14DSAL) For 18 mm or smaller diameters. (DS14DSAL) For drilling with a metal working drill bit. This, however, is locked, immediately turn the power ...

Instruction Manual
Page 59
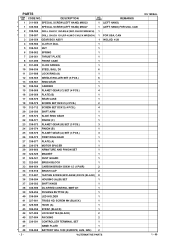
... NAME PLATE 48-1 BATTERY (BSL1415X) 48-2 BATTERY (BSL1815X) 501 CHARGER (MODEL UC18YGSL) 502 CASE 503 + DRIVER BIT NO. 2 65L 504 BATTERY COVER Q'TY 1 1 2 2 1 1 2 2 1 1 1 1 59 Item No. Part Name Q'TY 1 SPECIAL SCREW (LEFT HAND) M6 × 27 1 2 DRILL CHUCK 1 3 GEAR BOX ASS'Y 1 4 CLUTCH DIAL 1 5 NUT 1 6 SPRING 1 7 THRUST PLATE 1 8 FRONT CASE 1 9 CLICK SPRING 1 10...
... NAME PLATE 48-1 BATTERY (BSL1415X) 48-2 BATTERY (BSL1815X) 501 CHARGER (MODEL UC18YGSL) 502 CASE 503 + DRIVER BIT NO. 2 65L 504 BATTERY COVER Q'TY 1 1 2 2 1 1 2 2 1 1 1 1 59 Item No. Part Name Q'TY 1 SPECIAL SCREW (LEFT HAND) M6 × 27 1 2 DRILL CHUCK 1 3 GEAR BOX ASS'Y 1 4 CLUTCH DIAL 1 5 NUT 1 6 SPRING 1 7 THRUST PLATE 1 8 FRONT CASE 1 9 CLICK SPRING 1 10...
Parts List
Page 2
... 18DSAL 1 - 09 CODE NO. USED REMARKS 1 (LEFT HAND) * 1 330-588 SPECIAL SCREW (LEFT HAND) M6X27 1 (LEFT HAND) FOR USA, CAN * 2 330-586 DRILL CHUCK 13VLRQ-N (W/O CHUCK WRENCH) 1 * 2 330-587 DRILL CHUCK 13VLRP-N (W/O CHUCK WRENCH) 1 FOR USA, CAN 3 330-559 GEAR BOX ASS'Y 1 INCLUD. 4-28 4 330-582 CLUTCH DIAL 1 5 330-563 NUT 1 6 330...
... 18DSAL 1 - 09 CODE NO. USED REMARKS 1 (LEFT HAND) * 1 330-588 SPECIAL SCREW (LEFT HAND) M6X27 1 (LEFT HAND) FOR USA, CAN * 2 330-586 DRILL CHUCK 13VLRQ-N (W/O CHUCK WRENCH) 1 * 2 330-587 DRILL CHUCK 13VLRP-N (W/O CHUCK WRENCH) 1 FOR USA, CAN 3 330-559 GEAR BOX ASS'Y 1 INCLUD. 4-28 4 330-582 CLUTCH DIAL 1 5 330-563 NUT 1 6 330...


