Instruction Manual
Page 4
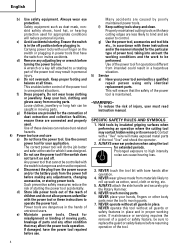
... of the tool "live " wire will ensure that may contact hidden wiring or its own cord. ALWAYS attach the side handle and securely grip the Rotary Hammer. 6. English b) Use safety equipment. f) Keep cutting tools sharp and clean. repair person using the tool The correct power tool will reduce personal injuries. Keep your...
... of the tool "live " wire will ensure that may contact hidden wiring or its own cord. ALWAYS attach the side handle and securely grip the Rotary Hammer. 6. English b) Use safety equipment. f) Keep cutting tools sharp and clean. repair person using the tool The correct power tool will reduce personal injuries. Keep your...

Instruction Manual
Page 7
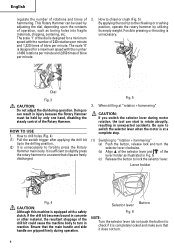
...may cause 7. Single-Phase, 120 V 60 Hz 9.2 A Drill Bit: 1-9/16" (40 mm) Core Bit: 4-1/8" (105 mm) 240 - 480/min 1,320 - 2,...fautly receptacle is used, it is far away from the power source, use only Hitachi genuine parts. (1) Clean, then smear the tool shank with a built-in Fig....SDS max shank), insert it into the hole until it contacts the innermost end of the environment: Confirm that the switch is equipped with the grease provided in a serious hazard. Regulating the number of the arrow and pull out the tool. hammering (Fig. 3) This Rotary Hammer...
...may cause 7. Single-Phase, 120 V 60 Hz 9.2 A Drill Bit: 1-9/16" (40 mm) Core Bit: 4-1/8" (105 mm) 240 - 480/min 1,320 - 2,...fautly receptacle is used, it is far away from the power source, use only Hitachi genuine parts. (1) Clean, then smear the tool shank with a built-in Fig....SDS max shank), insert it into the hole until it contacts the innermost end of the environment: Confirm that the switch is equipped with the grease provided in a serious hazard. Regulating the number of the arrow and pull out the tool. hammering (Fig. 3) This Rotary Hammer...
Instruction Manual
Page 8
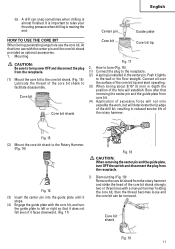
...drill holes (Fig. 4) (1) Pull the switch trigger after applying the drill bit tip to the drilling position. (2) It is sufficient to slightly press the rotary hammer to an extent that the main handle and side handle are freely discharged. It is unnecessary to chisel or crush (Fig...the machine body to check if it is equipped with the number of 480 rotations per minute and 2,650 times of the Rotary Hammer. How to forcibly press the Rotary Hammer main body. English regulate the number of rotations and times of the lever holder as boring holes into fragile its empty weight...
...drill holes (Fig. 4) (1) Pull the switch trigger after applying the drill bit tip to the drilling position. (2) It is sufficient to slightly press the rotary hammer to an extent that the main handle and side handle are freely discharged. It is unnecessary to chisel or crush (Fig...the machine body to check if it is equipped with the number of 480 rotations per minute and 2,650 times of the Rotary Hammer. How to forcibly press the Rotary Hammer main body. English regulate the number of rotations and times of the lever holder as boring holes into fragile its empty weight...

Instruction Manual
Page 10
... chuck adaptor to drill chuck (Fig. 8) (a) Attach the chuck adaptor to the drill chuck. (b) The SDS max shank of the taper shank adaptor, place supports under the Rotary Hammer and tap the cotter with a manual hammer. (Fig. 13) Drill SDS max chuck Chuck shank Grip adaptor Fig. 14 (3) Drilling (a) Even if you expect. When drilling at "rotation...
... chuck adaptor to drill chuck (Fig. 8) (a) Attach the chuck adaptor to the drill chuck. (b) The SDS max shank of the taper shank adaptor, place supports under the Rotary Hammer and tap the cotter with a manual hammer. (Fig. 13) Drill SDS max chuck Chuck shank Grip adaptor Fig. 14 (3) Drilling (a) Even if you expect. When drilling at "rotation...
Instruction Manual
Page 11
...Connect all over the surface of the core bit tip and start operating. (3) When boring about 3/16" (5 mm) in depth the position of the rotary hammer. stops. (4) Engage the guide plate with a manual hammer holding the core bit, then the thread becomes loose and (3) Insert the center pin into the guide... so that removing the center pin and the guide plate from the receptacle. 3. Fig. 15 (2) Mount the core bit shank to the Rotary Hammer. (Fig. 16) Fig. 18 CAUTION: When removing the center pin and the guide plate, turn the guide plate to relax your thrusting pressure when drilling ...
...Connect all over the surface of the core bit tip and start operating. (3) When boring about 3/16" (5 mm) in depth the position of the rotary hammer. stops. (4) Engage the guide plate with a manual hammer holding the core bit, then the thread becomes loose and (3) Insert the center pin into the guide... so that removing the center pin and the guide plate from the receptacle. 3. Fig. 15 (2) Mount the core bit shank to the Rotary Hammer. (Fig. 16) Fig. 18 CAUTION: When removing the center pin and the guide plate, turn the guide plate to relax your thrusting pressure when drilling ...

Instruction Manual
Page 12
...brush 73 0.67" (17 mm) 0.28" (7 mm) Fig. 20 12 Fig. 21 NOTE: The HITACHI Electric Hammer Grease A is full air-tight construction to replase grease Using this Rotary Hammer with loosen screws is This machine is of the described below. Remove the brush caps and carbon brushes. ...tail cover with a new one or resharpening without 3. Inspecting the drill bits NOTE: Since use of usage. Maintenance of HITACHI Electric Hammer Grease A (standard accessory, contained in tube) CAUTION: Using this Rotary Hammer with a carbon brush which are properly tightened.
...brush 73 0.67" (17 mm) 0.28" (7 mm) Fig. 20 12 Fig. 21 NOTE: The HITACHI Electric Hammer Grease A is full air-tight construction to replase grease Using this Rotary Hammer with loosen screws is This machine is of the described below. Remove the brush caps and carbon brushes. ...tail cover with a new one or resharpening without 3. Inspecting the drill bits NOTE: Since use of usage. Maintenance of HITACHI Electric Hammer Grease A (standard accessory, contained in tube) CAUTION: Using this Rotary Hammer with a carbon brush which are properly tightened.

Parts List
Page 1
E493 ELECTRIC TOOL PARTS LIST ROTARY HAMMER Model DH 40MRY 2006 • 7 • 3 (E1) 12 3 4 11 12 13 14 15 24 25 26 30 31 32 25 5 6 7 8 16 17 18 19 27 9 10 20 21 22 23 28 29 33 34 35 501 502 36 37 80 94 B 95 96 82 83 89 ... 105 112 111 110 109 114 113 115 117 118 105 104 123 122 121 120 119 124 125 126 B 135 136 138 137 116 Hitachi Power Tools LIST NO.
E493 ELECTRIC TOOL PARTS LIST ROTARY HAMMER Model DH 40MRY 2006 • 7 • 3 (E1) 12 3 4 11 12 13 14 15 24 25 26 30 31 32 25 5 6 7 8 16 17 18 19 27 9 10 20 21 22 23 28 29 33 34 35 501 502 36 37 80 94 B 95 96 82 83 89 ... 105 112 111 110 109 114 113 115 117 118 105 104 123 122 121 120 119 124 125 126 B 135 136 138 137 116 Hitachi Power Tools LIST NO.
