

User Manual
Page 1
... symbols are the property of their respective owners. 1 CAUTION This symbol indicates information that may appear in this symbol. NOTE • The information in this projector. After reading, store them in personal injury or even death due to the pages written following this manual...
... symbols are the property of their respective owners. 1 CAUTION This symbol indicates information that may appear in this symbol. NOTE • The information in this projector. After reading, store them in personal injury or even death due to the pages written following this manual...

User Manual
Page 2
... menu 30 Aspect, Over scan, V. phase, H. position, H. Contents Contents About this manual 1 EASY MENU 25 Contents 2 Projector features 3 Aspect, Zoom, Keystone, Mode, Bright, Contrast, Color, Tint, Sharpness, Whisper, Mirror, Reset, About contents of package . . 3 ...Filter time, Language, Part names 4 Go to advanced menu Projector 4 PICTURE menu 27 Controls 5 Bright, Contrast, Gamma, Color temp, Remote control 5 Color, Tint, Sharpness, Progressive, Preparations 6 Fastening the...
... menu 30 Aspect, Over scan, V. phase, H. position, H. Contents Contents About this manual 1 EASY MENU 25 Contents 2 Projector features 3 Aspect, Zoom, Keystone, Mode, Bright, Contrast, Color, Tint, Sharpness, Whisper, Mirror, Reset, About contents of package . . 3 ...Filter time, Language, Part names 4 Go to advanced menu Projector 4 PICTURE menu 27 Controls 5 Bright, Contrast, Gamma, Color temp, Remote control 5 Color, Tint, Sharpness, Progressive, Preparations 6 Fastening the...
User Manual
Page 3
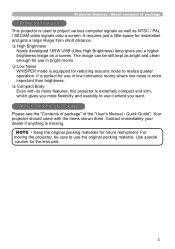
... High Brightness) lamp gives you more flexibility and usability to realize quieter operation. Quick Guide". Your projector should come with its many features, this projector is used to use the original packing material. NOTE • Keep the original packing materials for the lens.... 3 About contents of package Please see the "Contents of package" of package Projector features This projector is extremely compact and slim, which gives you a higher brightness image on a screen. For moving the projector, be still kept as NTSC / PAL / SECAM video signals onto a screen....
... High Brightness) lamp gives you more flexibility and usability to realize quieter operation. Quick Guide". Your projector should come with its many features, this projector is used to use the original packing material. NOTE • Keep the original packing materials for the lens.... 3 About contents of package Please see the "Contents of package" of package Projector features This projector is extremely compact and slim, which gives you a higher brightness image on a screen. For moving the projector, be still kept as NTSC / PAL / SECAM video signals onto a screen....
User Manual
Page 4
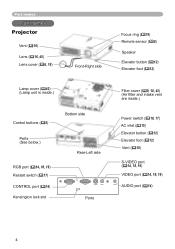
Part names Part names Projector Vent (10) Lens (16, 45) Lens cover (6, 16) Front-Right side Focus ring (19) Remote sensor (8) Speaker Elevator button (...
Part names Part names Projector Vent (10) Lens (16, 45) Lens cover (6, 16) Front-Right side Focus ring (19) Remote sensor (8) Speaker Elevator button (...
User Manual
Page 6
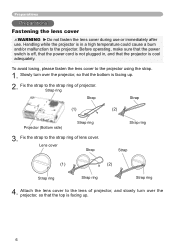
... lens cover during use or immediately after use. Fix the strap to the strap ring of lens cover. Attach the lens cover to the projector. Handling while the projector is facing up . 2. Before operating, make sure that the power switch is off, that the power cord is not plugged in a high temperature... could cause a burn and/or malfunction to the lens of projector, and slowly turn over the projector, so that the top is in , and that the bottom is cool adequately. To avoid losing, please fasten the lens cover to...
... lens cover during use or immediately after use. Fix the strap to the strap ring of lens cover. Attach the lens cover to the projector. Handling while the projector is facing up . 2. Before operating, make sure that the power switch is off, that the power cord is not plugged in a high temperature... could cause a burn and/or malfunction to the lens of projector, and slowly turn over the projector, so that the top is in , and that the bottom is cool adequately. To avoid losing, please fasten the lens cover to...

User Manual
Page 8
...;cult to send a remote signal to the sensor directly, please try. • Since the remote control uses infrared light to send signals to the projector (Class1 LED), be using the remote control for an extended period. • Replace the batteries whenever the remote control starts to the...'s output signal to malfunction. • When strong lights such as direct sunlight or light from an extremely close range (such as from directly hitting the projector's remote sensor. If it on wet objects. • Remove the batteries from the remote control and store them in a safe place if you won't ...
...;cult to send a remote signal to the sensor directly, please try. • Since the remote control uses infrared light to send signals to the projector (Class1 LED), be using the remote control for an extended period. • Replace the batteries whenever the remote control starts to the...'s output signal to malfunction. • When strong lights such as direct sunlight or light from an extremely close range (such as from directly hitting the projector's remote sensor. If it on wet objects. • Remove the batteries from the remote control and store them in a safe place if you won't ...
User Manual
Page 9
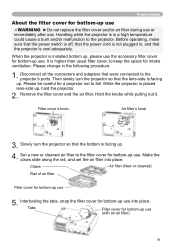
... a new or cleaned air filter to the projector's ports. Hold the knobs while pulling out it. Handling while the projector is higher than usual filter cover, to keep the space for a projector not to the projector. Slowly turn the projector so that were connected to the filter cover for...64257;lter's knob 3. Before operating, make sure that the power switch is off, that the power cord is placed lens-side up, hold the projector. 2. Preparations About the filter cover for bottom-up use WARNING ►Do not replace the filter cover and/or air fi...
... a new or cleaned air filter to the projector's ports. Hold the knobs while pulling out it. Handling while the projector is higher than usual filter cover, to keep the space for a projector not to the projector. Slowly turn the projector so that were connected to the filter cover for...64257;lter's knob 3. Before operating, make sure that the power switch is off, that the power cord is placed lens-side up, hold the projector. 2. Preparations About the filter cover for bottom-up use WARNING ►Do not replace the filter cover and/or air fi...
User Manual
Page 10
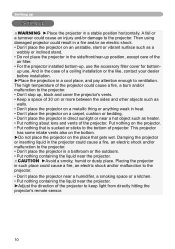
.../front/rear-up position, except care of the projector could result in a cool place, and pay attention enough to the projector. Then using damaged projector could cause a fire, a burn and/or malfunction to the projector. • Don't place the projector near a humidifier, a smoking space ...in a fire and/or an electric shock. • Don't place the projector on the projector. • Put nothing containing the liquid near the projector. Placing the projector in the case of the projector. Setting up Setting up , use . And in such place could cause an injury...
.../front/rear-up position, except care of the projector could result in a cool place, and pay attention enough to the projector. Then using damaged projector could cause a fire, a burn and/or malfunction to the projector. • Don't place the projector near a humidifier, a smoking space ...in a fire and/or an electric shock. • Don't place the projector on the projector. • Put nothing containing the liquid near the projector. Placing the projector in the case of the projector. Setting up Setting up , use . And in such place could cause an injury...
User Manual
Page 12
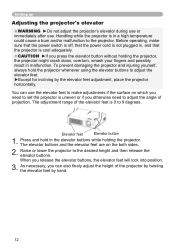
... surface on the both sides. 2. The adjustment range of the projector by twisting the elevator feet by the elevator feet adjustment, place the projector horizontally. Handling while the projector is in , and that the projector is cool adequately. Elevator feet Elevator button 1. As necessary, you... release the elevator buttons, the elevator feet will lock into position. 3. Setting up Adjusting the projector's elevator WARNING ►Do not adjust the projector's elevator during use or immediately after use the elevator feet to make sure that the power switch is off...
... surface on the both sides. 2. The adjustment range of the projector by twisting the elevator feet by the elevator feet adjustment, place the projector horizontally. Handling while the projector is in , and that the projector is cool adequately. Elevator feet Elevator button 1. As necessary, you... release the elevator buttons, the elevator feet will lock into position. 3. Setting up Adjusting the projector's elevator WARNING ►Do not adjust the projector's elevator during use or immediately after use the elevator feet to make sure that the power switch is off...

User Manual
Page 13
... use other CRT or LCD monitors to the correct port. Then the resolution will not be used with your dealer for details. This projector is compatible with this case, you connect devices to change the resolution. Use of some time and may take advantage of the corresponding ... off all devices prior to connecting them to simultaneous LCD and CRT display). NOTE • Whenever attempting to connect a laptop computer to the projector, be achieved by connecting the accessory RGB cable to computers that are VESA DDC (display data channel) compatible. • Please take some of...
... use other CRT or LCD monitors to the correct port. Then the resolution will not be used with your dealer for details. This projector is compatible with this case, you connect devices to change the resolution. Use of some time and may take advantage of the corresponding ... off all devices prior to connecting them to simultaneous LCD and CRT display). NOTE • Whenever attempting to connect a laptop computer to the projector, be achieved by connecting the accessory RGB cable to computers that are VESA DDC (display data channel) compatible. • Please take some of...

User Manual
Page 15
...that came with the power cord's specified voltage range. • Never modify the power cord. Power switch AC inlet Connector of the projector. 2. Setting up Connecting power supply WARNING ►Please use extra caution when connecting the power cord as incorrect or faulty connections may result in ...fire and/or electrical shock. • Only use with the projector. Never attempt to newly get correct one. • Only plug the power cord into the outlet. 15 Firmly plug the power cord's plug ...
...that came with the power cord's specified voltage range. • Never modify the power cord. Power switch AC inlet Connector of the projector. 2. Setting up Connecting power supply WARNING ►Please use extra caution when connecting the power cord as incorrect or faulty connections may result in ...fire and/or electrical shock. • Only use with the projector. Never attempt to newly get correct one. • Only plug the power cord into the outlet. 15 Firmly plug the power cord's plug ...
User Manual
Page 16
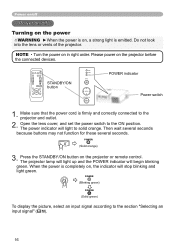
...(Blinking green) POWER (Solid green) To display the picture, select an input signal according to the projector and outlet. 2. Power on/off Power on/off Turning on the power WARNING ►When the power is on the... projector before the connected devices. Make sure that the power cord is completely on, the indicator will light... and light green. Press the STANDBY/ON button on in right order. The projector lamp will light up and the POWER indicator will begin blinking green. NOTE • Turn the power on the...
...(Blinking green) POWER (Solid green) To display the picture, select an input signal according to the projector and outlet. 2. Power on/off Power on/off Turning on the power WARNING ►When the power is on the... projector before the connected devices. Make sure that the power cord is completely on, the indicator will light... and light green. Press the STANDBY/ON button on in right order. The projector lamp will light up and the POWER indicator will begin blinking green. NOTE • Turn the power on the...

User Manual
Page 17
... the connected devices. • Except for prolonged periods of the following "Turning off the power. Press the STANDBY/ON button on the projector or remote control again while the message is controlled by using a pin or similar. Power off . Close the lens cover. In such a ...even for approximately 5 seconds. Neglect causes a damage of the electrode and un-lighting of the lamp. • This Projector is visible. Press the STANDBY/ON button on the projector or remote control. Make sure that the power indicator lights to solid orange, set the power switch to be used ...
... the connected devices. • Except for prolonged periods of the following "Turning off the power. Press the STANDBY/ON button on the projector or remote control again while the message is controlled by using a pin or similar. Power off . Close the lens cover. In such a ...even for approximately 5 seconds. Neglect causes a damage of the electrode and un-lighting of the lamp. • This Projector is visible. Press the STANDBY/ON button on the projector or remote control. Make sure that the power indicator lights to solid orange, set the power switch to be used ...
User Manual
Page 18
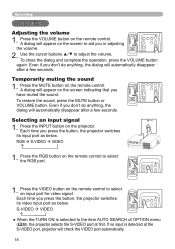
...OFF FREEZE VOLUME MUTE KEYSTONE POSITION - Press the VIDEO button on the projector. Each time you press the button, the projector switches its video input port as below . Each time you press the button, the projector switches its input port as below . Press the RGB button on ...the remote control. ZOOM + (38), the projector selects the S-VIDEO port at POSITION the MENU S-VIDEO port, projector will appear on the remote control. Press the MUTE button on the remote control to select an input port...
...OFF FREEZE VOLUME MUTE KEYSTONE POSITION - Press the VIDEO button on the projector. Each time you press the button, the projector switches its video input port as below . Each time you press the button, the projector switches its input port as below . Press the RGB button on ...the remote control. ZOOM + (38), the projector selects the S-VIDEO port at POSITION the MENU S-VIDEO port, projector will appear on the remote control. Press the MUTE button on the remote control to select an input port...

User Manual
Page 19
... remote control. RGB S-VIDEO VIDEO Operating STANDBY/ON VIDEO RGB SEARCH ASPECT AUTO BLANK VIDEO RGB SEARCH MAGNIFY HOME PAGE UP VOLUME ASPECTON AUTO BLANK END MAGNIFY OFF ON FREEZE OFF PAGE DOWN MUTE VOLUME KEYSTONE MUTE FREEZE POSITION POSITION KEYSTONE - Each ... you in turn. At a RGB signal NORMAL 4:3 16:9 At a video signal /no signal is found , the projector will appear on the remote control. button on the remote control. ZOOM + MENU ESC ENTER RESET Adjusting the focus 1. If no signal 4:3 16:9 ...
... remote control. RGB S-VIDEO VIDEO Operating STANDBY/ON VIDEO RGB SEARCH ASPECT AUTO BLANK VIDEO RGB SEARCH MAGNIFY HOME PAGE UP VOLUME ASPECTON AUTO BLANK END MAGNIFY OFF ON FREEZE OFF PAGE DOWN MUTE VOLUME KEYSTONE MUTE FREEZE POSITION POSITION KEYSTONE - Each ... you in turn. At a RGB signal NORMAL 4:3 16:9 At a video signal /no signal is found , the projector will appear on the remote control. button on the remote control. ZOOM + MENU ESC ENTER RESET Adjusting the focus 1. If no signal 4:3 16:9 ...
User Manual
Page 21
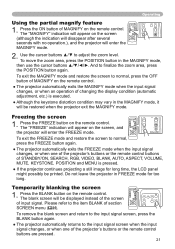
... BLANK VOLUME MUTE KEYSTONE - VIDEO RGB SEARCH ASPECT AUTO BLANK MAGNIFY ON OFF FREEZE VOLUME MUTE KEYSTONE POSITION - Do not leave the projector in the MAGNIFY mode, then use the cursor buttons And to adjust the zoom level. POSITION - Temporarily blanking the screen 1. Please ...keystone distortion condition may vary in the MAGNIFY mode, it will be printed. The "MAGNIFY" indication will appear on the screen, and the projector will enter the MAGNIFY mode. Use the cursor buttons ▲/▼ to finalize the zoom area, press the POSITION button again....
... BLANK VOLUME MUTE KEYSTONE - VIDEO RGB SEARCH ASPECT AUTO BLANK MAGNIFY ON OFF FREEZE VOLUME MUTE KEYSTONE POSITION - Do not leave the projector in the MAGNIFY mode, then use the cursor buttons And to adjust the zoom level. POSITION - Temporarily blanking the screen 1. Please ...keystone distortion condition may vary in the MAGNIFY mode, it will be printed. The "MAGNIFY" indication will appear on the screen, and the projector will enter the MAGNIFY mode. Use the cursor buttons ▲/▼ to finalize the zoom area, press the POSITION button again....

User Manual
Page 22
... SEARCH - To display a menu Press the MENU button on the remote control or one of choices on the projector. VIDEO RGB SEARCH ASPECT AUTO BLANK Using the menu function MAGNIFY VOLUME ON This projector has the following menus: PICTURE, IMAGE, INPUT, SETUP, SCREEN, OPOTFFION and EAMUSTE Y MENU. ZOOM + MENU button INPUT ASPECT...
... SEARCH - To display a menu Press the MENU button on the remote control or one of choices on the projector. VIDEO RGB SEARCH ASPECT AUTO BLANK Using the menu function MAGNIFY VOLUME ON This projector has the following menus: PICTURE, IMAGE, INPUT, SETUP, SCREEN, OPOTFFION and EAMUSTE Y MENU. ZOOM + MENU button INPUT ASPECT...

User Manual
Page 25
... mode for the MODE is "CUSTOM". See the item COLOR of GAMMA and COLOR TEMP differs from pre-assigned modes above, the display on the projector or remote control. See the item ZOOM of COLOR TEMP (28). Then perform it referring to the projected source. Multifunctional settings EASY MENU With...
... mode for the MODE is "CUSTOM". See the item COLOR of GAMMA and COLOR TEMP differs from pre-assigned modes above, the display on the projector or remote control. See the item ZOOM of COLOR TEMP (28). Then perform it referring to the projected source. Multifunctional settings EASY MENU With...
User Manual
Page 27
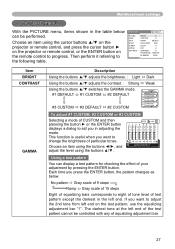
...;. Choose an item using the buttons ◄/►, and adjust the level using the cursor buttons ▲/▼ on the projector or remote control, and press the cursor button ► on the projector or remote control, or the ENTER button on the test pattern, use the equalizing adjustment bar "1". ENTER : 1 23 4 56...
...;. Choose an item using the buttons ◄/►, and adjust the level using the cursor buttons ▲/▼ on the projector or remote control, and press the cursor button ► on the projector or remote control, or the ENTER button on the test pattern, use the equalizing adjustment bar "1". ENTER : 1 23 4 56...

User Manual
Page 29
...-Down system) But these may lose the crisp. LOAD1 LOAD2 LOAD3 LOAD4 MY MEMORY SAVE4 SAVE3 SAVE2 SAVE1 This projector has 4 numbered memories for example, jagged line) of the picture at an interlaced signal of a VIDEO input, a S-VIDEO input or a component video input of MY...
...-Down system) But these may lose the crisp. LOAD1 LOAD2 LOAD3 LOAD4 MY MEMORY SAVE4 SAVE3 SAVE2 SAVE1 This projector has 4 numbered memories for example, jagged line) of the picture at an interlaced signal of a VIDEO input, a S-VIDEO input or a component video input of MY...


