
User Manual
Page 2
... up 6 Arrangement 7 Adjusting the projector's elevator . . 8 About the filter cover for bottom-up , MyScreen, Power on/off 16 MyScreen lock, Message Turning on the power 16 OPTION Menu 36 Turning off the power 16 Auto search, Auto off, Lamp time, Operating 17 Filter time,...ratio 18 Troubleshooting 42 Adjusting the zoom and focus . . . . 18 Related messages 42 Using the automatic adjustment feature . 19 Regarding the indicator lamps. . . . 44 Adjusting the position 19 Phenomena that may easily be Correcting the keystone distortions 20 mistaken for machine defects . . . . ...
... up 6 Arrangement 7 Adjusting the projector's elevator . . 8 About the filter cover for bottom-up , MyScreen, Power on/off 16 MyScreen lock, Message Turning on the power 16 OPTION Menu 36 Turning off the power 16 Auto search, Auto off, Lamp time, Operating 17 Filter time,...ratio 18 Troubleshooting 42 Adjusting the zoom and focus . . . . 18 Related messages 42 Using the automatic adjustment feature . 19 Regarding the indicator lamps. . . . 44 Adjusting the position 19 Phenomena that may easily be Correcting the keystone distortions 20 mistaken for machine defects . . . . ...
User Manual
Page 3
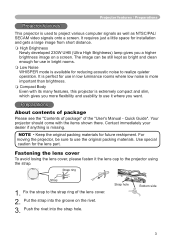
... just a little space for installation and gets a large image from short distance. High Brightness Newly developed 230W UHB (Ultra High Brightness) lamp gives you more flexibility and usability to use in bright rooms. Low Noise WHISPER mode is available for reducing acoustic noise to realize... quieter operation. It is perfect for use it the lens cap to the projector using the strap. Fix the strap to the strap ring of the "User's Manual - Put the strap into the strap hole. Strap hole...
... just a little space for installation and gets a large image from short distance. High Brightness Newly developed 230W UHB (Ultra High Brightness) lamp gives you more flexibility and usability to use in bright rooms. Low Noise WHISPER mode is available for reducing acoustic noise to realize... quieter operation. It is perfect for use it the lens cap to the projector using the strap. Fix the strap to the strap ring of the "User's Manual - Put the strap into the strap hole. Strap hole...
User Manual
Page 4
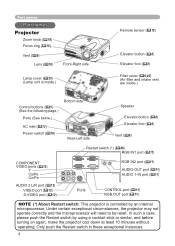
...Only push the Restart switch in these exceptional instances. 4 Under certain exceptional circumstances, the projector may not operate correctly and the microprocessor will need to be reset. Part names Part names Projector Zoom knob (18) Focus ring (18) Vent (6) Lens (...16) Front-Right side Lamp cover (39) (Lamp unit is inside.) Remote sensor (15) Elevator button (8) Elevator...
...Only push the Restart switch in these exceptional instances. 4 Under certain exceptional circumstances, the projector may not operate correctly and the microprocessor will need to be reset. Part names Part names Projector Zoom knob (18) Focus ring (18) Vent (6) Lens (...16) Front-Right side Lamp cover (39) (Lamp unit is inside.) Remote sensor (15) Elevator button (8) Elevator...
User Manual
Page 15
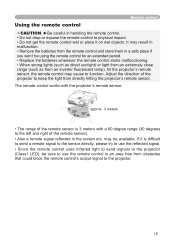
... not get the remote control wet or place it is 3 meters with the projector's remote sensor. 30º 30º approx. 3 meters • The range of the projector to keep the light from an inverter fluorescent lamp), hit the projector's remote sensor, the remote control may result in malfunction. • Remove the batteries...
... not get the remote control wet or place it is 3 meters with the projector's remote sensor. 30º 30º approx. 3 meters • The range of the projector to keep the light from an inverter fluorescent lamp), hit the projector's remote sensor, the remote control may result in malfunction. • Remove the batteries...
User Manual
Page 16
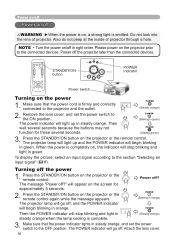
...rmly and correctly connected to the connected devices. The projector lamp will stop blinking and light in green. Power on/off Power on/off in right order. Press the STANDBY/ON button on the projector prior to the projector and the outlet. Make sure that the power ... because the buttons may not function for approximately 5 seconds. 2. will begin blinking in green) POWER (Steady green) 3. The projector lamp will go off the projector later than the connected devices. The POWER indicator will go off the power 1. POWER (Blinking in green. Do not look into...
...rmly and correctly connected to the connected devices. The projector lamp will stop blinking and light in green. Power on/off Power on/off in right order. Press the STANDBY/ON button on the projector prior to the projector and the outlet. Make sure that the power ... because the buttons may not function for approximately 5 seconds. 2. will begin blinking in green) POWER (Steady green) 3. The projector lamp will go off the projector later than the connected devices. The POWER indicator will go off the power 1. POWER (Blinking in green. Do not look into...
User Manual
Page 36
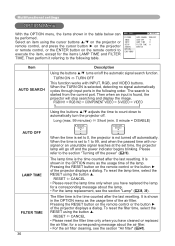
...ENABLE 1 AUTO OFF DISABLE 0 When the time is set time, the projector lamp will stop searching and display the image. Please refer to 0, the projector is shown in the OPTION menu as the usage time of the projector displays a dialog. It is not turned off . The search is the ...;lter time, select the RESET using the cursor buttons ▲/▼ on the projector or INPUT remote control, and press the cursor button ► on the projector SETUP SCREEN AUTO SEARCH TURN OFF AUTO OFF 0 LAMP TIME 0 FILTER TIME 0 SERVICE or remote control, or the ENTER button on...
...ENABLE 1 AUTO OFF DISABLE 0 When the time is set time, the projector lamp will stop searching and display the image. Please refer to 0, the projector is shown in the OPTION menu as the usage time of the projector displays a dialog. It is not turned off . The search is the ...;lter time, select the RESET using the cursor buttons ▲/▼ on the projector or INPUT remote control, and press the cursor button ► on the projector SETUP SCREEN AUTO SEARCH TURN OFF AUTO OFF 0 LAMP TIME 0 FILTER TIME 0 SERVICE or remote control, or the ENTER button on...

User Manual
Page 37
... a case, please choose DISABLE to disappear ghost. Adjust the selected element using the buttons ◄/►. 2. Note that the items LAMP TIME, FILTER TIME and LANGUAGE are locked. FILTER MESSAGE Use the ▲/▼ button to set by dust or others, the internal... temperature will rise, which could cause malfunction, or reduce the lifetime of menus will collectively return to the projector, environment around the projector, etc., the automatic adjustment may not work correctly. FACTORY RESET Selecting RESET using the buttons ▲/▼, and press ...
... a case, please choose DISABLE to disappear ghost. Adjust the selected element using the buttons ◄/►. 2. Note that the items LAMP TIME, FILTER TIME and LANGUAGE are locked. FILTER MESSAGE Use the ▲/▼ button to set by dust or others, the internal... temperature will rise, which could cause malfunction, or reduce the lifetime of menus will collectively return to the projector, environment around the projector, etc., the automatic adjustment may not work correctly. FACTORY RESET Selecting RESET using the buttons ▲/▼, and press ...
User Manual
Page 38
...cool sufficiently. Note that shards of glass could cause it to breathe the gas that the screws are electrical problems elsewhere besides the lamp. This is a cause of the projector, or cause injury during use old (used , it does), unplug the power cord from your eyes or mouth. Do not use...to burst during handling, so please do not put it in your local dealer. For lamp recycling, go to clean the projector or replace the lamp yourself. The lamp can cause burns, as well as possible. To replace the lamp, make a loud bang when it in accordance with a loud bang, or burn out...
...cool sufficiently. Note that shards of glass could cause it to breathe the gas that the screws are electrical problems elsewhere besides the lamp. This is a cause of the projector, or cause injury during use old (used , it does), unplug the power cord from your eyes or mouth. Do not use...to burst during handling, so please do not put it in your local dealer. For lamp recycling, go to clean the projector or replace the lamp yourself. The lamp can cause burns, as well as possible. To replace the lamp, make a loud bang when it in accordance with a loud bang, or burn out...

User Manual
Page 39
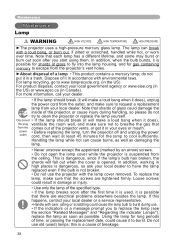
...Loosen the 2 screws (marked by the handles. 6. To prepare a new lamp, contact your dealer and tell the lamp type number = DT00691. After making sure that the projector has cooled adequately, slowly turn the projector so that the top is displayed, complete the following operation within 10 minutes of... switching power on the projector. Claws NOTE • When the lamp has been replaced after replacement) will result in the Center point of the lamp cover and remove the lamp cover. Turn the projector on the ceiling, or if the lamp has broken, also ask the dealer...
...Loosen the 2 screws (marked by the handles. 6. To prepare a new lamp, contact your dealer and tell the lamp type number = DT00691. After making sure that the projector has cooled adequately, slowly turn the projector so that the top is displayed, complete the following operation within 10 minutes of... switching power on the projector. Claws NOTE • When the lamp has been replaced after replacement) will result in the Center point of the lamp cover and remove the lamp cover. Turn the projector on the ceiling, or if the lamp has broken, also ask the dealer...
User Manual
Page 40
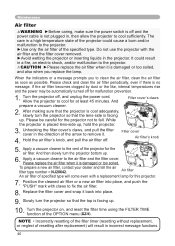
...air filter and the filter cover removed. ►Avoid wetting the projector or inserting liquids in the direction of resetting after replacement) will come even with a replacement lamp for the projector not to cool sufficiently. The care in a high temperature state of ...the projector could result in incorrect message functions. 40 Replace the filter cover and snap...
...air filter and the filter cover removed. ►Avoid wetting the projector or inserting liquids in the direction of resetting after replacement) will come even with a replacement lamp for the projector not to cool sufficiently. The care in a high temperature state of ...the projector could result in incorrect message functions. 40 Replace the filter cover and snap...
User Manual
Page 42
... be sure to reset the lamp timer(36). Please change within ** hours is displayed after the remedy, or if a message other than the following appears, please contact your projector or the signal source specs. 42 Please confirm the signal input connection, and the status of ...the signal source. If the same message is recommended. AFTER REPLACING LAMP, RESET THE LAMP TIMER. THE POWER WILL BE TURNED OFF 0 ...
... be sure to reset the lamp timer(36). Please change within ** hours is displayed after the remedy, or if a message other than the following appears, please contact your projector or the signal source specs. 42 Please confirm the signal input connection, and the status of ...the signal source. If the same message is recommended. AFTER REPLACING LAMP, RESET THE LAMP TIMER. THE POWER WILL BE TURNED OFF 0 ...
User Manual
Page 43
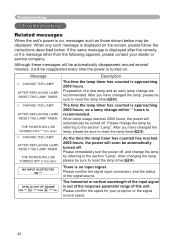
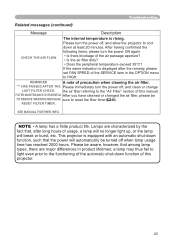
...fact that the power will break or burst, etc. the air filter referring to the "Air Filter" section of this projector. 43 NOTE • A lamp has a finite product life. Troubleshooting Related messages (continued) Message Description CHECK THE AIR FLOW The internal temperature is displayed ..., please turn the power off , and allow the projector to reset the filter timer(40). If the same indication is rising. This projector is equipped with an automatic shut-down at least 20 minutes. a lamp may thus fail to light even prior to the functioning...
...fact that the power will break or burst, etc. the air filter referring to the "Air Filter" section of this projector. 43 NOTE • A lamp has a finite product life. Troubleshooting Related messages (continued) Message Description CHECK THE AIR FLOW The internal temperature is displayed ..., please turn the power off , and allow the projector to reset the filter timer(40). If the same indication is rising. This projector is equipped with an automatic shut-down at least 20 minutes. a lamp may thus fail to light even prior to the functioning...
User Manual
Page 44
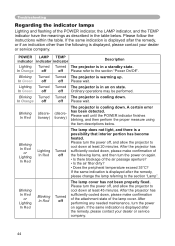
...properly fixed. If the same indication is in the table below . POWER LAMP TEMP indicator indicator indicator Description Lighting Turned Turned The projector is displayed after the remedy, please change the lamp referring to the section "Power On/Off". Please turn the power off Please wait.... down . Please follow the instructions within the table. Please turn the power off Please refer to the section "Lamp". In Green off off , and allow the projector to cool down , please make confirmation of the following is displayed after the remedy, please contact your...
...properly fixed. If the same indication is in the table below . POWER LAMP TEMP indicator indicator indicator Description Lighting Turned Turned The projector is displayed after the remedy, please change the lamp referring to the section "Power On/Off". Please turn the power off Please wait.... down . Please follow the instructions within the table. Please turn the power off Please refer to the section "Lamp". In Green off off , and allow the projector to cool down , please make confirmation of the following is displayed after the remedy, please contact your...

User Manual
Page 45
...filter dirty? • Does the peripheral temperature exceed 35°C? After the projector has sufficiently cooled down , please make confirmation of the attachment state of the lamp and lamp cover, and then turn the power on again. • Is there blockage of... to ON. Please immediately turn the power off , and allow the projector to cool down at least 45 minutes. If the same indication is not operating. Troubleshooting Regarding the indicator lamps (continued) POWER LAMP TEMP indicator indicator indicator Description Blinking In Red or Lighting In Red Turned...
...filter dirty? • Does the peripheral temperature exceed 35°C? After the projector has sufficiently cooled down , please make confirmation of the attachment state of the lamp and lamp cover, and then turn the power on again. • Is there blockage of... to ON. Please immediately turn the power off , and allow the projector to cool down at least 45 minutes. If the same indication is not operating. Troubleshooting Regarding the indicator lamps (continued) POWER LAMP TEMP indicator indicator indicator Description Blinking In Red or Lighting In Red Turned...
User Manual
Page 46
... cables are not correctly connected. Correctly connect the audio cables. Adjust the volume to a higher level using a cocktail stick or similar and the projector will restart. 3. After making sure that may be easy to be wrong. This operation sometimes resolves your dealer or service company. Some setting may... lamp cover, and then turn the power on the remote control. Either there is not set the AUDIO item in the OPTION menu (37) to reset all settings to [ | ] (On). Please turn off , and allow the projector to the on position. Correctly set to cool down , please ...
... cables are not correctly connected. Correctly connect the audio cables. Adjust the volume to a higher level using a cocktail stick or similar and the projector will restart. 3. After making sure that may be easy to be wrong. This operation sometimes resolves your dealer or service company. Some setting may... lamp cover, and then turn the power on the remote control. Either there is not set the AUDIO item in the OPTION menu (37) to reset all settings to [ | ] (On). Please turn off , and allow the projector to the on position. Correctly set to cool down , please ...

User Manual
Page 47
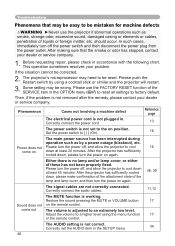
...machine defects (continued) Phenomenon Cases not involving a machine defect The lens cap is a unique characteristic of its product lifetime. The lamp is poor. Replace the lamp. 23, 25 23, 32 38, 39 Pictures appear blurry. Adjust BRIGHTNESS to AUTO, RGB, SMPTE240, REC709 or REC601. ...correctly adjusted. Color settings are not correctly connected. The lens is working . Remove the lens cap. The computer cannot detect the projector as a plug and play monitor. Troubleshooting Phenomena that the computer can detect a plug and play monitor using another plug and play ...
...machine defects (continued) Phenomenon Cases not involving a machine defect The lens cap is a unique characteristic of its product lifetime. The lamp is poor. Replace the lamp. 23, 25 23, 32 38, 39 Pictures appear blurry. Adjust BRIGHTNESS to AUTO, RGB, SMPTE240, REC709 or REC601. ...correctly adjusted. Color settings are not correctly connected. The lens is working . Remove the lens cap. The computer cannot detect the projector as a plug and play monitor. Troubleshooting Phenomena that the computer can detect a plug and play monitor using another plug and play ...

User Manual
Page 48
...name Liquid crystal projector Liquid Crystal panel Panel size Drive system Pixels CP-X444 : 2.0 cm (0.79 type) CP-X440 : 1.8 cm (0.7 type) TFT active matrix 786,432 pixels (1024 horizontal x 768 vertical) Lens CP-X444 : Zoom lens F=1.7 ~ 2.1 f=24.4 ~ 29.3 mm CP-X440 : Zoom lens F=1.7 ~ 1.9 f=21.8 ~ 26.2 mm Lamp 230W UHB ...and run through the suggested checks. If this does not resolve the problem, please contact your dealer. 48 Weight (mass) CP-X444 : 3.7 kg CP-X440 : 3.5 kg Ports RGB input: RGB IN1 ..D-sub 15pin mini x1 RGB IN2 ..D-sub 15pin mini x1 RGB output: RGB...
...name Liquid crystal projector Liquid Crystal panel Panel size Drive system Pixels CP-X444 : 2.0 cm (0.79 type) CP-X440 : 1.8 cm (0.7 type) TFT active matrix 786,432 pixels (1024 horizontal x 768 vertical) Lens CP-X444 : Zoom lens F=1.7 ~ 2.1 f=24.4 ~ 29.3 mm CP-X440 : Zoom lens F=1.7 ~ 1.9 f=21.8 ~ 26.2 mm Lamp 230W UHB ...and run through the suggested checks. If this does not resolve the problem, please contact your dealer. 48 Weight (mass) CP-X444 : 3.7 kg CP-X440 : 3.5 kg Ports RGB input: RGB IN1 ..D-sub 15pin mini x1 RGB IN2 ..D-sub 15pin mini x1 RGB output: RGB...


