
User Manual
Page 1
... unless any comments are accompanied, "the manuals" means all the documents provided with the projector. ENGLISH Projector CP-X2510Z/CP-X3010Z CP-X2011/CP-X2511/CP-X3011/CP-X3511 User's Manual (concise) Thank you for this product. Please read all 2 Entries and graphical symbols ... and cautions in the manuals or on the product. Contents First of package 4 Preparations 5 Loading batteries into the remote control..........5 Arrangement 6 Connecting your devices 7 Connecting power supply 8 Turning on the power 8 Adjusting the projector's elevator...........
... unless any comments are accompanied, "the manuals" means all the documents provided with the projector. ENGLISH Projector CP-X2510Z/CP-X3010Z CP-X2011/CP-X2511/CP-X3011/CP-X3511 User's Manual (concise) Thank you for this product. Please read all 2 Entries and graphical symbols ... and cautions in the manuals or on the product. Contents First of package 4 Preparations 5 Loading batteries into the remote control..........5 Arrangement 6 Connecting your devices 7 Connecting power supply 8 Turning on the power 8 Adjusting the projector's elevator...........

User Manual
Page 4
... more than 0.0005% Mercury or more than, 0.002% Cadmium, or more than 0.004% Lead. Be sure to dispose the equipment including any items are missing. (1) Remote control with this equipment, display the chemical symbol Hg, Cd, or Pb, then it means that all the items are included. If the batteries or accumulators...
... more than 0.0005% Mercury or more than, 0.002% Cadmium, or more than 0.004% Lead. Be sure to dispose the equipment including any items are missing. (1) Remote control with this equipment, display the chemical symbol Hg, Cd, or Pb, then it means that all the items are included. If the batteries or accumulators...
User Manual
Page 5
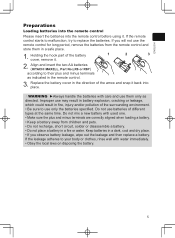
..., wipe out the leakage and then replace a battery. Replace the battery cover in the remote control. 3. Holding the hook part of different types at the same time. Align and insert the two AA batteries (HITACHI MAXELL, Part No.LR6 or R6P) according to their plus and minus terminals are correctly ...aligned when loading a battery. • Keep a battery away from the remote control and store them only as indicated in the direction of the ...
..., wipe out the leakage and then replace a battery. Replace the battery cover in the remote control. 3. Holding the hook part of different types at the same time. Align and insert the two AA batteries (HITACHI MAXELL, Part No.LR6 or R6P) according to their plus and minus terminals are correctly ...aligned when loading a battery. • Keep a battery away from the remote control and store them only as indicated in the direction of the ...
User Manual
Page 8
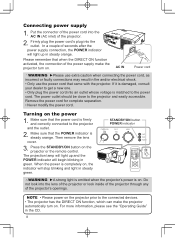
... projector through any of the projector's openings. NOTE • Please power on the projector prior to the power cord. Turning on the projector or the remote control. Press the STANDBY/ON button on the power 1. For more information, please see the "Operating Guide" in steady orange. Firmly plug the power cord's plug...
... projector through any of the projector's openings. NOTE • Please power on the projector prior to the power cord. Turning on the projector or the remote control. Press the STANDBY/ON button on the power 1. For more information, please see the "Operating Guide" in steady orange. Firmly plug the power cord's plug...
User Manual
Page 10
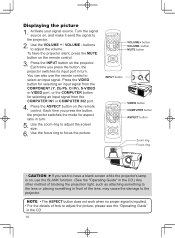
Press the INPUT button on the remote control. MY SOURCE/ VIDEO COMPUTER DOC.CAMERA ASPECT AUTO SEARCH BLANK MAGNIFY FREEZE PAGE VOLUME UP ON 㧗 DOWN OFF KEYSTONE...the COMPUTER IN1 or COMPUTER IN2 port. 4. NOTE • The ASPECT button does not work when no proper signal is on, use the remote control to adjust the volume. To have a blank screen while the projector's lamp is inputted. • For the details of how to the ... to the lens or placing something in the CD. 10 Displaying the picture 1. Turn the signal source on the remote control. 3.
Press the INPUT button on the remote control. MY SOURCE/ VIDEO COMPUTER DOC.CAMERA ASPECT AUTO SEARCH BLANK MAGNIFY FREEZE PAGE VOLUME UP ON 㧗 DOWN OFF KEYSTONE...the COMPUTER IN1 or COMPUTER IN2 port. 4. NOTE • The ASPECT button does not work when no proper signal is on, use the remote control to adjust the volume. To have a blank screen while the projector's lamp is inputted. • For the details of how to the ... to the lens or placing something in the CD. 10 Displaying the picture 1. Turn the signal source on the remote control. 3.
User Manual
Page 11
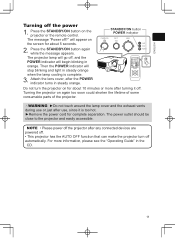
... appear on for complete separation. The message "Power off the power 1. The projector lamp will go off . Turning the projector on the projector or the remote control. WARNING ►Do not touch around the lamp cover and the exhaust vents during use or just after turning it is complete. 3. ENGLISH Turning off...
... appear on for complete separation. The message "Power off the power 1. The projector lamp will go off . Turning the projector on the projector or the remote control. WARNING ►Do not touch around the lamp cover and the exhaust vents during use or just after turning it is complete. 3. ENGLISH Turning off...

