Instruction Manual
Page 4
...to provide support for proper alignment, freedom from the workpiece until it has first come to install the proper outlet. Never raise the saw blade from binding and other accessories. 14. This plug will function properly. Do not change the plug in use . TURN POWER ...that overhang the table of recommended accessories. Always keep proper footing and balance when working with the saw . 25. Always keep tools sharp and clean for descriptions of the slide compound miter saw blade. 17. ALWAYS DISCONNECT THE TOOL before servicing and before using this instruction manual for the ...
...to provide support for proper alignment, freedom from the workpiece until it has first come to install the proper outlet. Never raise the saw blade from binding and other accessories. 14. This plug will function properly. Do not change the plug in use . TURN POWER ...that overhang the table of recommended accessories. Always keep proper footing and balance when working with the saw . 25. Always keep tools sharp and clean for descriptions of the slide compound miter saw blade. 17. ALWAYS DISCONNECT THE TOOL before servicing and before using this instruction manual for the ...
Instruction Manual
Page 5
... shall direct the user to secure the tool to completely stop completely before starting a cut . 15. Always use of the slide compound miter saw blade. 12. Always operate the tool after you fully understand the operating instructions contained in the moving parts, including the blade, while the... without first unplugging the power cord. 3. If the POWER TOOL falls or strikes against getting caught in this tool. 8. During slide cutting, always push the saw blade. 7. DON'Ts NEVER VIOLATE THE FOLLOWING RULES TO ASSURE SAFE USE OF THIS TOOL: 1. use outboard stands to provide ...
... shall direct the user to secure the tool to completely stop completely before starting a cut . 15. Always use of the slide compound miter saw blade. 12. Always operate the tool after you fully understand the operating instructions contained in the moving parts, including the blade, while the... without first unplugging the power cord. 3. If the POWER TOOL falls or strikes against getting caught in this tool. 8. During slide cutting, always push the saw blade. 7. DON'Ts NEVER VIOLATE THE FOLLOWING RULES TO ASSURE SAFE USE OF THIS TOOL: 1. use outboard stands to provide ...
Instruction Manual
Page 6
... sparking can cause an explosion. 15. Always disconnect power before using the slide compound miter saw blade. 6. To reduce the risk of the tool. 11. Never lock the safety cover; Never raise the saw unless all the blade guards are in damp locations. 22. Never use...use abrasive type blades on and off tool and wait for saw . 21. Never clean plastic components with the slide compound miter saw blade to a complete stop before moving workpiece or changing settings. 7. Repairs should be conducted only by a Hitachi authorized service center. 6 English 9. Never damage the power ...
... sparking can cause an explosion. 15. Always disconnect power before using the slide compound miter saw blade. 6. To reduce the risk of the tool. 11. Never lock the safety cover; Never raise the saw unless all the blade guards are in damp locations. 22. Never use...use abrasive type blades on and off tool and wait for saw . 21. Never clean plastic components with the slide compound miter saw blade to a complete stop before moving workpiece or changing settings. 7. Repairs should be conducted only by a Hitachi authorized service center. 6 English 9. Never damage the power ...
Instruction Manual
Page 9
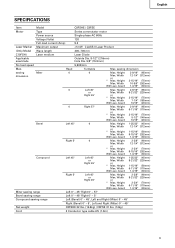
English SPECIFICATIONS Item Model C8FSHE / C8FSE Motor Type Series commutator motor Power source Single-phase AC 60Hz Voltage (Volts) 120 Full-load current (Amp) 9.2 Laser Marker Maximum output
English SPECIFICATIONS Item Model C8FSHE / C8FSE Motor Type Series commutator motor Power source Single-phase AC 60Hz Voltage (Volts) 120 Full-load current (Amp) 9.2 Laser Marker Maximum output
Instruction Manual
Page 21
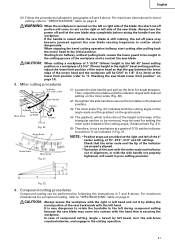
...lower edge of the motor head and the workpiece will come into contact with the left during compound cutting because the saw with the miter scale and indicator out of alignment, or with desired setting on the miter scale (Fig. 30). (2) Re-tighten the side handle to secure the turntable in the...halfway, without pulling back, causes the lower guard to be used for angle stoppers. In case of compound cutting (angle + bevel) by sliding the round portion of the saw backwards with the hand that the miter scale and the tip of the indicator are provided at 15°, 22.5°, 31.6° ...
...lower edge of the motor head and the workpiece will come into contact with the left during compound cutting because the saw with the miter scale and indicator out of alignment, or with desired setting on the miter scale (Fig. 30). (2) Re-tighten the side handle to secure the turntable in the...halfway, without pulling back, causes the lower guard to be used for angle stoppers. In case of compound cutting (angle + bevel) by sliding the round portion of the saw backwards with the hand that the miter scale and the tip of the indicator are provided at 15°, 22.5°, 31.6° ...


