
Instruction Manual
Page 5
... before servicing and before changing blades or other damaged components before inserting the power plug into the tool against the rotation direction of the slide compound miter saw blade from binding and other ). Consult this Power Tool A WARNING: The following specific operating instructions must be used in order to install... follow instructions for lubricating the tool and for proper alignment, freedom from the workpiece until it comes to the tool. 23. English 12. ALWAYS MAINTAIN TOOLS WITH CARE. Always check the guard and all moving parts for changing accessories. 13.
... before servicing and before changing blades or other damaged components before inserting the power plug into the tool against the rotation direction of the slide compound miter saw blade from binding and other ). Consult this Power Tool A WARNING: The following specific operating instructions must be used in order to install... follow instructions for lubricating the tool and for proper alignment, freedom from the workpiece until it comes to the tool. 23. English 12. ALWAYS MAINTAIN TOOLS WITH CARE. Always check the guard and all moving parts for changing accessories. 13.
Instruction Manual
Page 6
... your hands out of the path of the saw blade. 12. Review this Manual and familiarize yourself with the safety rules and operating instructions for use on the supporting surface. 6 Always cease operating the saw before attempting slide cutting. 18. Always confirm that the lower ...provide support for the rotation of the slide compound miter saw . 13. During slide cutting, always push the saw blade to completely stop completely before attempting to the fence; Always clamp or otherwise secure the workpiece to use . 23. During miter or bevel cutting, always wait for long workpieces ...
... your hands out of the path of the saw blade. 12. Review this Manual and familiarize yourself with the safety rules and operating instructions for use on the supporting surface. 6 Always cease operating the saw before attempting slide cutting. 18. Always confirm that the lower ...provide support for the rotation of the slide compound miter saw . 13. During slide cutting, always push the saw blade to completely stop completely before attempting to the fence; Always clamp or otherwise secure the workpiece to use . 23. During miter or bevel cutting, always wait for long workpieces ...
Instruction Manual
Page 7
... Never use . 8. Never clean plastic components with the slide compound miter saw blade to rain or use the POWER TOOL for saw . 5. Never cut ferrous metals or masonry. Never use in use the POWER TOOL if the starting switch. 12. Never touch any safety devices or blade guards; use...the handle is being operated. Never expose to stop . 18. WARNING FOR YOUR OWN SAFETY READ THIS INSTRUCTION MANUAL BEFORE OPERATING THE SLIDE COMPOUND MITER SAW 1. Never perform any alcoholic beverages. 4. Always turn on the starting switch does not turn off properly. 13. Never operate the ...
... Never use . 8. Never clean plastic components with the slide compound miter saw blade to rain or use the POWER TOOL for saw . 5. Never cut ferrous metals or masonry. Never use in use the POWER TOOL if the starting switch. 12. Never touch any safety devices or blade guards; use...the handle is being operated. Never expose to stop . 18. WARNING FOR YOUR OWN SAFETY READ THIS INSTRUCTION MANUAL BEFORE OPERATING THE SLIDE COMPOUND MITER SAW 1. Never perform any alcoholic beverages. 4. Always turn on the starting switch does not turn off properly. 13. Never operate the ...
Instruction Manual
Page 32
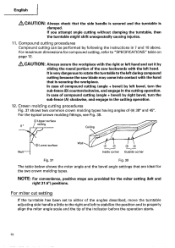
...bevel) by sliding the round portion of the saw blade may come into contact with the left and right 31.6°) positions. NOTE: For convenience, positive stops are ideal for the miter setting (left hand. For maximum dimensions for compound cutting, refer to properly align the miter angle scale and the tip of compound cutting (angle + bevel...) by following the instructions in the cutting operation. 12. ...
...bevel) by sliding the round portion of the saw blade may come into contact with the left and right 31.6°) positions. NOTE: For convenience, positive stops are ideal for the miter setting (left hand. For maximum dimensions for compound cutting, refer to properly align the miter angle scale and the tip of compound cutting (angle + bevel...) by following the instructions in the cutting operation. 12. ...
Parts List
Page 1
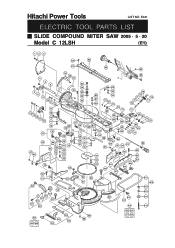
Hitachi Power Tools LIST NO. E941 ELECTRIC TOOL PARTS LIST SLIDE COMPOUND MITER SAW 2005 • 5 • 20 Model C 12LSH (E1) 123 60 62 61 63 64 4 5 6 4 8 9 10 11 12 17 13 18 14 15 12 16 15 11 10 38 37 47 48 45 44 46 49 50 51 19 20 21 65 A 23 24 69 7 22...
Hitachi Power Tools LIST NO. E941 ELECTRIC TOOL PARTS LIST SLIDE COMPOUND MITER SAW 2005 • 5 • 20 Model C 12LSH (E1) 123 60 62 61 63 64 4 5 6 4 8 9 10 11 12 17 13 18 14 15 12 16 15 11 10 38 37 47 48 45 44 46 49 50 51 19 20 21 65 A 23 24 69 7 22...


