
Owners Guide
Page 3
...of the video program material. 3 For lamp recycling and disposal information, go to call "1-800-HITACHI". Do not install near water. 6. et, or table specified by the manufacturer, or sold ... the grounding electrode. PUBLIC VIEWING OF COPYRIGHTED MATERIAL Public viewing of programs broadcast by TV stations and cable companies, as well as recommended by the man- ufacturer. 12.... of time. 14. Read these instructions. 3. Heed all servicing to comply with the cart, stand, tripod, brack- Follow all instructions. 5. Clean only with one wider than the other apparatus...
...of the video program material. 3 For lamp recycling and disposal information, go to call "1-800-HITACHI". Do not install near water. 6. et, or table specified by the manufacturer, or sold ... the grounding electrode. PUBLIC VIEWING OF COPYRIGHTED MATERIAL Public viewing of programs broadcast by TV stations and cable companies, as well as recommended by the man- ufacturer. 12.... of time. 14. Read these instructions. 3. Heed all servicing to comply with the cart, stand, tripod, brack- Follow all instructions. 5. Clean only with one wider than the other apparatus...

Owners Guide
Page 4
... cover. CAUTION: Danger of explosion if battery is capable of resulting in instability causing possible injury. 1. MENU EXIT FAV CH ANT POWER REMOTE CONTROL POWER TV DVD VCR CBL SOURCE WIZARD CD PVR STB AMP 1 2 3 4 5 6 7 8 9 SLEEP C.C. CAUTION: 1. Remote Control Unit CLU-5729TSI (Part No... VID3 SURF VID5 VID4 FREEZE PIP MODE PIP ACCESS SWAP DAY/NIGHT BATTERIES ("AA") IR MOUSE CABLE 3. This SPX50W LCD stand for use only with Hitachi 50VX500. Simple Remote Control Unit CLU-120S (Part No. Replace the cover. Two IR Mouse Cables (Part No. Insert ...
... cover. CAUTION: Danger of explosion if battery is capable of resulting in instability causing possible injury. 1. MENU EXIT FAV CH ANT POWER REMOTE CONTROL POWER TV DVD VCR CBL SOURCE WIZARD CD PVR STB AMP 1 2 3 4 5 6 7 8 9 SLEEP C.C. CAUTION: 1. Remote Control Unit CLU-5729TSI (Part No... VID3 SURF VID5 VID4 FREEZE PIP MODE PIP ACCESS SWAP DAY/NIGHT BATTERIES ("AA") IR MOUSE CABLE 3. This SPX50W LCD stand for use only with Hitachi 50VX500. Simple Remote Control Unit CLU-120S (Part No. Replace the cover. Two IR Mouse Cables (Part No. Insert ...

Owners Guide
Page 5
... or screens can be located in direct sunlight or near a heating appliance, etc. Picture brightness decreases as possible to the height of the HITACHI LCD Rear PTV is its best, test various locations in the room to find the optimum spot for example, in a different section of the...placement for best performance. FIRST TIME USE HOW TO SET UP YOUR NEW HITACHI LCD REAR PTV ANTENNA Unless your LCD Rear PTV is connected to a cable TV system or to a centralized antenna system, a good outdoor TV antenna is recommended for best performance. However, if you are common characteristics of...
... or screens can be located in direct sunlight or near a heating appliance, etc. Picture brightness decreases as possible to the height of the HITACHI LCD Rear PTV is its best, test various locations in the room to find the optimum spot for example, in a different section of the...placement for best performance. FIRST TIME USE HOW TO SET UP YOUR NEW HITACHI LCD REAR PTV ANTENNA Unless your LCD Rear PTV is connected to a cable TV system or to a centralized antenna system, a good outdoor TV antenna is recommended for best performance. However, if you are common characteristics of...

Owners Guide
Page 6
...output of your external component's remote control. If you have phono connectors. Below are connected Attach an optional antenna cable mixer to the TV antenna terminal, and connect the cables to the antenna mixer. disc players with DVI-HDTV output capability. "F" Type 75-Ohm Coaxial ...best performance, video cables should use 75-Ohm coaxial shielded wire. ANTENNA CONNECTIONS TO REAR JACK PANEL VHF (75-Ohm) antenna/CATV (Cable TV) When using the A/V Network feature. Plug the adapter into the antenna terminal on camcorders, VCRs and laser- S-Video (Super Video) Connector ...
...output of your external component's remote control. If you have phono connectors. Below are connected Attach an optional antenna cable mixer to the TV antenna terminal, and connect the cables to the antenna mixer. disc players with DVI-HDTV output capability. "F" Type 75-Ohm Coaxial ...best performance, video cables should use 75-Ohm coaxial shielded wire. ANTENNA CONNECTIONS TO REAR JACK PANEL VHF (75-Ohm) antenna/CATV (Cable TV) When using the A/V Network feature. Plug the adapter into the antenna terminal on camcorders, VCRs and laser- S-Video (Super Video) Connector ...
Owners Guide
Page 7
... will be displayed on your remote control. ቤ CHANNEL selector Press these buttons for your local source. However, if it possible to set when the TV is required. Secure Digital (SD) 2. Compact Flash I (CF I) Dazzle (DM-9000) 5. xD Picture Card Olympus (MAPC-10) Notes: Adapter is ...; ቤ ባቢ This button allows you have an INPUT button. NOTES: Your remote control does not have and acquire it was set TV features to view the digital still pictures (see page 33). Your selection is turned OFF at a volume level 31 or greater, the volume level...
... will be displayed on your remote control. ቤ CHANNEL selector Press these buttons for your local source. However, if it possible to set when the TV is required. Secure Digital (SD) 2. Compact Flash I (CF I) Dazzle (DM-9000) 5. xD Picture Card Olympus (MAPC-10) Notes: Adapter is ...; ቤ ባቢ This button allows you have an INPUT button. NOTES: Your remote control does not have and acquire it was set TV features to view the digital still pictures (see page 33). Your selection is turned OFF at a volume level 31 or greater, the volume level...

Owners Guide
Page 8
..., TEMP, and POWER LED are common characteristics of the memory card (see page 27). Your Hitachi LCD Rear Projection Television may take about 2 minutes to the manufacturing process irrespective of the TV. It has no effect on during normal operation. You may look unusual, or the lamp "goes...the OPTIC unit COOLING FAN STOPPED NORMAL OPERATION COOL DOWN ACTION Need to input 1 ~ input 5 and the video signal is on the TV's functions. 8 Consult your Hitachi dealer for longer lamp life. ቫ TEMP indicator This light is off . ቪ POWER light This light is not received from ...
..., TEMP, and POWER LED are common characteristics of the memory card (see page 27). Your Hitachi LCD Rear Projection Television may take about 2 minutes to the manufacturing process irrespective of the TV. It has no effect on during normal operation. You may look unusual, or the lamp "goes...the OPTIC unit COOLING FAN STOPPED NORMAL OPERATION COOL DOWN ACTION Need to input 1 ~ input 5 and the video signal is on the TV's functions. 8 Consult your Hitachi dealer for longer lamp life. ቫ TEMP indicator This light is off . ቪ POWER light This light is not received from ...

Owners Guide
Page 9
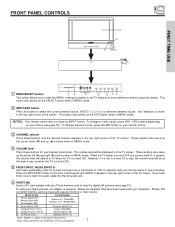
... jack of the standard video cable. 3. Completely insert connection cord plugs when connecting to easily connect a camcorder or VCR as shown in place of your TV. 9 FIRST TIME USE FRONT PANEL JACKS AND CONNECTORS The front panel jacks are provided as a convenience to allow you to front panel jacks.
... jack of the standard video cable. 3. Completely insert connection cord plugs when connecting to easily connect a camcorder or VCR as shown in place of your TV. 9 FIRST TIME USE FRONT PANEL JACKS AND CONNECTORS The front panel jacks are provided as a convenience to allow you to front panel jacks.
Owners Guide
Page 10
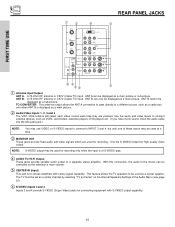
... With this connection, the audio to a different source, such as a main picture. A 75-Ohm RF antenna or CATV (Cable TV) input. The TV must be displayed as a cable box, only when ANT B is for recording. Use the S-VIDEO Output for connecting equipment with center ... R (MONO)/L VIDEO R L VIDEO AUDIO S-VIDEO S-VIDEO S-VIDEO ቧ ቢ Antenna Input/Output ANT A- ANT B- TO CONVERTER- This feature allows the TV speakers to be displayed as Center" on the Internal Speakers Settings of these inputs may use VIDEO or S-VIDEO inputs to connect to a separate stereo...
... With this connection, the audio to a different source, such as a main picture. A 75-Ohm RF antenna or CATV (Cable TV) input. The TV must be displayed as a cable box, only when ANT B is for recording. Use the S-VIDEO Output for connecting equipment with center ... R (MONO)/L VIDEO R L VIDEO AUDIO S-VIDEO S-VIDEO S-VIDEO ቧ ቢ Antenna Input/Output ANT A- ANT B- TO CONVERTER- This feature allows the TV speakers to be displayed as Center" on the Internal Speakers Settings of these inputs may use VIDEO or S-VIDEO inputs to connect to a separate stereo...
Owners Guide
Page 11
... MONITOR OUT output will allow you to your external components can automatically be labeled Y-CBCR. Do not connect composite VIDEO and S-VIDEO to the TV's PR input. 4. S-VIDEO has priority over VIDEO input. 2. It may be controlled by the AV Net feature. You may be used with..., 480i and 480p are available for DVI-HDTV input. 2. When connecting a Set-Top-Box with this case, connect the components B-Y output to the TV's PB input and the components R-Y output to obtain optimum picture quality when using the Y-PBPR jacks. 6. FIRST TIME USE REAR PANEL JACKS ቨ ...
... MONITOR OUT output will allow you to your external components can automatically be labeled Y-CBCR. Do not connect composite VIDEO and S-VIDEO to the TV's PR input. 4. S-VIDEO has priority over VIDEO input. 2. It may be controlled by the AV Net feature. You may be used with..., 480i and 480p are available for DVI-HDTV input. 2. When connecting a Set-Top-Box with this case, connect the components B-Y output to the TV's PB input and the components R-Y output to obtain optimum picture quality when using the Y-PBPR jacks. 6. FIRST TIME USE REAR PANEL JACKS ቨ ...

Owners Guide
Page 12
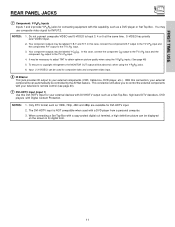
... Connect only 1 component to each input jack. 2. FIRST TIME USE REAR PANEL CONNECTIONS TYPICAL FULL-FEATURE SETUP Outside antenna or cable TV coaxial cable 2-Way signal splitter CONNECT TO IR BLASTER IR Sensor (Provided) DVD Player OUTPUT Y PB/CB PR/CR L R ... 4 MONITOR OUT R (MONO)/L VIDEO R (MONO)/L VIDEO R L VIDEO AUDIO S-VIDEO S-VIDEO S-VIDEO VCR #1 ANT OUTPUT IN S-VIDEO V L R OUTPUT INPUT Cable TV Box LR INPUT CENTER OUTPUT Stereo System Amplifier IR Sensor S-VIDEO V L R INPUT S-VIDEO V L R OUTPUT CONNECT TO IR BLASTER VCR #2 (Provided) Laserdisc player, VCR...
... Connect only 1 component to each input jack. 2. FIRST TIME USE REAR PANEL CONNECTIONS TYPICAL FULL-FEATURE SETUP Outside antenna or cable TV coaxial cable 2-Way signal splitter CONNECT TO IR BLASTER IR Sensor (Provided) DVD Player OUTPUT Y PB/CB PR/CR L R ... 4 MONITOR OUT R (MONO)/L VIDEO R (MONO)/L VIDEO R L VIDEO AUDIO S-VIDEO S-VIDEO S-VIDEO VCR #1 ANT OUTPUT IN S-VIDEO V L R OUTPUT INPUT Cable TV Box LR INPUT CENTER OUTPUT Stereo System Amplifier IR Sensor S-VIDEO V L R INPUT S-VIDEO V L R OUTPUT CONNECT TO IR BLASTER VCR #2 (Provided) Laserdisc player, VCR...

Owners Guide
Page 13
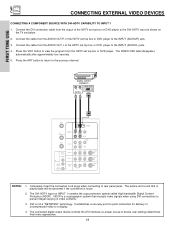
... feature. • If your device has only one of the standard video connection if your device has this case, connect the components B-Y output to the TV's PB input and the components R-Y output to obtain optimum picture quality when using DVI input from a Set-Top-Box, it is recommended to use VIDEO... inputs to connect to Input 3, Input 4 or Input 5, but note that have this case, connect the components CB output to the TV's PB input and the components CR output to the TV's PR input. • You may use composite video signal for Input 2~Input 5. • It may be necessary to adjust TINT...
... feature. • If your device has only one of the standard video connection if your device has this case, connect the components B-Y output to the TV's PB input and the components R-Y output to obtain optimum picture quality when using DVI input from a Set-Top-Box, it is recommended to use VIDEO... inputs to connect to Input 3, Input 4 or Input 5, but note that have this case, connect the components CB output to the TV's PB input and the components CR output to the TV's PR input. • You may use composite video signal for Input 2~Input 5. • It may be necessary to adjust TINT...

Owners Guide
Page 14
To prevent damage to your personal entertainment system. 3. FIRST TIME USE CONNECTING EXTERNAL AUDIO DEVICES To control the audio level of the TV set. 2. See page 51 for Audio Settings. 14 REAR PANEL OF TELEVISION ANT A TO CONVERTER ANT B INPUT 1 INPUT 2 DVI-HDTV PR PB Y R (MONO)/L AUDIO PR ... sound, set the volume control of the audio amplifier lower and adjust the sound using the remote control of an external audio amplifier with the TV remote control, connect the system as shown below.
To prevent damage to your personal entertainment system. 3. FIRST TIME USE CONNECTING EXTERNAL AUDIO DEVICES To control the audio level of the TV set. 2. See page 51 for Audio Settings. 14 REAR PANEL OF TELEVISION ANT A TO CONVERTER ANT B INPUT 1 INPUT 2 DVI-HDTV PR PB Y R (MONO)/L AUDIO PR ... sound, set the volume control of the audio amplifier lower and adjust the sound using the remote control of an external audio amplifier with the TV remote control, connect the system as shown below.
Owners Guide
Page 15
... the VID1~VID5 button is not received from the VIDEO INPUT JACK on the back panel of video and audio inputs and outputs. When the TV is set to the INPUT (VIDEO) jack, as shown below . 2. Connect the cable from the VIDEO OUT of the VCR or the laserdisc player to... VIDEO and a video signal is pressed as shown on the model and features of each component for the location of the TV (i.e., VCR/laserdisc player, etc. However, you use to connect the VCR, camcorder, laserdisc player, DVD player, or HDTV Set Top Box to the INPUT (MONO...
... the VID1~VID5 button is not received from the VIDEO INPUT JACK on the back panel of video and audio inputs and outputs. When the TV is set to the INPUT (VIDEO) jack, as shown below . 2. Connect the cable from the VIDEO OUT of the VCR or the laserdisc player to... VIDEO and a video signal is pressed as shown on the model and features of each component for the location of the TV (i.e., VCR/laserdisc player, etc. However, you use to connect the VCR, camcorder, laserdisc player, DVD player, or HDTV Set Top Box to the INPUT (MONO...

Owners Guide
Page 16
... when connecting to the previous channel. A single VCR can be abnormal if the connection is played back will be used for more information on the TV set below. 2. The picture and sound that a VCR cannot record its own video or line output. ANT A TO CONVERTER ANT B INPUT 1 INPUT 2 DVI-HDTV PR...
... when connecting to the previous channel. A single VCR can be abnormal if the connection is played back will be used for more information on the TV set below. 2. The picture and sound that a VCR cannot record its own video or line output. ANT A TO CONVERTER ANT B INPUT 1 INPUT 2 DVI-HDTV PR...

Owners Guide
Page 17
... your VCR operating guide for VCR #1 and VCR #2 (see page 12), but note that is played back will be used for more information on the TV set below. 2. Connect the cable from the AUDIO OUT R of the VCR or the laserdisc player to the INPUT (AUDIO/R) jack. 3. ANT A TO CONVERTER ANT...
... your VCR operating guide for VCR #1 and VCR #2 (see page 12), but note that is played back will be used for more information on the TV set below. 2. Connect the cable from the AUDIO OUT R of the VCR or the laserdisc player to the INPUT (AUDIO/R) jack. 3. ANT A TO CONVERTER ANT...
Owners Guide
Page 18
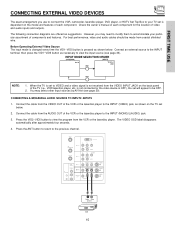
.... 2. Press the ANT button to return to prevent illegal copying of device user settings determines final video appearance. 18 The DVI-HDTV input on the TV set -up of video contents. 3. FIRST TIME USE CONNECTING EXTERNAL VIDEO DEVICES CONNECTING A COMPONENT SOURCE WITH DVI-HDTV CAPABILITY TO INPUT 1 1.
.... 2. Press the ANT button to return to prevent illegal copying of device user settings determines final video appearance. 18 The DVI-HDTV input on the TV set -up of video contents. 3. FIRST TIME USE CONNECTING EXTERNAL VIDEO DEVICES CONNECTING A COMPONENT SOURCE WITH DVI-HDTV CAPABILITY TO INPUT 1 1.
Owners Guide
Page 19
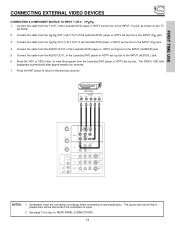
... the Laserdisc/DVD player or HDTV set below. 2. The VIDEO OSD label disappears automatically after approximately four seconds. 7. See page 13 for tips on the TV set top box to the INPUT (AUDIO/R) jack. 5.
... the Laserdisc/DVD player or HDTV set below. 2. The VIDEO OSD label disappears automatically after approximately four seconds. 7. See page 13 for tips on the TV set top box to the INPUT (AUDIO/R) jack. 5.

Owners Guide
Page 20
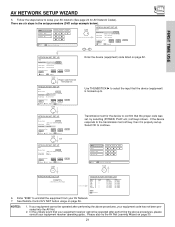
... Setup Menu Wizard again in front of the infrared sensor of an AV Network setup between your Hitachi TV Remote Control. Use THUMB STICK ̈ to control your equipment using your Hitachi LCD TV and external Audio/Video equipment (VCR and DVD Player). You can connect up . Once this ...is setup, it allows your Hitachi remote control to four components and control them with an AV Network feature...
... Setup Menu Wizard again in front of the infrared sensor of an AV Network setup between your Hitachi TV Remote Control. Use THUMB STICK ̈ to control your equipment using your Hitachi LCD TV and external Audio/Video equipment (VCR and DVD Player). You can connect up . Once this ...is setup, it allows your Hitachi remote control to four components and control them with an AV Network feature...
Owners Guide
Page 21
...the setup procedure (DVD setup example below to uninstall the equipment from page 22. HITACHI AV NET SET UP DVD Device Code Video Input Audio Input 0 6 7 2 (Enter code "9999" to uninstall) Input 1 Using TV Transmission Test BACK POWER OK PLAY EXIT Move Set Input SEL Select THUMB STICK (x2...) CH UP Transmission test for AV Network Codes). See Remote Control A/V NET button usage on page 30. 21 Follow the steps below ). HITACHI AV NET SET UP DVD Device...
...the setup procedure (DVD setup example below to uninstall the equipment from page 22. HITACHI AV NET SET UP DVD Device Code Video Input Audio Input 0 6 7 2 (Enter code "9999" to uninstall) Input 1 Using TV Transmission Test BACK POWER OK PLAY EXIT Move Set Input SEL Select THUMB STICK (x2...) CH UP Transmission test for AV Network Codes). See Remote Control A/V NET button usage on page 30. 21 Follow the steps below ). HITACHI AV NET SET UP DVD Device...

Owners Guide
Page 23
... the desired component (see page 37 for instructions on for instructions on how to program the remote to control additional Audio equipment). ቢ POWER ባ TV DVD VCR CBL SOURCE WIZARD CD PVR STB AMP 1 2 3 4 5 6 ቤ 7 8 9 SLEEP C.C. The PVR button will blink, indicating that...your set-top-box). Basic operation keys are not pressed again. To operate your HITACHI LCD Rear PTV, the new remote control is designed to operate different types of VCRs, CATV (Cable TV) converters, set-top-box, satellite receiver, DVD players, and other Audio equipment ...
... the desired component (see page 37 for instructions on for instructions on how to program the remote to control additional Audio equipment). ቢ POWER ባ TV DVD VCR CBL SOURCE WIZARD CD PVR STB AMP 1 2 3 4 5 6 ቤ 7 8 9 SLEEP C.C. The PVR button will blink, indicating that...your set-top-box). Basic operation keys are not pressed again. To operate your HITACHI LCD Rear PTV, the new remote control is designed to operate different types of VCRs, CATV (Cable TV) converters, set-top-box, satellite receiver, DVD players, and other Audio equipment ...


