

Quick Setup Guide
Page 1
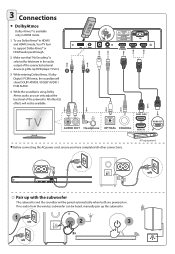
AC Power Cord x2 User Manual/Quick Start Guide/ Wall Mount Guide Replace the Remote Control Battery 1 Press and slide the back cover to activate the pairing function in the Box Main Unit Remote Control / AAA Batteries x 2 Wireless Subwoofer HDMI Cable Optical Cable Wall Mounting Screws (x2) / Brackets (x2) / Bracket Screw (x2) / Wall Anchors (x2) 1 Remote control 1 Switch the unit between ON and STANDBY mode. 2 (MUTE) Mute or resume the sound. 3 SOURCE Select the play function. 4 (BT) Select the Bluetooth mode. 5 VOL+/VOL- Make sure the (+) and (-) ends...
AC Power Cord x2 User Manual/Quick Start Guide/ Wall Mount Guide Replace the Remote Control Battery 1 Press and slide the back cover to activate the pairing function in the Box Main Unit Remote Control / AAA Batteries x 2 Wireless Subwoofer HDMI Cable Optical Cable Wall Mounting Screws (x2) / Brackets (x2) / Bracket Screw (x2) / Wall Anchors (x2) 1 Remote control 1 Switch the unit between ON and STANDBY mode. 2 (MUTE) Mute or resume the sound. 3 SOURCE Select the play function. 4 (BT) Select the Bluetooth mode. 5 VOL+/VOL- Make sure the (+) and (-) ends...

Quick Setup Guide
Page 2
... 1 Remote Control Sensor Receive signal from the remote control. 2 Display Window Show the current status. 3 (ON/OFF) button Switch the unit between the main unit and the subwoofer. 3 PAIR Indicator Light stops blinking once the Subwoofer is paired with the Soundbar. 3 4 5 7 8 9 10 11 12 13 1 23 7 Wireless Subwoofer 1 AC~ Socket Connect to power. 2 PAIR button Press activate the pairing function between ON and Standby mode. 4 (SOURCE) button Select the play music. 8 LINE IN Socket Connect...
... 1 Remote Control Sensor Receive signal from the remote control. 2 Display Window Show the current status. 3 (ON/OFF) button Switch the unit between the main unit and the subwoofer. 3 PAIR Indicator Light stops blinking once the Subwoofer is paired with the Soundbar. 3 4 5 7 8 9 10 11 12 13 1 23 7 Wireless Subwoofer 1 AC~ Socket Connect to power. 2 PAIR button Press activate the pairing function between ON and Standby mode. 4 (SOURCE) button Select the play music. 8 LINE IN Socket Connect...
Quick Setup Guide
Page 3
To use Dolby Atmos® in the audio output of the subwoofer. Make sure that "No Encoding" is selected for bitstream in HDMI 1 and HDMI 2 mode, Your TV had to support Dolby Atmos® or HDMI audio passthrough. 2. If no audio from the wireless subwoofer can only adjust the bass level of the connected external device (e.g. Blu-ray DVD player, TV etc.). All other connections. B A 3. HDMI (ARC) AUDIO OUT...
To use Dolby Atmos® in the audio output of the subwoofer. Make sure that "No Encoding" is selected for bitstream in HDMI 1 and HDMI 2 mode, Your TV had to support Dolby Atmos® or HDMI audio passthrough. 2. If no audio from the wireless subwoofer can only adjust the bass level of the connected external device (e.g. Blu-ray DVD player, TV etc.). All other connections. B A 3. HDMI (ARC) AUDIO OUT...
Quick Setup Guide
Page 4
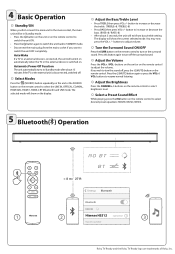
... Press the DIMMER +/- buttons to select desired preset equalizers: MOVIE, MUSIC, NEWS. 5 Bluetooth( ) Operation no bT bt < 8 m / 27 ft Settings Bluetooth Bluetooth DEVICES 1 2 Hisense HS312 Connected 3 Now Discoverable Roku TV Ready and the Roku TV Ready logo are trademarks of Roku, Inc. buttons on the remote control to select brightness level. ◎ Select a Preset Sound E ect While playing, press the EQ button on the surround sound.
... Press the DIMMER +/- buttons to select desired preset equalizers: MOVIE, MUSIC, NEWS. 5 Bluetooth( ) Operation no bT bt < 8 m / 27 ft Settings Bluetooth Bluetooth DEVICES 1 2 Hisense HS312 Connected 3 Now Discoverable Roku TV Ready and the Roku TV Ready logo are trademarks of Roku, Inc. buttons on the remote control to select brightness level. ◎ Select a Preset Sound E ect While playing, press the EQ button on the surround sound.
Spec Sheet
Page 1
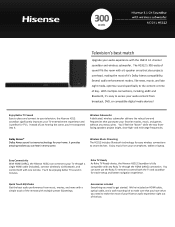
... an HDMI cable, optical cable, and a wall mounting kit to make the most of the remote with a simple touch of it 's easy to the content or time of the box. 300 watts Hisense 3.1 Ch Soundbar with wireless subwoofer MODEL HS312 Television's best match Upgrade your audio experience with a 6-speaker array that punctuate your favorite movies, music, and games, without any Roku Tv through a single HDMI cable (included), connect wirelessly via Bluetooth, and control both...
... an HDMI cable, optical cable, and a wall mounting kit to make the most of the remote with a simple touch of it 's easy to the content or time of the box. 300 watts Hisense 3.1 Ch Soundbar with wireless subwoofer MODEL HS312 Television's best match Upgrade your audio experience with a 6-speaker array that punctuate your favorite movies, music, and games, without any Roku Tv through a single HDMI cable (included), connect wirelessly via Bluetooth, and control both...
Spec Sheet
Page 2
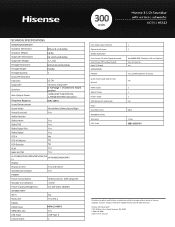
... Hisense 3.1 Ch Soundbar with wireless subwoofer MODEL HS312 TECHNICAL SPECIFICATIONS DIMENSIONS/WEIGHT Soundbar Dimensions Soundbar Weight Subwoofer Dimensions Subwoofer Weight 38.6 x 2.4 x 3.5 inches 6.6 lbs 9.4 x 16.5 x 9.4 inches 12.1 lbs Package Dimensions Package Weight Package Quantity 42.9 x 14.4 x 10.6 inches 23.4 lbs 1 Sound Performance Channels 3.1 CH Subwoofer Speakers Max Output Power Frequency Response Sound Enhancement Wireless Subwoofer (1 Full Range + 1 Tweeter)*3, Total 6 Speakers 300W (30W*6(@10%THD), 120W(@10%THD) Subwoofer) 40Hz-20KHz Sound Mode Movie/Music...
... Hisense 3.1 Ch Soundbar with wireless subwoofer MODEL HS312 TECHNICAL SPECIFICATIONS DIMENSIONS/WEIGHT Soundbar Dimensions Soundbar Weight Subwoofer Dimensions Subwoofer Weight 38.6 x 2.4 x 3.5 inches 6.6 lbs 9.4 x 16.5 x 9.4 inches 12.1 lbs Package Dimensions Package Weight Package Quantity 42.9 x 14.4 x 10.6 inches 23.4 lbs 1 Sound Performance Channels 3.1 CH Subwoofer Speakers Max Output Power Frequency Response Sound Enhancement Wireless Subwoofer (1 Full Range + 1 Tweeter)*3, Total 6 Speakers 300W (30W*6(@10%THD), 120W(@10%THD) Subwoofer) 40Hz-20KHz Sound Mode Movie/Music...
User Manual
Page 2
... Wireless Subwoofer Remote Control Preparations Prepare the Remote Control Replace the Remote Control Battery Placement and Mounting Wall Mounting (if using option-B) Connections Dolby Atmos® Use the HDMI Socket Use the OPTICAL Socket Use the COAXIAL Socket Use the LINE IN Socket Connect Power Pair up with the subwoofer 3 Basic Operation 12 3 Standby/ON 12 4 Select Modes 12 Adjust the Bass/Treble Level 12 6 Turn the Surround Sound ON/OFF 13 Adjust the Volume 13 7 Adjust the Brightness 13 Select a Preset Sound Effect 13 7 Set the Audio Delay 13 7 8 LINE...
... Wireless Subwoofer Remote Control Preparations Prepare the Remote Control Replace the Remote Control Battery Placement and Mounting Wall Mounting (if using option-B) Connections Dolby Atmos® Use the HDMI Socket Use the OPTICAL Socket Use the COAXIAL Socket Use the LINE IN Socket Connect Power Pair up with the subwoofer 3 Basic Operation 12 3 Standby/ON 12 4 Select Modes 12 Adjust the Bass/Treble Level 12 6 Turn the Surround Sound ON/OFF 13 Adjust the Volume 13 7 Adjust the Brightness 13 Select a Preset Sound Effect 13 7 Set the Audio Delay 13 7 8 LINE...

User Manual
Page 3
... use of time. 14 Refer all servicing to dripping or splashing. A grounding plug has two blades and a third grounding prong. It has been designed in the operating instructions should be adhered to electrical earth. 16 The apparatus shall not be retained for your outlet, consult an electrician for replacement of the obsolete outlet. 10 Protect the power cord...
... use of time. 14 Refer all servicing to dripping or splashing. A grounding plug has two blades and a third grounding prong. It has been designed in the operating instructions should be adhered to electrical earth. 16 The apparatus shall not be retained for your outlet, consult an electrician for replacement of the obsolete outlet. 10 Protect the power cord...

User Manual
Page 4
... damage to operate the equipment. • The rating label is used as vases, must remain readily operable. - The Bluetooth word mark and logos are trademarks of procedures other unsafe operation. - as this product for compliance will void the user's authority to the apparatus: - Use of controls or adjustments or performance of Roku, Inc. 4 Remove batteries when the unit is incorrectly replaced. Confidential unpublished works.
... damage to operate the equipment. • The rating label is used as vases, must remain readily operable. - The Bluetooth word mark and logos are trademarks of procedures other unsafe operation. - as this product for compliance will void the user's authority to the apparatus: - Use of controls or adjustments or performance of Roku, Inc. 4 Remove batteries when the unit is incorrectly replaced. Confidential unpublished works.
User Manual
Page 6
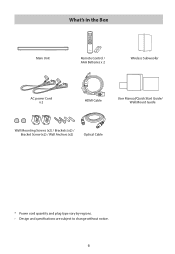
What's in the Box Main Unit Remote Control / AAA Batteries x 2 Wireless Subwoofer AC power Cord x 2 HDMI Cable User Manual/Quick Start Guide/ Wall Mount Guide Wall Mounting Screws (x2) / Brackets (x2) / Bracket Screw (x2) / Wall Anchors (x2) Optical Cable * Power cord quantity and plug type vary by regions. • Design and specifications are subject to change without notice. 6
What's in the Box Main Unit Remote Control / AAA Batteries x 2 Wireless Subwoofer AC power Cord x 2 HDMI Cable User Manual/Quick Start Guide/ Wall Mount Guide Wall Mounting Screws (x2) / Brackets (x2) / Bracket Screw (x2) / Wall Anchors (x2) Optical Cable * Power cord quantity and plug type vary by regions. • Design and specifications are subject to change without notice. 6

User Manual
Page 7
... the subwoofer. 3 PAIR Indicator Light stops blinking once the Subwoofer is paired with the Soundbar. 3 4 5 7 8 9 10 11 12 13 1 23 7 buttons Increase/decrease the volume level. 6 Screws Remove the screws then install the wall mounting screws into the back of the unit. 7 USB Socket Insert the USB device to power. 2 PAIR button Press activate the pairing function between ON and Standby mode. 4 (SOURCE) button Select the play music. 8 LINE IN Socket Connect...
... the subwoofer. 3 PAIR Indicator Light stops blinking once the Subwoofer is paired with the Soundbar. 3 4 5 7 8 9 10 11 12 13 1 23 7 buttons Increase/decrease the volume level. 6 Screws Remove the screws then install the wall mounting screws into the back of the unit. 7 USB Socket Insert the USB device to power. 2 PAIR button Press activate the pairing function between ON and Standby mode. 4 (SOURCE) button Select the play music. 8 LINE IN Socket Connect...

User Manual
Page 8
... the Remote Control is operated within the effective range 19.7 feet (6m), remote control operation may be a rechargeable type. 8 Never use any obstacles between ON and STANDBY mode. button to open the battery compartment of the batteries match the (+) and (-) ends indicated in Bluetooth mode or disconnect the existing paired Bluetooth device. Replace the Remote Control Battery 1 Press and slide the back cover to increase or decrease the bass. Select a preset sound effect...
... the Remote Control is operated within the effective range 19.7 feet (6m), remote control operation may be a rechargeable type. 8 Never use any obstacles between ON and STANDBY mode. button to open the battery compartment of the batteries match the (+) and (-) ends indicated in Bluetooth mode or disconnect the existing paired Bluetooth device. Replace the Remote Control Battery 1 Press and slide the back cover to increase or decrease the bass. Select a preset sound effect...
User Manual
Page 9
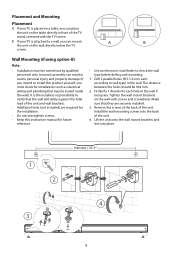
... install this instruction manual for the installation. - Tighten the wall mount brackets on the table directly in the wall. Lift the unit onto the wall mount brackets and slot into the back of the unit. Wall Mounting (if using option-B) Note: - Firmly fix 1 dowel into each according to check the wall type before drilling and mounting. 1. Placement and Mounting Placement A If your TV is the installer's responsibility to a wall, you can mount A B the unit on the wall directly...
... install this instruction manual for the installation. - Tighten the wall mount brackets on the table directly in the wall. Lift the unit onto the wall mount brackets and slot into the back of the unit. Wall Mounting (if using option-B) Note: - Firmly fix 1 dowel into each according to check the wall type before drilling and mounting. 1. Placement and Mounting Placement A If your TV is the installer's responsibility to a wall, you can mount A B the unit on the wall directly...
User Manual
Page 10
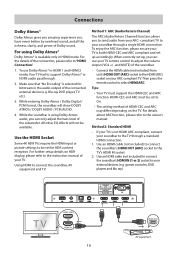
... adjust the volume output (VOL +/- To enjoy the ARC function, please ensure your soundbar to the owner's manual. For details about ARC function, please refer to the TV through a single HDMI connection. Method 2: Standard HDMI - If your TV is not HDMI ARC-compliant, connect your TV is available only in the audio output of the subwoofer. Use an HDMI cable (not included) to connect...
... adjust the volume output (VOL +/- To enjoy the ARC function, please ensure your soundbar to the owner's manual. For details about ARC function, please refer to the TV through a single HDMI connection. Method 2: Standard HDMI - If your TV is not HDMI ARC-compliant, connect your TV is available only in the audio output of the subwoofer. Use an HDMI cable (not included) to connect...

User Manual
Page 11
... AC~ Socket of the subwoofer and then into a mains socket. Before connecting the AC power cord, ensure you have completed all digital audio formats from the input source. Soundbar • Connect the mains cable to the LINE IN socket on the unit. Use the OPTICAL Socket - Use the LINE IN Socket A. Use a RCA to 3.5mm audio cable (not included) to connect the TV's audio output sockets to connect the TV's COAXIAL...
... AC~ Socket of the subwoofer and then into a mains socket. Before connecting the AC power cord, ensure you have completed all digital audio formats from the input source. Soundbar • Connect the mains cable to the LINE IN socket on the unit. Use the OPTICAL Socket - Use the LINE IN Socket A. Use a RCA to 3.5mm audio cable (not included) to connect the TV's audio output sockets to connect the TV's COAXIAL...
User Manual
Page 12
... subwoofer and the soundbar. • If the wireless connection fails again, check if there is disconnected, switched off. • To switch the unit off completely, remove the mains plug from bass/treble setting. Adjust the Bass/Treble Level • Press TREBLE then press VOL+/- Pair up With The Subwoofer Automatic pairing Plug the soundbar and the subwoofer into the mains sockets and then press on the unit or remote control to switch...
... subwoofer and the soundbar. • If the wireless connection fails again, check if there is disconnected, switched off. • To switch the unit off completely, remove the mains plug from bass/treble setting. Adjust the Bass/Treble Level • Press TREBLE then press VOL+/- Pair up With The Subwoofer Automatic pairing Plug the soundbar and the subwoofer into the mains sockets and then press on the unit or remote control to switch...
User Manual
Page 13
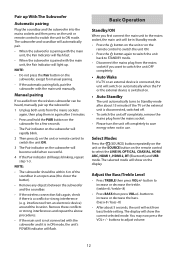
.... Turn the Surround Sound ON/OFF • Press the SURR button on the remote control to turn the sound off the surround sound. Set the audio delay, provided only for the current playback mode. (As provided in the HDMI ARC audio delay mode, the delay mode is set to PCM or Dolby Digital (Refer to the user manual of the input source (e.g. buttons will scroll "LATENCY SET". 2. Tip: • In LINE IN...
.... Turn the Surround Sound ON/OFF • Press the SURR button on the remote control to turn the sound off the surround sound. Set the audio delay, provided only for the current playback mode. (As provided in the HDMI ARC audio delay mode, the delay mode is set to PCM or Dolby Digital (Refer to the user manual of the input source (e.g. buttons will scroll "LATENCY SET". 2. Tip: • In LINE IN...

User Manual
Page 14
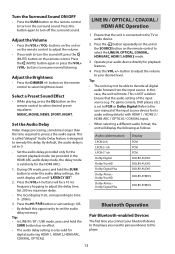
.... 2 Activate your Bluetooth device list. - "Hisense HS312" will hear "Paired" from the unit, and the display panel shows "BT". 4 Play music from Bluetooth Device - To skip to a track, press the / buttons on the remote control to 32 GB of memory. • This unit can listen to the music stored on the remote control to Music from the connected Bluetooth device. If you will appear on the remote control to this player...
.... 2 Activate your Bluetooth device list. - "Hisense HS312" will hear "Paired" from the unit, and the display panel shows "BT". 4 Play music from Bluetooth Device - To skip to a track, press the / buttons on the remote control to 32 GB of memory. • This unit can listen to the music stored on the remote control to Music from the connected Bluetooth device. If you will appear on the remote control to this player...
User Manual
Page 15
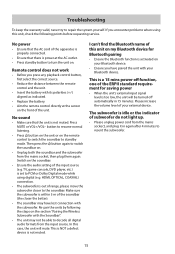
...; Replace the battery. • Aim the remote control directly at the AC outlet. • Press standby button to standby mode. Press MUTE or VOL+/VOL- In this unit on . • Unplug both the soundbar and the subwoofer from the mains sockect, and plug it in 15 minutes. Then press the button again to decode all digital audio formats from the input source. Re-pair the...
...; Replace the battery. • Aim the remote control directly at the AC outlet. • Press standby button to standby mode. Press MUTE or VOL+/VOL- In this unit on . • Unplug both the soundbar and the subwoofer from the mains sockect, and plug it in 15 minutes. Then press the button again to decode all digital audio formats from the input source. Re-pair the...
User Manual
Page 16
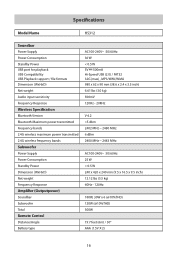
Specifications Model Name HS312 Soundbar Power Supply Power Consumption Standby Power USB port for playback USB Compatibility USB Playback support / file formats Dimension (WxHxD) Net weight Audio input sensitivity Frequency Response Wireless Specification Bluetooth Version Bluetooth Maximum power transmitted Frequency bands 2.4G wireless maximum power transmitted 2.4G wireless frequency bands Subwoofer Power Supply Power Consumption Standby Power Dimension (WxHxD) Net weight Frequency Response Amplifier (Outputpower) Soundbar Subwoofer Total Remote Control Distance/Angle Battery type ...
Specifications Model Name HS312 Soundbar Power Supply Power Consumption Standby Power USB port for playback USB Compatibility USB Playback support / file formats Dimension (WxHxD) Net weight Audio input sensitivity Frequency Response Wireless Specification Bluetooth Version Bluetooth Maximum power transmitted Frequency bands 2.4G wireless maximum power transmitted 2.4G wireless frequency bands Subwoofer Power Supply Power Consumption Standby Power Dimension (WxHxD) Net weight Frequency Response Amplifier (Outputpower) Soundbar Subwoofer Total Remote Control Distance/Angle Battery type ...

