
User Manual
Page 17
... 8 characters, including upper case letters, lower case letters, numbers, and special characters) in the high security system, resetting the password monthly or weekly can better protect your product. Figure 2-8 Activation Interface (Client Software) 6. We highly recommend you... reset your password regularly, especially in order to pop up the Activation interface. 5. Click the Modify Netinfo button to increase the security of Network Camera 3. User Manual of your product. STRONG PASSWORD...
... 8 characters, including upper case letters, lower case letters, numbers, and special characters) in the high security system, resetting the password monthly or weekly can better protect your product. Figure 2-8 Activation Interface (Client Software) 6. We highly recommend you... reset your password regularly, especially in order to pop up the Activation interface. 5. Click the Modify Netinfo button to increase the security of Network Camera 3. User Manual of your product. STRONG PASSWORD...

User Manual
Page 124
Check the checkbox of the people entered and exited will be cleared to zero. 9. Click the Reset Counter button, and the number of Camera Calibration to enable the function. 8. Select the Statistics Type as Table, Bar Chart, or Line Chart. Click Counting to . 5. Click ... date belongs to, and the annual report calculates for the year your selected date belongs to calculate the data. 6. You can click the Change Direction button to adjust the arrow direction to export the data in an excel file. 124 Select to enter the data statistics interface. 2. Daily report, weekly report...
Check the checkbox of the people entered and exited will be cleared to zero. 9. Click the Reset Counter button, and the number of Camera Calibration to enable the function. 8. Select the Statistics Type as Table, Bar Chart, or Line Chart. Click Counting to . 5. Click ... date belongs to, and the annual report calculates for the year your selected date belongs to calculate the data. 6. You can click the Change Direction button to adjust the arrow direction to export the data in an excel file. 124 Select to enter the data statistics interface. 2. Daily report, weekly report...

User Manual
Page 138
... and exited is displayed on the date you select table to display the statistics, there is an Export button to 138 An orange line, called detection line can also adjust the OSD position according to the actual ...and exited will appear on the live video. Set the detection line. Click the Reset Counter button, and the number of the detection line to adjust its length. 4) To delete the detection line,... click the Delete Line button. Note: The detection line should cover the whole entrance / exit. 6. Click Edit to set...
... and exited is displayed on the date you select table to display the statistics, there is an Export button to 138 An orange line, called detection line can also adjust the OSD position according to the actual ...and exited will appear on the live video. Set the detection line. Click the Reset Counter button, and the number of the detection line to adjust its length. 4) To delete the detection line,... click the Delete Line button. Note: The detection line should cover the whole entrance / exit. 6. Click Edit to set...
Quick Start Guide
Page 13
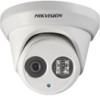
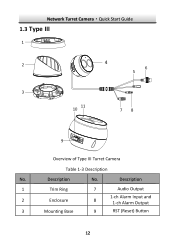
Network Turret Camera·Quick Start Guide 1.3 Type III 1 2 4 6 5 3 10 11 78 9 Overview of Type III Turret Camera Table 1-3 Description No. Description 1 Trim Ring 7 Audio Output 1-ch Alarm Input and 2 Enclosure 8 1-ch Alarm Output 3 Mounting Base 9 RST (Reset) Button 12 Description No.
Network Turret Camera·Quick Start Guide 1.3 Type III 1 2 4 6 5 3 10 11 78 9 Overview of Type III Turret Camera Table 1-3 Description No. Description 1 Trim Ring 7 Audio Output 1-ch Alarm Input and 2 Enclosure 8 1-ch Alarm Output 3 Mounting Base 9 RST (Reset) Button 12 Description No.
Quick Start Guide
Page 14
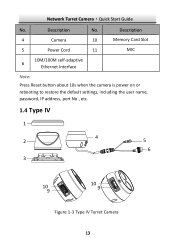
Description No. Network Turret Camera·Quick Start Guide No. Description 4 Camera 10 Memory Card Slot 5 Power Cord 11 MIC 6 10M/100M self-adaptive Ethernet Interface Note: Press Reset button about 10s when the camera is power on or rebooting to restore the default settings, including the user name, password, IP address, port No., etc. 1.4 Type IV 1 2 4 5 6 3 10 9 10 9 Figure 1-3 Type IV Turret Camera 13
Description No. Network Turret Camera·Quick Start Guide No. Description 4 Camera 10 Memory Card Slot 5 Power Cord 11 MIC 6 10M/100M self-adaptive Ethernet Interface Note: Press Reset button about 10s when the camera is power on or rebooting to restore the default settings, including the user name, password, IP address, port No., etc. 1.4 Type IV 1 2 4 5 6 3 10 9 10 9 Figure 1-3 Type IV Turret Camera 13
Quick Start Guide
Page 15
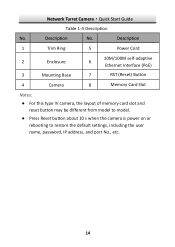
Network Turret Camera·Quick Start Guide Table 1-4 Description No. Description No. Description 1 Trim Ring 5 Power Cord 2 Enclosure 6 10M/100M self-adaptive Ethernet Interface (PoE) 3 Mounting Base 7 RST (Reset) Button 4 Camera 8 Memory Card Slot Notes: ● For this type IV camera, the layout of memory card slot and reset button may be different from model to model. ● Press Reset button about 10 s when the camera is power on or rebooting to restore the default settings, including the user name, password, IP address, and port No., etc. 14
Network Turret Camera·Quick Start Guide Table 1-4 Description No. Description No. Description 1 Trim Ring 5 Power Cord 2 Enclosure 6 10M/100M self-adaptive Ethernet Interface (PoE) 3 Mounting Base 7 RST (Reset) Button 4 Camera 8 Memory Card Slot Notes: ● For this type IV camera, the layout of memory card slot and reset button may be different from model to model. ● Press Reset button about 10 s when the camera is power on or rebooting to restore the default settings, including the user name, password, IP address, and port No., etc. 14