User Manual
Page 12
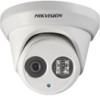
... via a switch or a router. Activation via Web Browser, Activation via SADP, and Activation via Client Software are required to activate the camera first by default, you can use the camera. User Manual of Network Camera Refer to the Figure 2-2 to set network camera over the LAN via Web Browser...1. Input the IP address into the address bar of the camera is 192.168.1.64. For the camera enables the DHCP by setting a strong password for Activation via SADP software. Notes: The default IP address of the web browser, and click Enter to the network. 2.
... via a switch or a router. Activation via Web Browser, Activation via SADP, and Activation via Client Software are required to activate the camera first by default, you can use the camera. User Manual of Network Camera Refer to the Figure 2-2 to set network camera over the LAN via Web Browser...1. Input the IP address into the address bar of the camera is 192.168.1.64. For the camera enables the DHCP by setting a strong password for Activation via SADP software. Notes: The default IP address of the web browser, and click Enter to the network. 2.

User Manual
Page 22
... 3.1 or Chapter 3.2. 4. Note: The device IP address gets locked if the admin user performs 7 failed password attempts (5 attempts for the first time using, refer to the Network Camera 3.1 Accessing by Web Browsers Steps: 1. Note: The default IP address is 192.168.1.64. If the camera is not activated, please activate... Chapter 3 Access to the section 2.1.2 for details. The admin user should configure the device accounts and user/operator permissions properly. Input the user name and password and click . Activate the network camera for the user/operator).
... 3.1 or Chapter 3.2. 4. Note: The device IP address gets locked if the admin user performs 7 failed password attempts (5 attempts for the first time using, refer to the Network Camera 3.1 Accessing by Web Browsers Steps: 1. Note: The default IP address is 192.168.1.64. If the camera is not activated, please activate... Chapter 3 Access to the section 2.1.2 for details. The admin user should configure the device accounts and user/operator permissions properly. Input the user name and password and click . Activate the network camera for the user/operator).

User Manual
Page 47
...port No. User Manual of strong passwords for all passwords and other security settings is required for PPPoE access. Note: A reboot is the responsibility of all functions and network devices. ranges from 1024 to any port No. Server Port: The default server port number is 443, ...characters) in order to take effect. 6.3.3 Configuring PPPoE Settings Steps: 1. Check the Enable PPPoE checkbox to 65535. 3. HTTPS Port: The default port number is 8000, and it can be something of your system against security risks, we strongly recommend the use of Network Camera ranges...
...port No. User Manual of strong passwords for all passwords and other security settings is required for PPPoE access. Note: A reboot is the responsibility of all functions and network devices. ranges from 1024 to any port No. Server Port: The default server port number is 443, ...characters) in order to take effect. 6.3.3 Configuring PPPoE Settings Steps: 1. Check the Enable PPPoE checkbox to 65535. 3. HTTPS Port: The default port number is 8000, and it can be something of your system against security risks, we strongly recommend the use of Network Camera ranges...

User Manual
Page 48
...numbers and special characters) in order to increase the security of your system against security risks, we strongly recommend the use of strong passwords for all passwords and other security settings is set to use the Dynamic DNS (DDNS) for the settings to enable this feature. 3. Before you ...can use PPPoE as its default network connection, you start: Registration on the DDNS server is required before configuring the DDNS settings of the camera. ...
...numbers and special characters) in order to increase the security of your system against security risks, we strongly recommend the use of strong passwords for all passwords and other security settings is set to use the Dynamic DNS (DDNS) for the settings to enable this feature. 3. Before you ...can use PPPoE as its default network connection, you start: Registration on the DDNS server is required before configuring the DDNS settings of the camera. ...

User Manual
Page 55
...video and image can be edited. If Auto is selected, you can also leave these parameters blank, and the device will adopt the default settings for dialing after other parameters are selectable. Check the checkbox to better protect your privacy and to enable the UPnP™ function.... to enable the wireless dial settings. 3. You can set the offline time and manual dialing parameters. 2) Set the access number, user name, password, APN, MTU and verification protocol. Steps: 1. Note: The wireless dial function requires the support of Network Camera With the function enabled, you ...
...video and image can be edited. If Auto is selected, you can also leave these parameters blank, and the device will adopt the default settings for dialing after other parameters are selectable. Check the checkbox to better protect your privacy and to enable the UPnP™ function.... to enable the wireless dial settings. 3. You can set the offline time and manual dialing parameters. 2) Set the access number, user name, password, APN, MTU and verification protocol. Steps: 1. Note: The wireless dial function requires the support of Network Camera With the function enabled, you ...

User Manual
Page 60
...better protect your privacy and to be configured. Configuration >Advanced Configuration > Network > NAT 2. Click Save to send emails with the default port numbers: Choose Port Mapping Mode as Auto. 60 Choose the port mapping mode. To port mapping with attached alarm images. ... Translation) Settings Purpose: 1. Enter the NAT settings interface. Receiver's Address: The email address of the installer and/or end-user. The password should be something of your own choosing (using a minimum of 8 characters, including upper case letters, lower case letters, numbers and special...
...better protect your privacy and to be configured. Configuration >Advanced Configuration > Network > NAT 2. Click Save to send emails with the default port numbers: Choose Port Mapping Mode as Auto. 60 Choose the port mapping mode. To port mapping with attached alarm images. ... Translation) Settings Purpose: 1. Enter the NAT settings interface. Receiver's Address: The email address of the installer and/or end-user. The password should be something of your own choosing (using a minimum of 8 characters, including upper case letters, lower case letters, numbers and special...

User Manual
Page 148
... The admin user cannot be created. ● Different level user owns different permissions. Input the User Name, select Level and input Password. User Manual of Network Camera Chapter 12 Others 12.1 Managing User Accounts Enter the User Management interface: Configuration >Basic Configuration> Security ... be something of your system against security risks, we strongly recommend the use of strong passwords for all permissions by default and can only change the admin password. Steps: 1. Operator and user are selectable. Click Add to better protect your own choosing (using a minimum ...
... The admin user cannot be created. ● Different level user owns different permissions. Input the User Name, select Level and input Password. User Manual of Network Camera Chapter 12 Others 12.1 Managing User Accounts Enter the User Management interface: Configuration >Basic Configuration> Security ... be something of your system against security risks, we strongly recommend the use of strong passwords for all permissions by default and can only change the admin password. Steps: 1. Operator and user are selectable. Click Add to better protect your own choosing (using a minimum ...
Quick Start Guide
Page 14
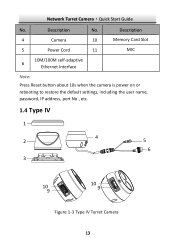
Description No. Network Turret Camera·Quick Start Guide No. Description 4 Camera 10 Memory Card Slot 5 Power Cord 11 MIC 6 10M/100M self-adaptive Ethernet Interface Note: Press Reset button about 10s when the camera is power on or rebooting to restore the default settings, including the user name, password, IP address, port No., etc. 1.4 Type IV 1 2 4 5 6 3 10 9 10 9 Figure 1-3 Type IV Turret Camera 13
Description No. Network Turret Camera·Quick Start Guide No. Description 4 Camera 10 Memory Card Slot 5 Power Cord 11 MIC 6 10M/100M self-adaptive Ethernet Interface Note: Press Reset button about 10s when the camera is power on or rebooting to restore the default settings, including the user name, password, IP address, port No., etc. 1.4 Type IV 1 2 4 5 6 3 10 9 10 9 Figure 1-3 Type IV Turret Camera 13
Quick Start Guide
Page 15
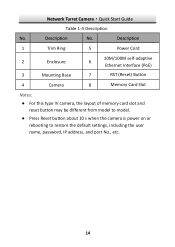
Network Turret Camera·Quick Start Guide Table 1-4 Description No. Description No. Description 1 Trim Ring 5 Power Cord 2 Enclosure 6 10M/100M self-adaptive Ethernet Interface (PoE) 3 Mounting Base 7 RST (Reset) Button 4 Camera 8 Memory Card Slot Notes: ● For this type IV camera, the layout of memory card slot and reset button may be different from model to model. ● Press Reset button about 10 s when the camera is power on or rebooting to restore the default settings, including the user name, password, IP address, and port No., etc. 14
Network Turret Camera·Quick Start Guide Table 1-4 Description No. Description No. Description 1 Trim Ring 5 Power Cord 2 Enclosure 6 10M/100M self-adaptive Ethernet Interface (PoE) 3 Mounting Base 7 RST (Reset) Button 4 Camera 8 Memory Card Slot Notes: ● For this type IV camera, the layout of memory card slot and reset button may be different from model to model. ● Press Reset button about 10 s when the camera is power on or rebooting to restore the default settings, including the user name, password, IP address, and port No., etc. 14

Quick Start Guide
Page 41
... the camera. Input the IP address into the address bar of the web browser, and press Enter to . 2. Notes: The default IP address of Network Camera for it before you need to use the camera. Activation via Web Browser, Activation via SADP, and Activation via ... and the camera should belong to the same subnet. For the camera enables the DHCP by setting a strong password for Activation via Client Software. 3.2.1 Activation via Client Software are required to activate the camera first by default, you can use the SADP software to search the IP address. 40
... the camera. Input the IP address into the address bar of the web browser, and press Enter to . 2. Notes: The default IP address of Network Camera for it before you need to use the camera. Activation via Web Browser, Activation via SADP, and Activation via ... and the camera should belong to the same subnet. For the camera enables the DHCP by setting a strong password for Activation via Client Software. 3.2.1 Activation via Client Software are required to activate the camera first by default, you can use the SADP software to search the IP address. 40

Quick Start Guide
Page 47
...Enter key to the same subnet with your computer. 3. Click Login. 46 Note: The device IP address gets locked if the admin user performs 7 failed password attempts (5 attempts for the user/operator). 4. You are recommended to change the IP address to enter the login interface. Network Turret Camera·Quick Start...above version, Mozilla Firefox 5.0 and above version and Google Chrome 18 and above version Steps: 1. Delete the unnecessary accounts and user/operator permissions. Note: The default IP address is 192.168.1.64. Input the user name and password. Open the web browser. 2.
...Enter key to the same subnet with your computer. 3. Click Login. 46 Note: The device IP address gets locked if the admin user performs 7 failed password attempts (5 attempts for the user/operator). 4. You are recommended to change the IP address to enter the login interface. Network Turret Camera·Quick Start...above version, Mozilla Firefox 5.0 and above version and Google Chrome 18 and above version Steps: 1. Delete the unnecessary accounts and user/operator permissions. Note: The default IP address is 192.168.1.64. Input the user name and password. Open the web browser. 2.