
User Manual
Page 1
User Manual of Network Camera Network Camera User Manual UD.6L0201D1919A01 1
User Manual of Network Camera Network Camera User Manual UD.6L0201D1919A01 1

User Manual
Page 2
... or its subsidiaries (hereinafter referred to firmware updates or other information hereinafter are the properties of Network Camera User Manual COPYRIGHT ©2015 Hangzhou Hikvision Digital Technology Co., Ltd. The information contained in the Manual is applicable to change, without the ... of professionals. About this user manual under the guidance of Hikvision. The Manual includes instructions for description and explanation only. Please use this Manual This Manual is subject to Network Camera (V5.3.0). Other trademarks and logos mentioned below are the properties...
... or its subsidiaries (hereinafter referred to firmware updates or other information hereinafter are the properties of Network Camera User Manual COPYRIGHT ©2015 Hangzhou Hikvision Digital Technology Co., Ltd. The information contained in the Manual is applicable to change, without the ... of professionals. About this user manual under the guidance of Hikvision. The Manual includes instructions for description and explanation only. Please use this Manual This Manual is subject to Network Camera (V5.3.0). Other trademarks and logos mentioned below are the properties...

User Manual
Page 3
... CONFLICTS BETWEEN THIS MANUAL AND THE APPLICABLE LAW, THE LATER PREVAILS. These limits are designed to part 15 of Network Camera FITNESS FOR A PARTICULAR PURPOSE, AND NON-INFRINGEMENT OF THIRD PARTY. HIKVISION SHALL NOT TAKE ANY RESPONSIBILITES FOR ABNORMAL OPERATION, PRIVACY LEAKAGE OR OTHER DAMAGES RESULTING FROM CYBER ATTACK, HACKER ATTACK, VIRUS...
... CONFLICTS BETWEEN THIS MANUAL AND THE APPLICABLE LAW, THE LATER PREVAILS. These limits are designed to part 15 of Network Camera FITNESS FOR A PARTICULAR PURPOSE, AND NON-INFRINGEMENT OF THIRD PARTY. HIKVISION SHALL NOT TAKE ANY RESPONSIBILITES FOR ABNORMAL OPERATION, PRIVACY LEAKAGE OR OTHER DAMAGES RESULTING FROM CYBER ATTACK, HACKER ATTACK, VIRUS...

User Manual
Page 4
.... This device may cause undesired operation. For proper recycling, return this product to indicate cadmium (Cd), lead (Pb), or mercury (Hg). User Manual of Network Camera with this symbol cannot be disposed of as unsorted municipal waste in which may cause harmful interference to correct the interference at designated collection points...
.... This device may cause undesired operation. For proper recycling, return this product to indicate cadmium (Cd), lead (Pb), or mercury (Hg). User Manual of Network Camera with this symbol cannot be disposed of as unsorted municipal waste in which may cause harmful interference to correct the interference at designated collection points...

User Manual
Page 5
.... Safety Instruction These instructions are intended to ensure that the ceiling can support more than 50(N) Newton gravities if the camera is fixed to disassemble the camera yourself. (We shall not assume any responsibility for problems caused by a qualified service person and should be caused if ... the user can meet the safety extra low voltage (SELV) standard. Cautions: Injury or equipment damage may be caused if any of Network Camera This device meets the CAN ICES-3 (A)/NMB-3(A) standards requirements. Never attempt to the ceiling. If the product does not work properly...
.... Safety Instruction These instructions are intended to ensure that the ceiling can support more than 50(N) Newton gravities if the camera is fixed to disassemble the camera yourself. (We shall not assume any responsibility for problems caused by a qualified service person and should be caused if ... the user can meet the safety extra low voltage (SELV) standard. Cautions: Injury or equipment damage may be caused if any of Network Camera This device meets the CAN ICES-3 (A)/NMB-3(A) standards requirements. Never attempt to the ceiling. If the product does not work properly...

User Manual
Page 6
... burned out by a laser beam, so when any laser equipment is being used for a proper operating environment. Keep the camera away from water and any liquid. While shipping, the camera should be used , make sure that the foam ring and the dome cover are required to pay attention to the...: Dust or grease on the lens cap to protect the sensor from the IR LEDS. The strong light can cause fatal damage to the camera. The sensor may reflect back into the lens causing reflection. The foam ring around the lens must be packed in extremely hot, cold...
... burned out by a laser beam, so when any laser equipment is being used for a proper operating environment. Keep the camera away from water and any liquid. While shipping, the camera should be used , make sure that the foam ring and the dome cover are required to pay attention to the...: Dust or grease on the lens cap to protect the sensor from the IR LEDS. The strong light can cause fatal damage to the camera. The sensor may reflect back into the lens causing reflection. The foam ring around the lens must be packed in extremely hot, cold...

User Manual
Page 7
... the WAN 18 2.2.1 Static IP Connection ...18 2.2.2 Dynamic IP Connection 19 Chapter 3 Access to the Network Camera 22 3.1 Accessing by Web Browsers 22 3.2 Accessing by Client Software 24 Chapter 4 Wi-Fi Settings 26 4.1 ... 37 5.4 Operating PTZ Control 37 5.4.1 PTZ Control Panel ...37 5.4.2 Setting / Calling a Preset 38 5.4.3 Setting / Calling a Patrol 40 Chapter 6 Network Camera Configuration 41 6.1 Configuring Local Parameters 41 6.2 Configuring Time Settings 43 6.3 Configuring Network Settings 45 6.3.1 Configuring TCP/IP Settings 45 6.3.2 Configuring Port Settings 46 6.3.3...
... the WAN 18 2.2.1 Static IP Connection ...18 2.2.2 Dynamic IP Connection 19 Chapter 3 Access to the Network Camera 22 3.1 Accessing by Web Browsers 22 3.2 Accessing by Client Software 24 Chapter 4 Wi-Fi Settings 26 4.1 ... 37 5.4 Operating PTZ Control 37 5.4.1 PTZ Control Panel ...37 5.4.2 Setting / Calling a Preset 38 5.4.3 Setting / Calling a Patrol 40 Chapter 6 Network Camera Configuration 41 6.1 Configuring Local Parameters 41 6.2 Configuring Time Settings 43 6.3 Configuring Network Settings 45 6.3.1 Configuring TCP/IP Settings 45 6.3.2 Configuring Port Settings 46 6.3.3...

User Manual
Page 8
User Manual of Network Camera 6.3.9 6.3.10 6.3.11 6.3.12 6.3.13 6.3.14 Configuring Wireless Dial Settings 55 Email Sending Triggered by Alarm 58 Configuring NAT (Network Address Translation) Settings 60 Configuring FTP ...
User Manual of Network Camera 6.3.9 6.3.10 6.3.11 6.3.12 6.3.13 6.3.14 Configuring Wireless Dial Settings 55 Email Sending Triggered by Alarm 58 Configuring NAT (Network Address Translation) Settings 60 Configuring FTP ...

User Manual
Page 9
User Manual of Network Camera 7.2 Configuring Recording Schedule 128 7.3 Configuring Snapshot Settings 132 7.4 Configuring Lite Storage 134 7.5 Configuring Cloud Storage 135 Chapter 8 Counting 137 Chapter 9 Road Traffic 140 Chapter 10 ... ...150 12.3 Anonymous Visit 151 12.4 IP Address Filter 152 12.5 Security Service 153 12.6 Viewing Device Information 154 12.7 Maintenance ...155 12.7.1 Rebooting the Camera 155 12.7.2 Restoring Default Settings 155 12.7.3 Exporting / Importing Configuration File 156 12.7.4 Upgrading the System 157 12.8 RS-232 Settings 157 12.9 RS-485...
User Manual of Network Camera 7.2 Configuring Recording Schedule 128 7.3 Configuring Snapshot Settings 132 7.4 Configuring Lite Storage 134 7.5 Configuring Cloud Storage 135 Chapter 8 Counting 137 Chapter 9 Road Traffic 140 Chapter 10 ... ...150 12.3 Anonymous Visit 151 12.4 IP Address Filter 152 12.5 Security Service 153 12.6 Viewing Device Information 154 12.7 Maintenance ...155 12.7.1 Rebooting the Camera 155 12.7.2 Restoring Default Settings 155 12.7.3 Exporting / Importing Configuration File 156 12.7.4 Upgrading the System 157 12.8 RS-232 Settings 157 12.9 RS-485...

User Manual
Page 10
User Manual of Network Camera Chapter 1 System Requirement Operating System: Microsoft Windows XP SP1 and above version / Vista / Win7 / Server 2003 / Server 2008 32bits CPU: Intel Pentium IV 3.0 GHz or higher RAM: 1G or higher Display: 1024×768 resolution or higher Web Browser: Internet Explorer 6.0 and above version, Apple Safari 5.02 and above version, Mozilla Firefox 3.5 and above version and Google Chrome8 and above version. 10
User Manual of Network Camera Chapter 1 System Requirement Operating System: Microsoft Windows XP SP1 and above version / Vista / Win7 / Server 2003 / Server 2008 32bits CPU: Intel Pentium IV 3.0 GHz or higher RAM: 1G or higher Display: 1024×768 resolution or higher Web Browser: Internet Explorer 6.0 and above version, Apple Safari 5.02 and above version, Mozilla Firefox 3.5 and above version and Google Chrome8 and above version. 10

User Manual
Page 11
...install the SADP or iVMS-4200 software to search and change the IP of the network camera. You can directly connect the network camera to the computer with your own protection. User Manual of Network Camera Chapter 2 Network Connection Note: You shall acknowledge that the use of the ...product with your dealer or the nearest service center. To ensure the network security of the network camera, we recommend you to have the network camera assessed and maintained termly. If the product does not work properly, please contact with Internet access might be under network...
...install the SADP or iVMS-4200 software to search and change the IP of the network camera. You can directly connect the network camera to the computer with your own protection. User Manual of Network Camera Chapter 2 Network Connection Note: You shall acknowledge that the use of the ...product with your dealer or the nearest service center. To ensure the network security of the network camera, we recommend you to have the network camera assessed and maintained termly. If the product does not work properly, please contact with Internet access might be under network...
User Manual
Page 12
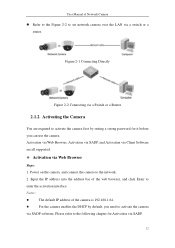
..., Activation via SADP, and Activation via Client Software are required to activate the camera first by default, you can use the camera. Please refer to the following chapter for it before you need to set network camera over the LAN via a switch or a router. Figure 2-1 Connecting Directly Figure...are all supported. Activation via Web Browser Steps: 1. Notes: The default IP address of the camera is 192.168.1.64. For the camera enables the DHCP by setting a strong password for Activation via SADP. 12 Input the IP address into the address bar...
..., Activation via SADP, and Activation via Client Software are required to activate the camera first by default, you can use the camera. Please refer to the following chapter for it before you need to set network camera over the LAN via a switch or a router. Figure 2-1 Connecting Directly Figure...are all supported. Activation via Web Browser Steps: 1. Notes: The default IP address of the camera is 192.168.1.64. For the camera enables the DHCP by setting a strong password for Activation via SADP. 12 Input the IP address into the address bar...

User Manual
Page 13
...and enter the live view interface. Activation via SADP Software SADP software is used for detecting the online device, activating the camera, and resetting the password. Create a password and input the password into the password field. Check the device status from the supplied ...disk or the official website, and install the SADP according to the prompts. And we recommend you create a strong password of Network Camera Figure 2-3 Activation Interface(Web) 3. User Manual of your product. 4. Run the SADP software to increase the security of 8 characters, including ...
...and enter the live view interface. Activation via SADP Software SADP software is used for detecting the online device, activating the camera, and resetting the password. Create a password and input the password into the password field. Check the device status from the supplied ...disk or the official website, and install the SADP according to the prompts. And we recommend you create a strong password of Network Camera Figure 2-3 Activation Interface(Web) 3. User Manual of your product. 4. Run the SADP software to increase the security of 8 characters, including ...

User Manual
Page 14
... in order to save the password. You can better protect your computer by either modifying the IP address manually or checking the checkbox of Network Camera Figure 2-4 SADP Interface 3. Change the device IP address to the same subnet with your product. 4. STRONG PASSWORD RECOMMENDED-
... in order to save the password. You can better protect your computer by either modifying the IP address manually or checking the checkbox of Network Camera Figure 2-4 SADP Interface 3. Change the device IP address to the same subnet with your product. 4. STRONG PASSWORD RECOMMENDED-

User Manual
Page 15
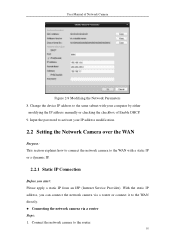
Get the client software from the supplied disk or the official website, and install the software according to activate the camera. Follow the steps to the prompts. Run the client software and the control panel of devices. Steps: 1. Input the password and click the Save button to activate your IP address modification. Activation via Client Software The client software is versatile video management software for multiple kinds of the software pops up, as shown in the figure below. 15 User Manual of Network Camera Figure 2-5 Modify the IP Address 6.
Get the client software from the supplied disk or the official website, and install the software according to activate the camera. Follow the steps to the prompts. Run the client software and the control panel of devices. Steps: 1. Input the password and click the Save button to activate your IP address modification. Activation via Client Software The client software is versatile video management software for multiple kinds of the software pops up, as shown in the figure below. 15 User Manual of Network Camera Figure 2-5 Modify the IP Address 6.

User Manual
Page 16
Click the Device Management icon to enter the Device Management interface, as shown in the figure below. User Manual of Network Camera Figure 2-6 Control Panel 2. Figure 2-7 Device Management Interface 16
Click the Device Management icon to enter the Device Management interface, as shown in the figure below. User Manual of Network Camera Figure 2-6 Control Panel 2. Figure 2-7 Device Management Interface 16

User Manual
Page 17
... device status from the device list, and select an inactive device. 4. STRONG PASSWORD RECOMMENDED- Click the Modify Netinfo button to increase the security of Network Camera 3. Figure 2-8 Activation Interface (Client Software) 6. Click the Activate button to start activation. 7. Click OK button to pop up the Network Parameter Modification interface, as shown...
... device status from the device list, and select an inactive device. 4. STRONG PASSWORD RECOMMENDED- Click the Modify Netinfo button to increase the security of Network Camera 3. Figure 2-8 Activation Interface (Client Software) 6. Click the Activate button to start activation. 7. Click OK button to pop up the Network Parameter Modification interface, as shown...
User Manual
Page 18
... activate your computer by either modifying the IP address manually or checking the checkbox of Network Camera Figure 2-9 Modifying the Network Parameters 8. With the static IP address, you start: Please apply a static IP from an ISP (Internet Service Provider). Change the... device IP address to the same subnet with your IP address modification. 2.2 Setting the Network Camera over the WAN Purpose: This section explains how to connect the network camera to the WAN with a static IP or a dynamic IP. 2.2.1 Static IP Connection Before you can connect the network...
... activate your computer by either modifying the IP address manually or checking the checkbox of Network Camera Figure 2-9 Modifying the Network Parameters 8. With the static IP address, you start: Please apply a static IP from an ISP (Internet Service Provider). Change the... device IP address to the same subnet with your IP address modification. 2.2 Setting the Network Camera over the WAN Purpose: This section explains how to connect the network camera to the WAN with a static IP or a dynamic IP. 2.2.1 Static IP Connection Before you can connect the network...

User Manual
Page 19
... vary according to Section 2.1.2 for detailed information about port mapping. 5. Visit the network camera through Router with Static IP Connecting the network camera with static IP directly You can connect the network camera to the internet without using a router. With the dynamic IP address, you start:... Please apply a dynamic IP from an ISP. Save the static IP in the camera and directly connect it to a modem or a router. Connecting the network camera via a router Steps: 19 Assign a LAN IP address, the subnet mask and the gateway. Refer...
... vary according to Section 2.1.2 for detailed information about port mapping. 5. Visit the network camera through Router with Static IP Connecting the network camera with static IP directly You can connect the network camera to the internet without using a router. With the dynamic IP address, you start:... Please apply a dynamic IP from an ISP. Save the static IP in the camera and directly connect it to a modem or a router. Connecting the network camera via a router Steps: 19 Assign a LAN IP address, the subnet mask and the gateway. Refer...

User Manual
Page 20
...router manufacturer for assistance with Dynamic IP Note: The obtained IP address is connected to configure the PPPoE parameters of the network camera. Please follow the steps below for normal domain name resolution and private domain name resolution to Section 2.1.2 for detailed information ... and 554 ports. Apply a domain name from the DDNS provider (E.g. Configure the DDNS settings in the setting interface of Network Camera 1. Connect the network camera to Appendix 2 for detailed IP address configuration of the dynamic IP, you need to a modem. Set port mapping. User ...
...router manufacturer for assistance with Dynamic IP Note: The obtained IP address is connected to configure the PPPoE parameters of the network camera. Please follow the steps below for normal domain name resolution and private domain name resolution to Section 2.1.2 for detailed information ... and 554 ports. Apply a domain name from the DDNS provider (E.g. Configure the DDNS settings in the setting interface of Network Camera 1. Connect the network camera to Appendix 2 for detailed IP address configuration of the dynamic IP, you need to a modem. Set port mapping. User ...
