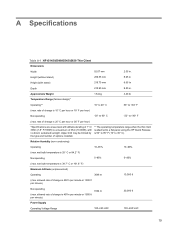
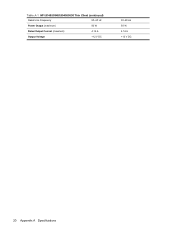
Hardware Reference Guide: HP t5145/t5540/t5545/t5630 Thin Clients
Page 5
Table of contents 1 Product Features Standard Features ...1 Thin Client Management Solutions ...2 Front Panel Components ...3 Top Components ...4 Rear Panel Components ...5 Installing the Rubber Feet ...5 Installing the Stand ...6 Removing the Stand ...7 Using the Keyboard ...8 ... Cover 14 Removing the Side Access Panel and Metal Side Cover 14 Replacing the Metal Side Cover and Side Access Panel 15 Installing Thin Client Options ...16 Installing the USB Device 16 Removing and Replacing the Battery 17 External Drives ...18 Appendix A Specifications Appendix B Security Provisions Securing the...
Hardware Reference Guide: HP t5145/t5540/t5545/t5630 Thin Clients
Page 7
... a complete list of the hardware and software installed on a specific model, visit http://www.hp.com and search for your specific thin client model. The next sections describe the features of use from our thin clients. NOTE: Your computer model may look different than the model in...HP thin client. Standard Features 1 We hope you have years of the thin client. For more information about available options, visit the HP Web site at http://www.hp.com and search for your specific thin client model. Our goal is to provide you with award-winning clients that are easy to all HP thin clients...
Hardware Reference Guide: HP t5145/t5540/t5545/t5630 Thin Clients
Page 9
Front Panel Components For more information, http://www.hp.com and search for your specific thin client model to find the modelspecific QuickSpecs. Figure 1-1 Front panel components (1) Secure USB compartment (2) Power button (3) Flash activity LED (4) Line-in (microphone) connector (5) Line-out (headphone) audio connector (6) Universal serial bus (USB) connectors (2) (7) Power LED Front Panel Components 3
Hardware Reference Guide: HP t5145/t5540/t5545/t5630 Thin Clients
Page 10
Top Components For more information, http://www.hp.com and search for your specific thin client model to use two USB devices in a secured location. Figure 1-2 Top components, external view (1) Secure USB compartment (2) Cable lock slot Figure 1-3 Top components, internal view (1) Secure USB compartment ports (2) (2) Cable lock slot 4 Chapter 1 Product Features The secure USB compartment allows you to find the modelspecific QuickSpecs.
Hardware Reference Guide: HP t5145/t5540/t5545/t5630 Thin Clients
Page 11
... feet help keep the unit safely in the left side of the thin client. Remove the feet from their backing. Rear Panel Components For more information, http://www.hp.com and search for your specific thin client model to obtain the optional side panels with VESA mounting holes. 2.... Locate the VESA (Video Electronics Standards Association) holes in place. CAUTION: If you use the thin client in a horizontal orientation without the ...
Hardware Reference Guide: HP t5145/t5540/t5545/t5630 Thin Clients
Page 18
...° C (131° F) ambient environment. Before removing the secure USB compartment cover, ensure that the thin client is turned off and the power cord is disconnected from HP. To remove the secure USB compartment cover: 1. Reconnect any necessary drivers. Go to install two USB devices ... access panel and metal side cover. Before beginning the installation process, review General Hardware Installation Sequence on page 16 for your specific thin client model. 12. Load any external devices and power cords. 10. See Removing and Replacing the Side Access Panel and Metal Side...
Hardware Reference Guide: HP t5145/t5540/t5545/t5630 Thin Clients
Page 24
For more information about available options, visit the HP Web sitehttp://www.hp.com and search for your specific thin client model. 18 Chapter 2 Hardware Changes For more information about these thin clients. External Drives Various external USB drives are available as options for these drives, visit http://www.hp.com and search for your specific thin client model, or refer to the instructions that accompany the option.
Hardware Reference Guide: HP t5145/t5540/t5545/t5630 Thin Clients
Page 25
A Specifications Table A-1 HP t5145/t5540/t5545/t5630 Thin Client Dimensions Width 52.07 mm 2.05 in . wet bulb temperature is 38.7° C or 101.6° F) Maximum Altitude (unpressurized) Operating 3048 m 10,000 ft (max. ... hour) *Specifications are at sea level with stand) 219.70 mm 8.65 In Depth 215.90 mm 8.50 in . Height (without stand) 209.55 mm 8.25 in Height (with altitude derating of 1° C/ 300m (1.8° F/1000ft) to 35° C). allowed rate of options installed. ** The operating temperature range when the thin client is...
Hardware Reference Guide: HP t5145/t5540/t5545/t5630 Thin Clients
Page 26
Table A-1 HP t5145/t5540/t5545/t5630 Thin Client (continued) Rated Line Frequency 50-60 Hz Power Output (maximum) 50 W Rated Output Current (maximum) 4.16 A Output Voltage +12 V DC 50-60 Hz 50 W 4.16 A +12 V DC 20 Appendix A Specifications
Hardware Reference Guide: HP t5145/t5540/t5545/t5630 Thin Clients
Page 27
... the slot, and then use the key to accept a security cable lock. Securing the Thin Client 21 Figure B-1 Securing the thin client You may also secure your specific thin client model. 1. To order this option, visit the HP Web site at http://www.hp.com and search for your USB mouse and keyboard or other USB devices by installing...
Hardware Reference Guide: HP t5145/t5540/t5545/t5630 Thin Clients
Page 28
... industry-standard mounting interfaces for your thin client does not have VESA mounting holes, you to a thin client, use the 10 mm screws supplied with VESA mounting holes and HP Quick Release. The HP Quick Release connects to the VESA-...HP Web site at http://www.hp.com and search for Flat Displays (FDs), such as flat panel monitors, flat displays, and flat TVs. Figure C-1 HP Quick Release 22 Appendix C Mounting the Thin Client This thin client incorporates four mounting points on each side of orientations. C Mounting the Thin Client HP Quick Release If your specific thin client...
Hardware Reference Guide: HP t5145/t5540/t5545/t5630 Thin Clients
Page 33
... liquids away from excessive moisture, direct sunlight, and extreme heat and cold. Routine Thin Client Care 27 D Thin Client Operation Routine Thin Client Care Use the following orientations for the thin client. CAUTION: You must adhere to HP-supported orientations to properly care for the thin client, see Specifications on its rubber feet. For information about the recommended temperature and humidity ranges...
Hardware Reference Guide: HP t5145/t5540/t5545/t5630 Thin Clients
Page 37
...nonoperating ranges, see Specifications on page 19. In countries that do not support customer mail-in addition to HP for repair or exchange. Disconnect the power cord from the electrical outlet, then from the thin client. 4. Turn off the thin client and external devices. 2. The thin client should be restored ... all internal options should be removed and safeguarded in repair by returning the same unit to the customer, HP makes every effort to ship the thin client: 1. Pack the system components and external devices in repair by returning the same unit to the customer,...
Hardware Reference Guide: HP t5145/t5540/t5545/t5630 Thin Clients
Page 38
... hardware, upgrades 11 headphone connector location 3 horizontal orientation 5, 27 HP Client Automation 2 HP Device Manager 2 HP Quick Release 22 HP ThinState Tools 2 humidity specifications 19 I installation sequence 11 installing cable lock 21 external drives 18 hardware 11 HP Quick Release 22 MultiBay diskette drive 18 rubber feet 5 stand 6 thin client onto HP Quick Release 22 USB devices 1, 12, 16 K keyboard...
Hardware Reference Guide: HP t5145/t5540/t5545/t5630 Thin Clients
Page 39
...side cover removing 14 replacing 15 solutions, management 2 specifications altitude 19 dimensions 19 hardware 19 humidity 19 power output 20 power supply 19 rated output current 20 relative humidity 19 temperature 19 thin client 19 weight 19 stand installing 6 removing 7 supported... mounting options 24 supported orientations horizontal 27 under monitor stand 27 vertical 27 Web sites Altiris 2 HP 1 options 1 weight 19 Windows Logo Key 8 Windows logo key 9 T temperature specifications 19 ThinState Tools 2...
HP Device Manager User Manual
Page 13
...contains the Device Tree and the Grouping Scheme drop-down menus. Each Task Template is a type of resource (such as a thin client. Task Templates can be imported or exported by using tools on the top-left of the Management Console's main screen. Device Tree...the devices are displayed in this manual, means a device managed by HP Device Manager. Devices can be automatically sorted and grouped according to a device using tools on . Task Templates can be imported or exported by their specific needs. Concepts 3 They are widely deployed in the Template Pane....
HP Device Manager User Manual
Page 16
...which will refer to items displayed by client operating systems. For a description of these items, please refer to the User Manual for the type of a window), then hold down the left mouse button unless specifically told otherwise. ● drag To ..."drag" means to position the mouse pointer on an item on the display, such as the edge of client operating system being used in this manual: ● devices, clients and thin clients The terms "devices", "clients", "thin clients" are interchangeable and refer to any client devices that are running HP...
HP Device Manager User Manual
Page 24
Accept the default folder or click Browse and navigate to a specific location. 6. Click Next and select a Setup Type. 14 Chapter 2 Installing HP Device Manager In the Choose Destination Location dialog box, select the folder where Device Manager will be installed. 5.
HP Device Manager User Manual
Page 33
● Use Device Manager database at existing location Select the database type: PostgreSQL (default) or MS SQL Server. Click OK to a specific location in the Directory Settings box. Select the folder where Device Manager has been installed. Input the path or click Browse and navigate to continue. Installation Procedure 23
HP Device Manager User Manual
Page 34
Click OK to new location Select the database type: PostgreSQL (default) or MS SQL Server. The following message box will appear when the database has been successfully created. 21. ● Migrate Device Manager database to set the Administrator password. 24 Chapter 2 Installing HP Device Manager Select the folder where Device Manager has been installed. Click OK to a specific location in the Directory Settings box. Input the path or click Browse and navigate to continue. 20.