
HP DTC Cabling and Racking Guide
Page 12
Straight-through mounting holes are used . Rails Rails are provided on vertical columns for use in conjunction with the greatest power output towards the top of the racked components. System Rack Product Numbers HP 1.1 meter system rack - This racking order allows the distribution panels to ... risk. Either standard or metric mounting hardware can only be located in the system rack. When cables are four rail kits available for the HP system racks. DTC Racking Order DTC units should be considered when racking systems. Following these guidelines will not unnecessarily ...
Straight-through mounting holes are used . Rails Rails are provided on vertical columns for use in conjunction with the greatest power output towards the top of the racked components. System Rack Product Numbers HP 1.1 meter system rack - This racking order allows the distribution panels to ... risk. Either standard or metric mounting hardware can only be located in the system rack. When cables are four rail kits available for the HP system racks. DTC Racking Order DTC units should be considered when racking systems. Following these guidelines will not unnecessarily ...

HP DTC Cabling and Racking Guide
Page 14
2 Guidelines for Racking Systems Rail Types Description Computer Non-HP System II VXI Used with all HP computers and peripherals Used with equipment conforming to EIA spec Used with HP System II instruments Used with HP VXI mainframe equipment Product Number C2788A E3664A E3663A E3665A Note Refer to the Instrument Rack User's Guide (part number E3660-90001) for further information about HP racks. 8
2 Guidelines for Racking Systems Rail Types Description Computer Non-HP System II VXI Used with all HP computers and peripherals Used with equipment conforming to EIA spec Used with HP System II instruments Used with HP VXI mainframe equipment Product Number C2788A E3664A E3663A E3665A Note Refer to the Instrument Rack User's Guide (part number E3660-90001) for further information about HP racks. 8

HP DTC Cabling and Racking Guide
Page 16
The DTC 72MX should be racked with rail type C2788A. The DTC 16xx family should be centered within an EIA unit envelope boundary. 3 Guidelines for populating a Rack To accommodate slight variations in height and width of rackable devices, different types of rails are shown below: HP Rail E3664A 455.22 6.41 HP Rail C2788A 427.50 20.0 2.70 5.10 10 Some rails allow devices which do not use a complete EIA unit, to be racked with rail type E3664A. These rail types are available.
The DTC 72MX should be racked with rail type C2788A. The DTC 16xx family should be centered within an EIA unit envelope boundary. 3 Guidelines for populating a Rack To accommodate slight variations in height and width of rackable devices, different types of rails are shown below: HP Rail E3664A 455.22 6.41 HP Rail C2788A 427.50 20.0 2.70 5.10 10 Some rails allow devices which do not use a complete EIA unit, to be racked with rail type E3664A. These rail types are available.

HP DTC Cabling and Racking Guide
Page 17
rails are recommended for populating a Rack The maximum number of DTC 72MX in a 1.6 m rack is 4 The maximum number of DTC 72MX in a 1.1 m rack is 2 HP recommends that members of the DTC 16xx family be racked as illustrated below; Populating a Rack 3 Guidelines for the lowest racked DTC. 11
rails are recommended for populating a Rack The maximum number of DTC 72MX in a 1.6 m rack is 4 The maximum number of DTC 72MX in a 1.1 m rack is 2 HP recommends that members of the DTC 16xx family be racked as illustrated below; Populating a Rack 3 Guidelines for the lowest racked DTC. 11

HP DTC Cabling and Racking Guide
Page 20
... DTC when you need to test the DTC or interpret faults. Note If you want to rack your DTC 72MX in an HP cabinet, you must use the HP C2788A rail kit. 1 Mount the side brackets on the front of the system rack, with the front facing outwards. The system rack front panel... fits onto the "snaps" attached to the brackets. 14 The DTC 72MX is delivered with brackets attached for mounting in standard 19" EIA racks, including HP...
... DTC when you need to test the DTC or interpret faults. Note If you want to rack your DTC 72MX in an HP cabinet, you must use the HP C2788A rail kit. 1 Mount the side brackets on the front of the system rack, with the front facing outwards. The system rack front panel... fits onto the "snaps" attached to the brackets. 14 The DTC 72MX is delivered with brackets attached for mounting in standard 19" EIA racks, including HP...

HP DTC Cabling and Racking Guide
Page 21
Fix the brackets on the DTC to the brackets. 15 The snaps are attached to the rack using four screws from your rack assembly kit. 4 Push the system rack front panel into the rack, along the previously installed rails. 4 Racking a DTC 72MX with a system rack front panel 3 Slide the DTC into place.
Fix the brackets on the DTC to the brackets. 15 The snaps are attached to the rack using four screws from your rack assembly kit. 4 Push the system rack front panel into the rack, along the previously installed rails. 4 Racking a DTC 72MX with a system rack front panel 3 Slide the DTC into place.

HP DTC Cabling and Racking Guide
Page 22
4 Racking a DTC 72MX with a desktop front panel Racking a DTC 72MX with a desktop front panel 1 Remove the front panel and unscrew the plastic snaps from the side brackets. 2 Slide the DTC into the rack, along the previously installed rails. 16
4 Racking a DTC 72MX with a desktop front panel Racking a DTC 72MX with a desktop front panel 1 Remove the front panel and unscrew the plastic snaps from the side brackets. 2 Slide the DTC into the rack, along the previously installed rails. 16

HP DTC Cabling and Racking Guide
Page 25
Use the screws supplied with the rack mounting kit to fix the two brackets onto the sides of the DTC. 2 Slide the DTC 16xx into the rack along the previously installed rails. 4 Racking the DTC 16xx family 1 Use the four small cross-head screws supplied to fix the side the accessories kit) in a visible position inside the rack. 19
Use the screws supplied with the rack mounting kit to fix the two brackets onto the sides of the DTC. 2 Slide the DTC 16xx into the rack along the previously installed rails. 4 Racking the DTC 16xx family 1 Use the four small cross-head screws supplied to fix the side the accessories kit) in a visible position inside the rack. 19

HP DTC Cabling and Racking Guide
Page 111
... DTC 16xx family accessories kit 18 diagnostic port 39 example connections 35 mounting 19 racking guidelines 11 rail type 10 to 8-port DDP 40 to 8-port MDP 40 DTC 72MX asynchronous processor boards 37 ...36 front panels 13 maximum in rack 11 racking in non-HP racks 13 racking with desktop front panel 16 racking with system rack front panel 14 rail type 10 to 8-port DDP 41 to 8-port MDP ...rear mounting 24 P patch panels 86 power button desktop front panel 17 protocol analyzer connection 66 R rail product numbers 7 rails types 7 RS-232 over twisted pair 84 standard 70 with 10BaseT 75 with RS-423 75 ...
... DTC 16xx family accessories kit 18 diagnostic port 39 example connections 35 mounting 19 racking guidelines 11 rail type 10 to 8-port DDP 40 to 8-port MDP 40 DTC 72MX asynchronous processor boards 37 ...36 front panels 13 maximum in rack 11 racking in non-HP racks 13 racking with desktop front panel 16 racking with system rack front panel 14 rail type 10 to 8-port DDP 41 to 8-port MDP ...rear mounting 24 P patch panels 86 power button desktop front panel 17 protocol analyzer connection 66 R rail product numbers 7 rails types 7 RS-232 over twisted pair 84 standard 70 with 10BaseT 75 with RS-423 75 ...
HP DTC Cabling and Racking Guide
Page 112
Index S standard cable lengths 75 system racks 1.1 meter 5 1.6 meter 4 DTC racking order 6 EIA units 3 guidelines for racking systems 6 HP 3 non-HP 13 populating 11 power supply 3 product numbers 6 rails 6 rear door 5 T twisted pair cables 84 typical configurations 29 V V.35 cable 98 X X.25 boards 97 106
Index S standard cable lengths 75 system racks 1.1 meter 5 1.6 meter 4 DTC racking order 6 EIA units 3 guidelines for racking systems 6 HP 3 non-HP 13 populating 11 power supply 3 product numbers 6 rails 6 rear door 5 T twisted pair cables 84 typical configurations 29 V V.35 cable 98 X X.25 boards 97 106

Installation Guide, Seventh Edition - HP 9000 rp3410 and HP 9000 rp3440
Page 25
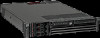
...rotating them outward. This section explains how to remove and replace the covers for both rack and pedestal-mounted configurations. Accessing a Rack-Mounted Server HP 9000 rp3410 and rp3440 servers are not installed before turning the server on it. For slide installation instructions, see the Installation Guide, Mid-Weight Slide Kit... a hot-swappable item, you are employed prior to extending the server. and so on a rack-mounted server, pull the server out onto the rail guides and remove the top cover. To extend the server from the server chassis. Step 1. Chapter 1 25
...rotating them outward. This section explains how to remove and replace the covers for both rack and pedestal-mounted configurations. Accessing a Rack-Mounted Server HP 9000 rp3410 and rp3440 servers are not installed before turning the server on it. For slide installation instructions, see the Installation Guide, Mid-Weight Slide Kit... a hot-swappable item, you are employed prior to extending the server. and so on a rack-mounted server, pull the server out onto the rail guides and remove the top cover. To extend the server from the server chassis. Step 1. Chapter 1 25

Installation Guide, Seventh Edition - HP 9000 rp3410 and HP 9000 rp3440
Page 26
...of the rack until it stops. Step 1. Step 2. Insert the Server into the Rack To insert the server into the rack until the guide-rail release clips are closed. Ensure the top cover lock keyswitch is necessary when installing or removing many components. Slide the server out of the server... inward and push the server into the rack, follow these steps: Step 1. Verify that the rack latches are visible. Press the rail clips on and external cables (including the power cord) connected. Power off the server and disconnect the power and external cables from the back ...
...of the rack until it stops. Step 1. Step 2. Insert the Server into the Rack To insert the server into the rack until the guide-rail release clips are closed. Ensure the top cover lock keyswitch is necessary when installing or removing many components. Slide the server out of the server... inward and push the server into the rack, follow these steps: Step 1. Verify that the rack latches are visible. Press the rail clips on and external cables (including the power cord) connected. Power off the server and disconnect the power and external cables from the back ...

User Service Guide, Sixth Edition - HP 9000 rp3410/rp3440
Page 52
...and Replacing Server Covers and Bezels To upgrade, remove, or replace most server components, you in an approved rack. Accessing a Rack-Mounted Server HP 9000 rp3410 and rp3440 servers are designed to be placed, and slide the server as close to a server that are only replacing a hot-swappable fan. Use caution... the forks of the server, you are not installed before turning the server on a rack-mounted server, pull the server out onto the rail guides and remove the top cover. Because of the weight of the lifter to remove and replace the covers for both rack and pedestal-mounted...
...and Replacing Server Covers and Bezels To upgrade, remove, or replace most server components, you in an approved rack. Accessing a Rack-Mounted Server HP 9000 rp3410 and rp3440 servers are designed to be placed, and slide the server as close to a server that are only replacing a hot-swappable fan. Use caution... the forks of the server, you are not installed before turning the server on a rack-mounted server, pull the server out onto the rail guides and remove the top cover. Because of the weight of the lifter to remove and replace the covers for both rack and pedestal-mounted...

User Service Guide, Sixth Edition - HP 9000 rp3410/rp3440
Page 53
...-Mounted Server Removal of the rack until it . Insert the Server Into the Rack To insert the server into the rack until the guide-rail release clips are replacing a hot-swappable item, you are visible. Installing Additional Components 53 Ensure that the rack latches are employed before extending...outward. Verify that all anti-tip features (front and rear anti-tip feet installed; Removing and Replacing the Top Cover on the HP website at http://www.hp.com/racksolutions. and so on and leave the external cables (including the power cord) connected. 1. Extend the Server From the ...
...-Mounted Server Removal of the rack until it . Insert the Server Into the Rack To insert the server into the rack until the guide-rail release clips are replacing a hot-swappable item, you are visible. Installing Additional Components 53 Ensure that the rack latches are employed before extending...outward. Verify that all anti-tip features (front and rear anti-tip feet installed; Removing and Replacing the Top Cover on the HP website at http://www.hp.com/racksolutions. and so on and leave the external cables (including the power cord) connected. 1. Extend the Server From the ...

User Service Guide, Sixth Edition - HP 9000 rp3410/rp3440
Page 126
...server covers from the outlet or power protection device unless you are only replacing a hot-swappable fan. Accessing a Rack-Mount Server HP 9000 rp3410 and rp3440 servers are replacing a hot-swappable item, you are designed to remove and replace the server covers and bezel for rack-mount ... server. WARNING! This section explains how to be rack mounted. For slide installation instructions, see the Installation Guide, Mid-Weight Slide Kit (HP part number 5065-7291). adequate ballast properly placed, and so on.) are employed before turning the server on a rack-mounted server, pull ...
...server covers from the outlet or power protection device unless you are only replacing a hot-swappable fan. Accessing a Rack-Mount Server HP 9000 rp3410 and rp3440 servers are replacing a hot-swappable item, you are designed to remove and replace the server covers and bezel for rack-mount ... server. WARNING! This section explains how to be rack mounted. For slide installation instructions, see the Installation Guide, Mid-Weight Slide Kit (HP part number 5065-7291). adequate ballast properly placed, and so on.) are employed before turning the server on a rack-mounted server, pull ...

User Service Guide, Sixth Edition - HP 9000 rp3410/rp3440
Page 127
Press the rail clips on and external cables (including the power cord) connected. Rotate the blue release lever toward the back of the server and slide the cover ... Rack Latches 3. Slide the server out of the server. 2. Inserting the Server Into the Rack To insert the server into the rack until the guide-rail release clips are visible. Verify that the rack latches are replacing a hot-swappable item, you can leave the server on either side of the server...
Press the rail clips on and external cables (including the power cord) connected. Rotate the blue release lever toward the back of the server and slide the cover ... Rack Latches 3. Slide the server out of the server. 2. Inserting the Server Into the Rack To insert the server into the rack until the guide-rail release clips are visible. Verify that the rack latches are replacing a hot-swappable item, you can leave the server on either side of the server...