
HP USB Digital Drive
Page 2
The Digital Drive can purchase one (in various storage capacities) from any computer that is a pocket-sized SD (Secure Digital) memory drive for storing and transferring files such as digital pictures, music, video, and data. However, you will need an SD memory card to operate the Digital Drive. An SD memory card 2 may not be used with any HP authorized reseller. You can be included. User Guide 1 The HP USB Digital Drive 1 is running Microsoft Windows XP Home, Windows XP Pro, or Windows 2000.
The Digital Drive can purchase one (in various storage capacities) from any computer that is a pocket-sized SD (Secure Digital) memory drive for storing and transferring files such as digital pictures, music, video, and data. However, you will need an SD memory card to operate the Digital Drive. An SD memory card 2 may not be used with any HP authorized reseller. You can be included. User Guide 1 The HP USB Digital Drive 1 is running Microsoft Windows XP Home, Windows XP Pro, or Windows 2000.

HP USB Digital Drive
Page 3
If the SD memory card does not slide in properly, gently pull it out and reinsert it. 2 User Guide Installing the SD Memory Card 1. Remove the cap 1 of the Digital Drive. 2. Insert the SD memory card into the SD slot 2 with the notched corner positioned on the lower left as shown.
If the SD memory card does not slide in properly, gently pull it out and reinsert it. 2 User Guide Installing the SD Memory Card 1. Remove the cap 1 of the Digital Drive. 2. Insert the SD memory card into the SD slot 2 with the notched corner positioned on the lower left as shown.
HP USB Digital Drive
Page 4
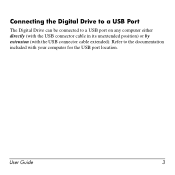
Refer to a USB port on any computer either directly (with the USB connector cable in its unextended position) or by extension (with your computer for the USB port location. Connecting the Digital Drive to a USB Port The Digital Drive can be connected to the documentation included with the USB connector cable extended). User Guide 3
Refer to a USB port on any computer either directly (with the USB connector cable in its unextended position) or by extension (with your computer for the USB port location. Connecting the Digital Drive to a USB Port The Digital Drive can be connected to the documentation included with the USB connector cable extended). User Guide 3
HP USB Digital Drive
Page 5
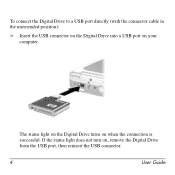
If the status light does not turn on your computer. To connect the Digital Drive to a USB port directly (with the connector cable in the unextended position): » Insert the USB connector on the Digital Drive into a USB port on , remove the Digital Drive from the USB port, then reinsert the USB connector. 4 User Guide The status light on the Digital Drive turns on when the connection is successful.
If the status light does not turn on your computer. To connect the Digital Drive to a USB port directly (with the connector cable in the unextended position): » Insert the USB connector on the Digital Drive into a USB port on , remove the Digital Drive from the USB port, then reinsert the USB connector. 4 User Guide The status light on the Digital Drive turns on when the connection is successful.

HP USB Digital Drive
Page 6
Rotate the USB connector cable out of its extended position): 1. User Guide 5 To connect the Digital Drive to a USB port by extension (with the USB cable in its track gently until it is fully extended.
Rotate the USB connector cable out of its extended position): 1. User Guide 5 To connect the Digital Drive to a USB port by extension (with the USB cable in its track gently until it is fully extended.
HP USB Digital Drive
Page 7
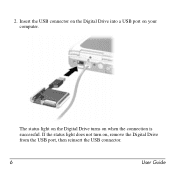
Insert the USB connector on the Digital Drive into a USB port on when the connection is successful. The status light on the Digital Drive turns on your computer. 2. If the status light does not turn on, remove the Digital Drive from the USB port, then reinsert the USB connector. 6 User Guide
Insert the USB connector on the Digital Drive into a USB port on when the connection is successful. The status light on the Digital Drive turns on your computer. 2. If the status light does not turn on, remove the Digital Drive from the USB port, then reinsert the USB connector. 6 User Guide
HP USB Digital Drive
Page 8
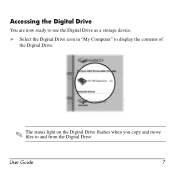
Accessing the Digital Drive You are now ready to use the Digital Drive as a storage device. » Select the Digital Drive icon in "My Computer" to display the contents of the Digital Drive. ✎ The status light on the Digital Drive flashes when you copy and move files to and from the Digital Drive. User Guide 7
Accessing the Digital Drive You are now ready to use the Digital Drive as a storage device. » Select the Digital Drive icon in "My Computer" to display the contents of the Digital Drive. ✎ The status light on the Digital Drive flashes when you copy and move files to and from the Digital Drive. User Guide 7

HP USB Digital Drive
Page 9
Disconnecting the Digital Drive ✎ Do not attempt to Remove Hardware" message appears on your taskbar. Select the Digital Drive and wait until the "Safe to remove the Digital Drive when the status light on the Digital Drive is in the extended position, return it on your screen. 3. Gently unplug the Digital Drive from the USB port. ✎ If the USB connector cable is flashing. 1. Select the "Safely Remove Hardware" icon on its track for safe storage. 8 User Guide A dialog box displays a list of connected devices. 2.
Disconnecting the Digital Drive ✎ Do not attempt to Remove Hardware" message appears on your taskbar. Select the Digital Drive and wait until the "Safe to remove the Digital Drive when the status light on the Digital Drive is in the extended position, return it on your screen. 3. Gently unplug the Digital Drive from the USB port. ✎ If the USB connector cable is flashing. 1. Select the "Safely Remove Hardware" icon on its track for safe storage. 8 User Guide A dialog box displays a list of connected devices. 2.
HP USB Digital Drive
Page 10
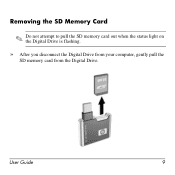
User Guide 9 Removing the SD Memory Card ✎ Do not attempt to pull the SD memory card out when the status light on the Digital Drive is flashing. » After you disconnect the Digital Drive from your computer, gently pull the SD memory card from the Digital Drive.
User Guide 9 Removing the SD Memory Card ✎ Do not attempt to pull the SD memory card out when the status light on the Digital Drive is flashing. » After you disconnect the Digital Drive from your computer, gently pull the SD memory card from the Digital Drive.
HP USB Digital Drive
Page 11
... HP technical support. To access HP technical support, visit the HP Web site at http://www.hp.com, and select your own questions. You can either browse the postings as a guest, or register as a user and submit your country or region. HP responds to questions in a timely manner. Accessing Technical Support Support services are using 10 User Guide...
... HP technical support. To access HP technical support, visit the HP Web site at http://www.hp.com, and select your own questions. You can either browse the postings as a guest, or register as a user and submit your country or region. HP responds to questions in a timely manner. Accessing Technical Support Support services are using 10 User Guide...
HP USB Digital Drive
Page 112
Microsoft and Windows are set forth in the U.S. and/or other countries. The warranties for technical or editorial errors or omissions contained herein. SD Logo is subject to change without notice. The information contained herein is a trademark. User Guide HP USB Digital Drive First Edition July 2003 HP shall not be liable for HP products and services are trademarks of Microsoft Corporation in the express warranty statements accompanying such products and services. © 2003 Hewlett-Packard Development Company, L.P.
Microsoft and Windows are set forth in the U.S. and/or other countries. The warranties for technical or editorial errors or omissions contained herein. SD Logo is subject to change without notice. The information contained herein is a trademark. User Guide HP USB Digital Drive First Edition July 2003 HP shall not be liable for HP products and services are trademarks of Microsoft Corporation in the express warranty statements accompanying such products and services. © 2003 Hewlett-Packard Development Company, L.P.

Reference Guide
Page 10
Then contact Customer Care. 1-4 Reference Guide If you install a device and then receive a warning message, remove the device to restore notebook functionality. Getting Started with Your Notebook Bottom Panel Components 1 Hard drive 2 Battery latch 3 RAM (memory) cover 4 Reset button 5 Mini PCI cover (no user parts inside) Ä CAUTION: To prevent an unresponsive system and the display of a warning message, install only a Mini PCI device authorized for use in your notebook by the governmental agency that regulates wireless devices in your country.
Then contact Customer Care. 1-4 Reference Guide If you install a device and then receive a warning message, remove the device to restore notebook functionality. Getting Started with Your Notebook Bottom Panel Components 1 Hard drive 2 Battery latch 3 RAM (memory) cover 4 Reset button 5 Mini PCI cover (no user parts inside) Ä CAUTION: To prevent an unresponsive system and the display of a warning message, install only a Mini PCI device authorized for use in your notebook by the governmental agency that regulates wireless devices in your country.
Reference Guide
Page 13
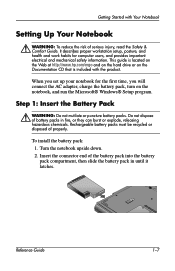
...charge the battery pack, turn on the Documentation CD that is located on the Web at http://www.hp.com/ergo and on the hard drive or on the notebook, and run the Microsoft® Windows® Setup program. Rechargeable battery packs must be recycled or ...guide is included with Your Notebook Setting Up Your Notebook Å WARNING: To reduce the risk of the battery pack into the battery pack compartment, then slide the battery pack in fire, or they can burst or explode, releasing hazardous chemicals. Turn the notebook upside down. 2. When you set up your notebook for computer users...
...charge the battery pack, turn on the Documentation CD that is located on the Web at http://www.hp.com/ergo and on the hard drive or on the notebook, and run the Microsoft® Windows® Setup program. Rechargeable battery packs must be recycled or ...guide is included with Your Notebook Setting Up Your Notebook Å WARNING: To reduce the risk of the battery pack into the battery pack compartment, then slide the battery pack in fire, or they can burst or explode, releasing hazardous chemicals. Turn the notebook upside down. 2. When you set up your notebook for computer users...
Reference Guide
Page 16
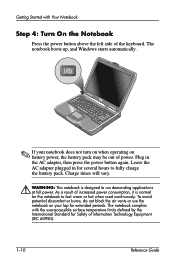
... the left side of the keyboard. Getting Started with the user-accessible surface temperature limits defined by the International Standard for Safety of Information Technology Equipment (IEC 60950). 1-10 Reference Guide The notebook boots up, and Windows starts automatically. ✎ If your... lap for extended periods. Plug in for the notebook to run demanding applications at full power. To avoid potential discomfort ...
... the left side of the keyboard. Getting Started with the user-accessible surface temperature limits defined by the International Standard for Safety of Information Technology Equipment (IEC 60950). 1-10 Reference Guide The notebook boots up, and Windows starts automatically. ✎ If your... lap for extended periods. Plug in for the notebook to run demanding applications at full power. To avoid potential discomfort ...
Reference Guide
Page 30
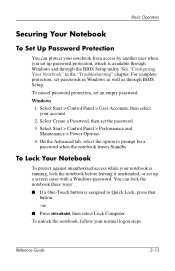
... Control Panel > Performance and Maintenance > Power Options. 4. To unlock the notebook, follow your account. 2. To Lock Your Notebook To protect against unauthorized access while your notebook from access by another user when you set up a screen saver with a Windows password. On the ...Touch button is assigned to prompt for a password when the notebook leaves Standby. To cancel password protection, set the password. 3. Reference Guide 2-13 You can protect your notebook is running, lock the notebook before leaving it unattended, or set up password protection, which ...
... Control Panel > Performance and Maintenance > Power Options. 4. To unlock the notebook, follow your account. 2. To Lock Your Notebook To protect against unauthorized access while your notebook from access by another user when you set up a screen saver with a Windows password. On the ...Touch button is assigned to prompt for a password when the notebook leaves Standby. To cancel password protection, set the password. 3. Reference Guide 2-13 You can protect your notebook is running, lock the notebook before leaving it unattended, or set up password protection, which ...
Reference Guide
Page 32
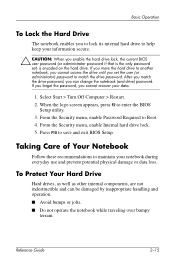
... are not indestructible and can change the notebook (and drive) password. Reference Guide 2-15 When the logo screen appears, press F2 to another notebook, you cannot access the drive until you enable the hard drive lock, the current BIOS user password (or administrator password if that is... the only password set the user (or administrator) password...
... are not indestructible and can change the notebook (and drive) password. Reference Guide 2-15 When the logo screen appears, press F2 to another notebook, you cannot access the drive until you enable the hard drive lock, the current BIOS user password (or administrator password if that is... the only password set the user (or administrator) password...
Reference Guide
Page 89
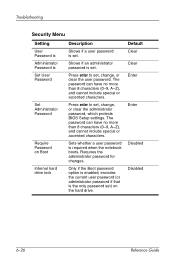
... Internal hard drive lock Description Shows if a user password is set . Requires the administrator password for changes. Sets whether a user password is set . Press enter to set... password, which protects BIOS Setup settings. Troubleshooting Security Menu Setting User Password is Administrator Password is Set User Password Set Administrator Password Require Password on the hard drive. The... include special or accented characters. Press enter to set , change , or clear the user password. The password can have no more than 8 characters (0-9, A-Z), and cannot include ...
... Internal hard drive lock Description Shows if a user password is set . Requires the administrator password for changes. Sets whether a user password is set . Press enter to set... password, which protects BIOS Setup settings. Troubleshooting Security Menu Setting User Password is Administrator Password is Set User Password Set Administrator Password Require Password on the hard drive. The... include special or accented characters. Press enter to set , change , or clear the user password. The password can have no more than 8 characters (0-9, A-Z), and cannot include ...
HP Compaq nx9020, nx9030 and nx9040 Notebook PCs- Startup Guide
Page 7
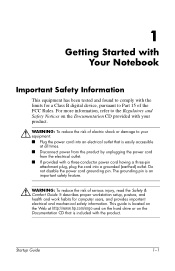
.... Å WARNING: To reduce the risk of serious injury, read the Safety & Comfort Guide. It describes proper workstation setup, posture, and health and work habits for a Class B digital device...is easily accessible at http://www.hp.com/ergo and on the hard drive or on the Documentation CD provided with the limits for computer users, and provides important electrical and... mechanical safety information. Do not disable the power cord grounding pin. 1 Getting Started with Your Notebook Important Safety Information This...
.... Å WARNING: To reduce the risk of serious injury, read the Safety & Comfort Guide. It describes proper workstation setup, posture, and health and work habits for a Class B digital device...is easily accessible at http://www.hp.com/ergo and on the hard drive or on the Documentation CD provided with the limits for computer users, and provides important electrical and... mechanical safety information. Do not disable the power cord grounding pin. 1 Getting Started with Your Notebook Important Safety Information This...
HP Compaq nx9020, nx9030 and nx9040 Notebook PCs- Startup Guide
Page 11
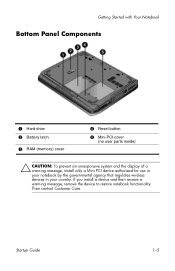
Startup Guide 1-5 Getting Started with Your Notebook Bottom Panel Components 1 Hard drive 2 Battery latch 3 RAM (memory) cover 4 Reset button 5 Mini PCI cover (no user parts inside) Ä CAUTION: To prevent an unresponsive system and the display of a warning message, install only a Mini PCI device authorized for use in your notebook by the governmental agency that regulates wireless devices in your country. If you install a device and then receive a warning message, remove the device to restore notebook functionality. Then contact Customer Care.
Startup Guide 1-5 Getting Started with Your Notebook Bottom Panel Components 1 Hard drive 2 Battery latch 3 RAM (memory) cover 4 Reset button 5 Mini PCI cover (no user parts inside) Ä CAUTION: To prevent an unresponsive system and the display of a warning message, install only a Mini PCI device authorized for use in your notebook by the governmental agency that regulates wireless devices in your country. If you install a device and then receive a warning message, remove the device to restore notebook functionality. Then contact Customer Care.

HP Compaq nx9020, nx9030 and nx9040 Notebook PCs- Startup Guide
Page 14
... for the first time, you set up your notebook for computer users, and provides important electrical and mechanical safety information. Step 1: Insert the Battery Pack Å WARNING: Do not mutilate or puncture battery packs. This guide is located on the Web at http://www.hp.com/ergo and on the hard drive or on...
... for the first time, you set up your notebook for computer users, and provides important electrical and mechanical safety information. Step 1: Insert the Battery Pack Å WARNING: Do not mutilate or puncture battery packs. This guide is located on the Web at http://www.hp.com/ergo and on the hard drive or on...


