Limited Warranty and Technical Support
Page 1
... COUNTRIES, SOME EXCLUSIONS OR LIMITATIONS OF THIS LIMITED WARRANTY MAY NOT APPLY TO YOU. HP will not alter form, fit, or function of defective parts, including hard drives identified by HP Intelligent Manageability software as "HP") with "1 YR," "2 YR," or "3 YR" marked on the serial number... label located on the back of the unit Included HP accessories, digital writing pen, and batteries Duration of ...
... COUNTRIES, SOME EXCLUSIONS OR LIMITATIONS OF THIS LIMITED WARRANTY MAY NOT APPLY TO YOU. HP will not alter form, fit, or function of defective parts, including hard drives identified by HP Intelligent Manageability software as "HP") with "1 YR," "2 YR," or "3 YR" marked on the serial number... label located on the back of the unit Included HP accessories, digital writing pen, and batteries Duration of ...
Limited Warranty and Technical Support
Page 2
... according to the terms and conditions of this Limited Warranty become the property of receiving warranty service. During the Limited Warranty Period, HP will repair or replace the defective component parts or the hardware product. This is required within the Limited Warranty Period. BEFORE RETURNING ... purchase price or lease payments (less interest) instead of the spare part. You may be free from HP. YOU SHOULD MAKE PERIODIC BACKUP COPIES OF THE DATA STORED ON YOUR HARD DRIVE OR OTHER STORAGE DEVICES AS A PRECAUTION AGAINST POSSIBLE FAILURES, ALTERATION, OR LOSS OF THE DATA. Spare...
... according to the terms and conditions of this Limited Warranty become the property of receiving warranty service. During the Limited Warranty Period, HP will repair or replace the defective component parts or the hardware product. This is required within the Limited Warranty Period. BEFORE RETURNING ... purchase price or lease payments (less interest) instead of the spare part. You may be free from HP. YOU SHOULD MAKE PERIODIC BACKUP COPIES OF THE DATA STORED ON YOUR HARD DRIVE OR OTHER STORAGE DEVICES AS A PRECAUTION AGAINST POSSIBLE FAILURES, ALTERATION, OR LOSS OF THE DATA. Spare...
Reference Guide
Page 4
... Up Password Protection 2-13 To Lock Your Notebook 2-13 To Attach an Optional Security Cable 2-14 To Protect Against Viruses 2-14 To Lock the Hard Drive 2-15 Taking Care of Your Notebook 2-15 To Protect Your Hard Drive 2-15 To Maintain Your Notebook 2-16 To Safeguard Your Data 2-16 To... Extend the Life of the Display 2-17 To Clean Your Notebook 2-17 3 Battery Packs and Power Management Managing ...
... Up Password Protection 2-13 To Lock Your Notebook 2-13 To Attach an Optional Security Cable 2-14 To Protect Against Viruses 2-14 To Lock the Hard Drive 2-15 Taking Care of Your Notebook 2-15 To Protect Your Hard Drive 2-15 To Maintain Your Notebook 2-16 To Safeguard Your Data 2-16 To... Extend the Life of the Display 2-17 To Clean Your Notebook 2-17 3 Battery Packs and Power Management Managing ...
Reference Guide
Page 5
.... . . . . 4-7 5 Add-On Devices Connecting External Devices 5-1 To Insert or Remove a PC Card 5-1 To Connect an Audio Device 5-3 To Connect a TV to Your Notebook (Select Models Only 5-4 Switching the Display to the External Monitor (Select Models Only 5-5 To Connect a... a RAM Expansion Module 5-9 To Remove a RAM Expansion Module 5-10 Replacing the Hard Drive 5-12 To Replace the Hard Drive 5-12 To Replace the Hard Drive Holder 5-13 To Prepare a New Hard Drive 5-14 6 Troubleshooting Troubleshooting Your Notebook 6-1 Audio Problems 6-2 CD-ROM and DVD Problems 6-3 Reference Guide v
.... . . . . 4-7 5 Add-On Devices Connecting External Devices 5-1 To Insert or Remove a PC Card 5-1 To Connect an Audio Device 5-3 To Connect a TV to Your Notebook (Select Models Only 5-4 Switching the Display to the External Monitor (Select Models Only 5-5 To Connect a... a RAM Expansion Module 5-9 To Remove a RAM Expansion Module 5-10 Replacing the Hard Drive 5-12 To Replace the Hard Drive 5-12 To Replace the Hard Drive Holder 5-13 To Prepare a New Hard Drive 5-14 6 Troubleshooting Troubleshooting Your Notebook 6-1 Audio Problems 6-2 CD-ROM and DVD Problems 6-3 Reference Guide v
Reference Guide
Page 6
... 6-4 Hard Drive Problems 6-5 Heat Problems 6-6 Infrared Problems 6-6 Keyboard and Pointing Device Problems 6-7 Local Area Network (LAN) Problems 6-8 Memory Problems 6-9 Modem Problems 6-10 PC Card (PCMCIA) Problems 6-13 Performance Problems 6-14 Power and Battery Pack Problems 6-15 Printing Problems 6-18 Serial, Parallel and USB Problems 6-19 Startup Problems 6-20 Wireless Problems 6-21 Configuring Your Notebook...
... 6-4 Hard Drive Problems 6-5 Heat Problems 6-6 Infrared Problems 6-6 Keyboard and Pointing Device Problems 6-7 Local Area Network (LAN) Problems 6-8 Memory Problems 6-9 Modem Problems 6-10 PC Card (PCMCIA) Problems 6-13 Performance Problems 6-14 Power and Battery Pack Problems 6-15 Printing Problems 6-18 Serial, Parallel and USB Problems 6-19 Startup Problems 6-20 Wireless Problems 6-21 Configuring Your Notebook...
Reference Guide
Page 8
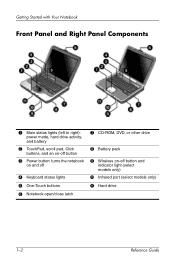
Infrared port (select models only) q Hard drive 1-2 Reference Guide Getting Started with Your Notebook Front Panel and Right Panel Components 1 Main status lights (left to right): power mode, hard drive activity, and battery 2 TouchPad, scroll pad, Click buttons, and an on-off button 3 Power button: turns the notebook on and off 4 Keyboard status lights 5 One-Touch buttons 6 Notebook open/close latch 7 CD-ROM, DVD, or other drive 8 Battery pack 9 Wireless on-off button and indicator light (select models only) -
Infrared port (select models only) q Hard drive 1-2 Reference Guide Getting Started with Your Notebook Front Panel and Right Panel Components 1 Main status lights (left to right): power mode, hard drive activity, and battery 2 TouchPad, scroll pad, Click buttons, and an on-off button 3 Power button: turns the notebook on and off 4 Keyboard status lights 5 One-Touch buttons 6 Notebook open/close latch 7 CD-ROM, DVD, or other drive 8 Battery pack 9 Wireless on-off button and indicator light (select models only) -
Reference Guide
Page 10
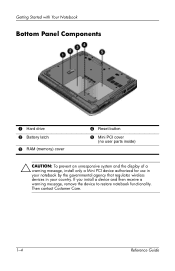
Then contact Customer Care. 1-4 Reference Guide If you install a device and then receive a warning message, remove the device to restore notebook functionality. Getting Started with Your Notebook Bottom Panel Components 1 Hard drive 2 Battery latch 3 RAM (memory) cover 4 Reset button 5 Mini PCI cover (no user parts inside) Ä CAUTION: To prevent an unresponsive system and the display of a warning message, install only a Mini PCI device authorized for use in your notebook by the governmental agency that regulates wireless devices in your country.
Then contact Customer Care. 1-4 Reference Guide If you install a device and then receive a warning message, remove the device to restore notebook functionality. Getting Started with Your Notebook Bottom Panel Components 1 Hard drive 2 Battery latch 3 RAM (memory) cover 4 Reset button 5 Mini PCI cover (no user parts inside) Ä CAUTION: To prevent an unresponsive system and the display of a warning message, install only a Mini PCI device authorized for use in your notebook by the governmental agency that regulates wireless devices in your country.
Reference Guide
Page 11
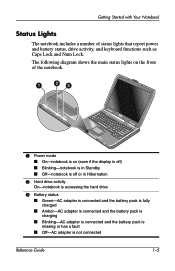
... and Num Lock. Getting Started with Your Notebook Status Lights The notebook includes a number of the notebook. 1 Power mode ■ On-notebook is on (even if the display is off) ■ Blinking-notebook is in Standby ■ Off-notebook is off or in Hibernation 2 Hard drive activity On-notebook is accessing the hard drive 3 Battery status ■ Green-AC adapter is...
... and Num Lock. Getting Started with Your Notebook Status Lights The notebook includes a number of the notebook. 1 Power mode ■ On-notebook is on (even if the display is off) ■ Blinking-notebook is in Standby ■ Off-notebook is off or in Hibernation 2 Hard drive activity On-notebook is accessing the hard drive 3 Battery status ■ Green-AC adapter is...
Reference Guide
Page 13
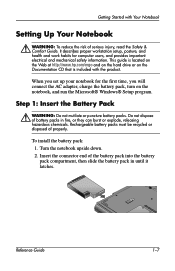
...the AC adapter, charge the battery pack, turn on the Documentation CD that is located on the Web at http://www.hp.com/ergo and on the hard drive or on the notebook, and run the Microsoft® Windows® Setup program. To install the battery pack: 1. This guide is included ...with Your Notebook Setting Up Your Notebook Å WARNING: To reduce the risk of battery packs in until it latches. Do not dispose of ...
...the AC adapter, charge the battery pack, turn on the Documentation CD that is located on the Web at http://www.hp.com/ergo and on the hard drive or on the notebook, and run the Microsoft® Windows® Setup program. To install the battery pack: 1. This guide is included ...with Your Notebook Setting Up Your Notebook Å WARNING: To reduce the risk of battery packs in until it latches. Do not dispose of ...
Reference Guide
Page 17
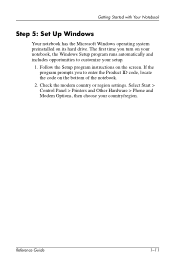
.... If the program prompts you turn on its hard drive. Select Start > Control Panel > Printers and Other Hardware > Phone and Modem Options, then choose your setup. 1. Getting Started with Your Notebook Step 5: Set Up Windows Your notebook has the Microsoft Windows operating system preinstalled on your notebook, the Windows Setup program runs automatically and includes...
.... If the program prompts you turn on its hard drive. Select Start > Control Panel > Printers and Other Hardware > Phone and Modem Options, then choose your setup. 1. Getting Started with Your Notebook Step 5: Set Up Windows Your notebook has the Microsoft Windows operating system preinstalled on your notebook, the Windows Setup program runs automatically and includes...
Reference Guide
Page 20
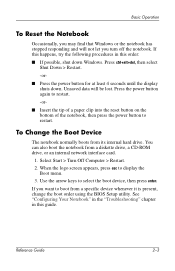
... boot from a specific device whenever it is present, change the boot order using the BIOS Setup utility. Reference Guide 2-3 You can also boot the notebook from its internal hard drive. Use the arrow keys to restart. Press the power button again to restart. -or- ■ Insert the tip of a paper clip into the...
... boot from a specific device whenever it is present, change the boot order using the BIOS Setup utility. Reference Guide 2-3 You can also boot the notebook from its internal hard drive. Use the arrow keys to restart. Press the power button again to restart. -or- ■ Insert the tip of a paper clip into the...
Reference Guide
Page 32
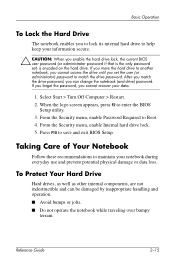
...Setup. From the Security menu, enable Internal hard drive lock. 5. Press F10 to Boot. 4. If you move the hard drive to another notebook, you cannot access the drive until you set ) is encoded on the hard drive. Taking Care of Your Notebook Follow these recommendations to maintain your data. ...jolts. ■ Do not operate the notebook while traveling over bumpy terrain. Basic Operation To Lock the Hard Drive The notebook enables you to lock its internal hard drive to help keep your information secure. Ä CAUTION: When you enable the hard drive lock, the current BIOS user password ...
...Setup. From the Security menu, enable Internal hard drive lock. 5. Press F10 to Boot. 4. If you move the hard drive to another notebook, you cannot access the drive until you set ) is encoded on the hard drive. Taking Care of Your Notebook Follow these recommendations to maintain your data. ...jolts. ■ Do not operate the notebook while traveling over bumpy terrain. Basic Operation To Lock the Hard Drive The notebook enables you to lock its internal hard drive to help keep your information secure. Ä CAUTION: When you enable the hard drive lock, the current BIOS user password ...
Reference Guide
Page 33
... while the system is starting or stopping. ■ Back up or carry the notebook by its display. ■ Do not use a pointing device or activate any other device that air can flow freely around the notebook. This turns off the hard drive. See the "Battery Packs and Power Management" chapter. To Safeguard Your Data...
... while the system is starting or stopping. ■ Back up or carry the notebook by its display. ■ Do not use a pointing device or activate any other device that air can flow freely around the notebook. This turns off the hard drive. See the "Battery Packs and Power Management" chapter. To Safeguard Your Data...

Reference Guide
Page 36
... Hibernation is turned off . Briefly press the power button to return to the hard drive, your current session in Standby for a specified interval Hard drive turns off. Begin using the notebook, and the hard drive turns on values set to turn on resuming that was not saved will find on... the display. No pointing devices are used, no disk drive is accessed, and no port (serial,...
... Hibernation is turned off . Briefly press the power button to return to the hard drive, your current session in Standby for a specified interval Hard drive turns off. Begin using the notebook, and the hard drive turns on values set to turn on resuming that was not saved will find on... the display. No pointing devices are used, no disk drive is accessed, and no port (serial,...
Reference Guide
Page 61
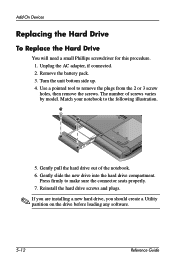
Turn the unit bottom side up. 4. Use a pointed tool to the following illustration. 5. Gently pull the hard drive out of screws varies by model. Gently slide the new drive into the hard drive compartment. Remove the battery pack. 3. Match your notebook to remove the plugs from the 2 or 3 screw holes, then remove the screws. Unplug the AC...
Turn the unit bottom side up. 4. Use a pointed tool to the following illustration. 5. Gently pull the hard drive out of screws varies by model. Gently slide the new drive into the hard drive compartment. Remove the battery pack. 3. Match your notebook to remove the plugs from the 2 or 3 screw holes, then remove the screws. Unplug the AC...

Reference Guide
Page 62
... end. You will need a small Phillips screwdriver for this connector from the end of the new hard drive. Remove the 4 screws from the hard drive you are removing. Insert the drive into the holder and drive case. Notice that the hard drive has a pin connector attachment at each end so that does not have a holder, you can remove...
... end. You will need a small Phillips screwdriver for this connector from the end of the new hard drive. Remove the 4 screws from the hard drive you are removing. Insert the drive into the holder and drive case. Notice that the hard drive has a pin connector attachment at each end so that does not have a holder, you can remove...
Reference Guide
Page 63
If you also need to prepare it to be able to restore the Windows software and operating system that were originally installed on your notebook. Add-On Devices To Prepare a New Hard Drive When you install a new hard drive, you want to work with your notebook, follow the system recovery procedures described in the "Troubleshooting" chapter of this guide. 5-14 Reference Guide
If you also need to prepare it to be able to restore the Windows software and operating system that were originally installed on your notebook. Add-On Devices To Prepare a New Hard Drive When you install a new hard drive, you want to work with your notebook, follow the system recovery procedures described in the "Troubleshooting" chapter of this guide. 5-14 Reference Guide
Reference Guide
Page 68
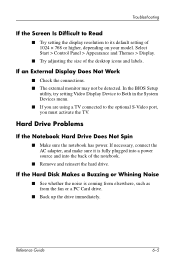
... If you are using a TV connected to its default setting of the notebook. ■ Remove and reinsert the hard drive. Hard Drive Problems If the Notebook Hard Drive Does Not Spin ■ Make sure the notebook has power. If necessary, connect the AC adapter, and make sure it ...is coming from elsewhere, such as from the fan or a PC Card drive. ■ Back up the drive immediately. Select...
... If you are using a TV connected to its default setting of the notebook. ■ Remove and reinsert the hard drive. Hard Drive Problems If the Notebook Hard Drive Does Not Spin ■ Make sure the notebook has power. If necessary, connect the AC adapter, and make sure it ...is coming from elsewhere, such as from the fan or a PC Card drive. ■ Back up the drive immediately. Select...
Reference Guide
Page 77
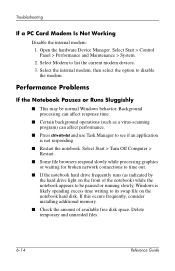
... of the notebook) while the notebook appears to list the current modem devices. 3. Troubleshooting If a PC Card Modem Is Not Working Disable the internal modem: 1. Background processing can affect response time. ■ Certain background operations (such as indicated by the hard drive light on the.... ■ Some file browsers respond slowly while processing graphics or waiting for broken network connections to time out. ■ If the notebook hard drive frequently runs (as a virus-scanning program) can affect performance. ■ Press ctrl+alt+del and use Task Manager to disable the...
... of the notebook) while the notebook appears to list the current modem devices. 3. Troubleshooting If a PC Card Modem Is Not Working Disable the internal modem: 1. Background processing can affect response time. ■ Certain background operations (such as indicated by the hard drive light on the.... ■ Some file browsers respond slowly while processing graphics or waiting for broken network connections to time out. ■ If the notebook hard drive frequently runs (as a virus-scanning program) can affect performance. ■ Press ctrl+alt+del and use Task Manager to disable the...

Reference Guide
Page 87
...format. Sets the language for the BIOS version at publication. Main Menu Setting BIOS Revision System Time System Date Language Internal Hard Disk UMA Video Memory Memory Serial Number Description Shows the current BIOS version. Default Detected automatically Detected automatically Detected automatically Auto .../yy format). Values set take effect immediately. Displays the serial number as shown on the back of the unit. Sets the hard drive type and various parameters. The following tables describe BIOS settings for BIOS Setup. Shows the extended memory size. Sets the video ...
...format. Sets the language for the BIOS version at publication. Main Menu Setting BIOS Revision System Time System Date Language Internal Hard Disk UMA Video Memory Memory Serial Number Description Shows the current BIOS version. Default Detected automatically Detected automatically Detected automatically Auto .../yy format). Values set take effect immediately. Displays the serial number as shown on the back of the unit. Sets the hard drive type and various parameters. The following tables describe BIOS settings for BIOS Setup. Shows the extended memory size. Sets the video ...

