Reference Guide
Page 90
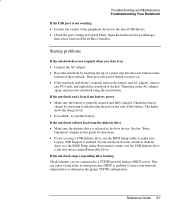
...to turn it and pressing the pad on . • If the notebook still doesn't respond, remove the battery and AC adapter, remove any PC Cards, and undock the notebook if docked. If the notebook stops responding after booting Check whether you 're using the reset button. See the "Basic ...Operation" chapter in the AC adapter again, and reset the notebook using a USB diskette drive, use the BIOS Setup utility Boot menu to ...
...to turn it and pressing the pad on . • If the notebook still doesn't respond, remove the battery and AC adapter, remove any PC Cards, and undock the notebook if docked. If the notebook stops responding after booting Check whether you 're using the reset button. See the "Basic ...Operation" chapter in the AC adapter again, and reset the notebook using a USB diskette drive, use the BIOS Setup utility Boot menu to ...
Reference Guide
Page 95
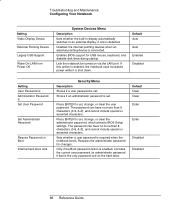
...(0-9, A-Z), and cannot include special or accented characters. Requires the administrator password for USB mouse, keyboard, and diskette disk drive during startup. Default Clear Clear Enter Enter Disabled Disabled 86 Reference Guide Lets the notebook be turned on the hard drive. Sets whether a user password is shut down....password if that is the only password set) on via the LAN port. If this option is enabled, the notebook uses increased power while it is required when the notebook boots. Press ENTER to set , change , or clear the user password. Press ENTER to an external display, if...
...(0-9, A-Z), and cannot include special or accented characters. Requires the administrator password for USB mouse, keyboard, and diskette disk drive during startup. Default Clear Clear Enter Enter Disabled Disabled 86 Reference Guide Lets the notebook be turned on the hard drive. Sets whether a user password is shut down....password if that is the only password set) on via the LAN port. If this option is enabled, the notebook uses increased power while it is required when the notebook boots. Press ENTER to set , change , or clear the user password. Press ENTER to an external display, if...
Reference Guide
Page 119
..., 23 recommended media, 23 cleaning the notebook, 28 configuring BIOS settings, 84 modem, 38 connecting IEEE 1394 devices, 53 LAN, 39 wireless network, 40 D data protection, 28 DDR-266 RAM, 58, 73 default BIOS settings, 85 devices boot order, 87 temporary boot order, 17 diskette drive location, 5 USB, 81 display BIOS settings, 86 brightness...
..., 23 recommended media, 23 cleaning the notebook, 28 configuring BIOS settings, 84 modem, 38 connecting IEEE 1394 devices, 53 LAN, 39 wireless network, 40 D data protection, 28 DDR-266 RAM, 58, 73 default BIOS settings, 85 devices boot order, 87 temporary boot order, 17 diskette drive location, 5 USB, 81 display BIOS settings, 86 brightness...
Reference Guide
Page 121
rebooting boot device, 87 temporary boot device, 17 region code, 23 regulatory information, 101 removing CD, 20, 22 DVD, 20, 22 hard drive, 62 hard drive holder, 63 PC card, 49 reset button, 17 resetting, 17 S safety battery use, 98 infrared port, 99 laser, 98 power cords, 97 ...73 modem, 73 overheating, 70 parallel port, 80 PC card, 76 performance, 76 pointing devices, 71 power, 77 printing, 79 resuming, 82 serial port, 80 Standby, 82 startup, 81 USB, 80 wireless communication, 82 turning on notebook, 13 typing special characters, 21 U USB diskette drive, 81 port location, 5 third port location...
rebooting boot device, 87 temporary boot device, 17 region code, 23 regulatory information, 101 removing CD, 20, 22 DVD, 20, 22 hard drive, 62 hard drive holder, 63 PC card, 49 reset button, 17 resetting, 17 S safety battery use, 98 infrared port, 99 laser, 98 power cords, 97 ...73 modem, 73 overheating, 70 parallel port, 80 PC card, 76 performance, 76 pointing devices, 71 power, 77 printing, 79 resuming, 82 serial port, 80 Standby, 82 startup, 81 USB, 80 wireless communication, 82 turning on notebook, 13 typing special characters, 21 U USB diskette drive, 81 port location, 5 third port location...
Maintenance and Service Guide
Page 53
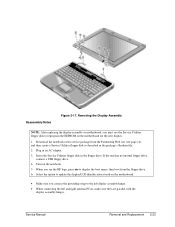
...you see the HP logo, press esc to update the display/LCD identification stored on the notebook. 5. Plug in the package's Readme file. 2. If the unit has no internal floppy drive, connect a USB floppy drive. 4. . Select the option to display the boot menu, then boot from the ...Partnership Web site (see page vii), and then create a Service Utilities floppy disk as described in an AC adapter. 3. Download the notebook series service package from the...
...you see the HP logo, press esc to update the display/LCD identification stored on the notebook. 5. Plug in the package's Readme file. 2. If the unit has no internal floppy drive, connect a USB floppy drive. 4. . Select the option to display the boot menu, then boot from the ...Partnership Web site (see page vii), and then create a Service Utilities floppy disk as described in an AC adapter. 3. Download the notebook series service package from the...
Maintenance and Service Guide
Page 85
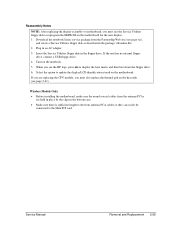
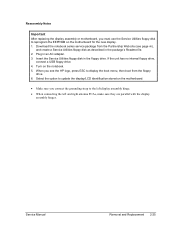
...antenna PCAs are replacing the CPU module, you must use the Service Utilities floppy disk to display the boot menu, and then boot from the floppy drive. 6. Download the notebook Series service package from the Partnership Web site (see page 2-41). Insert the Service Utilities floppy ...display/LCD identification stored on the motherboard. When you see the HP logo, press esc to reprogram the EEPROM on the notebook. 5. Service Manual Removal and Replacement 2-55 If the unit has no internal floppy drive, connect a USB floppy drive. 4. Turn on the motherboard for the new display....
...antenna PCAs are replacing the CPU module, you must use the Service Utilities floppy disk to display the boot menu, and then boot from the floppy drive. 6. Download the notebook Series service package from the Partnership Web site (see page 2-41). Insert the Service Utilities floppy ...display/LCD identification stored on the motherboard. When you see the HP logo, press esc to reprogram the EEPROM on the notebook. 5. Service Manual Removal and Replacement 2-55 If the unit has no internal floppy drive, connect a USB floppy drive. 4. Turn on the motherboard for the new display....
Maintenance and Service Guide
Page 127
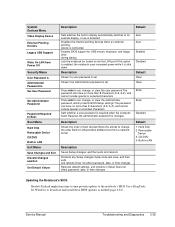
... devices when an external pointing device is connected Enables BIOS support for USB mouse, keyboard, and floppy drive during startup Lets the notebook be turned on via the LAN port If this option is enabled, the notebook uses increased power while it is shut down Description Shows if a ... exits and reboots Does not affect password, date, or time changes Restores default settings, and remains in LAN provides diskless boot from time to time provide updates to the notebook's BIOS Use e-DiagTools for Windows to download and install these BIOS updates as needed (page 2-61). Removable Device 3....
... devices when an external pointing device is connected Enables BIOS support for USB mouse, keyboard, and floppy drive during startup Lets the notebook be turned on via the LAN port If this option is enabled, the notebook uses increased power while it is shut down Description Shows if a ... exits and reboots Does not affect password, date, or time changes Restores default settings, and remains in LAN provides diskless boot from time to time provide updates to the notebook's BIOS Use e-DiagTools for Windows to download and install these BIOS updates as needed (page 2-61). Removable Device 3....
Service Manual
Page 67
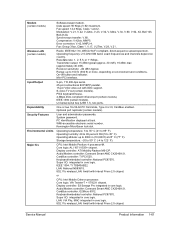
...parallel. 15-pin VGA video-out with Intersil Prism 2.5 chipset. Universal serial bus (USB 1.1), two ports. System password. WMI-accessible electronic serial number. IEEE 1394: TI ... support. CardBus controller: O2Micro 6912. Range: up to 3000 m (10,000 ft) at boot. S-video TV out (certain models). Operating altitude: up to 122° F). Core logic:..., V.90, V.92, X2, Bell 103, Bell 212A. IEEE-1394 (certain models). User and administrator passwords. PC identification displayed at 25° C (77° F). Super I /O: integrated in core logic. CardBus controller: ...
...parallel. 15-pin VGA video-out with Intersil Prism 2.5 chipset. Universal serial bus (USB 1.1), two ports. System password. WMI-accessible electronic serial number. IEEE 1394: TI ... support. CardBus controller: O2Micro 6912. Range: up to 3000 m (10,000 ft) at boot. S-video TV out (certain models). Operating altitude: up to 122° F). Core logic:..., V.90, V.92, X2, Bell 103, Bell 212A. IEEE-1394 (certain models). User and administrator passwords. PC identification displayed at 25° C (77° F). Super I /O: integrated in core logic. CardBus controller: ...
Service Manual
Page 96
... disk to reprogram the EEPROM on the notebook. 5. If the unit has no internal floppy drive, connect a USB floppy drive. 4. Service Manual Removal and Replacement 2-25 Download the notebook series service package from the Partnership Web site (see the HP logo, press ESC to display the boot menu, then boot from the floppy drive. 6. Insert the...
... disk to reprogram the EEPROM on the notebook. 5. If the unit has no internal floppy drive, connect a USB floppy drive. 4. Service Manual Removal and Replacement 2-25 Download the notebook series service package from the Partnership Web site (see the HP logo, press ESC to display the boot menu, then boot from the floppy drive. 6. Insert the...
Service Manual
Page 128
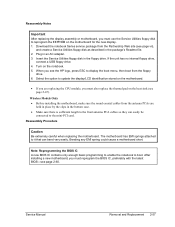
... boot from the Partnership Web site (see page 2-60. Download the notebook Series service package from the floppy drive. 6. Turn on the heat sink (see page 2-47). If the unit has no internal floppy drive, connect a USB floppy drive. 4. Reassembly Procedure Caution Be extremely careful when replacing the motherboard. When you see the HP...
... boot from the Partnership Web site (see page 2-60. Download the notebook Series service package from the floppy drive. 6. Turn on the heat sink (see page 2-47). If the unit has no internal floppy drive, connect a USB floppy drive. 4. Reassembly Procedure Caution Be extremely careful when replacing the motherboard. When you see the HP...
Service Manual
Page 156
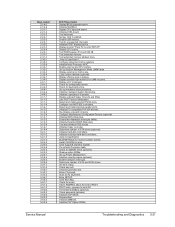
Initialize EISA board. Enable USB devices. Test for configuration errors. Test extended memory address...Disable onboard Super I /O ports. Late POST device initialization. Detect and install external parallel ports. Jump to boot OS. Build MPTABLE for F2 keystroke. Enter SETUP. POST done - Initialize MultiBoot. Set up hardware interrupt ...Multi Processor APIC. Enable external and CPU caches. Set up System Management Mode (SMM) area. Initialize PC-compatible PnP ISA devices. Initialize floppy controller. Install CD-ROM for keyboard errors. Initialize typematic rate....
Initialize EISA board. Enable USB devices. Test for configuration errors. Test extended memory address...Disable onboard Super I /O ports. Late POST device initialization. Detect and install external parallel ports. Jump to boot OS. Build MPTABLE for F2 keystroke. Enter SETUP. POST done - Initialize MultiBoot. Set up hardware interrupt ...Multi Processor APIC. Enable external and CPU caches. Set up System Management Mode (SMM) area. Initialize PC-compatible PnP ISA devices. Initialize floppy controller. Install CD-ROM for keyboard errors. Initialize typematic rate....
Service Manual
Page 163
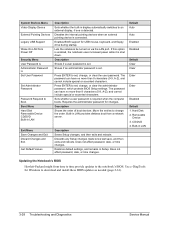
... the notebook be turned on via the LAN port. Built-in LAN Updating the Notebook's BIOS Hewlett-Packard might from a network server. Built-in LAN provides diskless boot from time to time provide updates to the notebook's BIOS.... Use e-DiagTools for Windows to set, change, or clear the administrator password, which protects BIOS Setup settings. Press ENTER to download and install these BIOS updates as needed (page 2-61). 3-28 Troubleshooting and Diagnostics Service Manual Requires the administrator password for USB...
... the notebook be turned on via the LAN port. Built-in LAN Updating the Notebook's BIOS Hewlett-Packard might from a network server. Built-in LAN provides diskless boot from time to time provide updates to the notebook's BIOS.... Use e-DiagTools for Windows to set, change, or clear the administrator password, which protects BIOS Setup settings. Press ENTER to download and install these BIOS updates as needed (page 2-61). 3-28 Troubleshooting and Diagnostics Service Manual Requires the administrator password for USB...


