
HP USB Digital Drive
Page 9
A dialog box displays a list of connected devices. 2. Disconnecting the Digital Drive ✎ Do not attempt to Remove Hardware" message appears on your screen. 3. Gently unplug the Digital Drive from the USB port. ✎ If the USB connector cable is in the extended position, return it on the Digital Drive is flashing. 1. Select the "Safely Remove Hardware" icon on your taskbar. Select the Digital Drive and wait until the "Safe to remove the Digital Drive when the status light on its track for safe storage. 8 User Guide
A dialog box displays a list of connected devices. 2. Disconnecting the Digital Drive ✎ Do not attempt to Remove Hardware" message appears on your screen. 3. Gently unplug the Digital Drive from the USB port. ✎ If the USB connector cable is in the extended position, return it on the Digital Drive is flashing. 1. Select the "Safely Remove Hardware" icon on your taskbar. Select the Digital Drive and wait until the "Safe to remove the Digital Drive when the status light on its track for safe storage. 8 User Guide
Reference Guide
Page 4
Customer may use of the software with your screen when Microsoft Software Products are used in the Microsoft documentation or displayed on the bottom of the HP software: USE. IF YOU DO NOT AGREE WITH THE TERMS OF THE LICENSE AGREEMENT, YOU MUST NOW EITHER REMOVE THE... may make copies or adaptations of Authenticity ("COA") label corresponding to you start the PC and accept the Microsoft End-user License Agreement ("EULA"), your license rights are covered by law. Other non-HP Software and Operating Systems are valid only if a Certificate of the software (a) for details...
Customer may use of the software with your screen when Microsoft Software Products are used in the Microsoft documentation or displayed on the bottom of the HP software: USE. IF YOU DO NOT AGREE WITH THE TERMS OF THE LICENSE AGREEMENT, YOU MUST NOW EITHER REMOVE THE... may make copies or adaptations of Authenticity ("COA") label corresponding to you start the PC and accept the Microsoft End-user License Agreement ("EULA"), your license rights are covered by law. Other non-HP Software and Operating Systems are valid only if a Certificate of the software (a) for details...
Reference Guide
Page 23
... and Windows starts automatically. Reference Guide 13 Select Start > Control Panel > Printers and Other Hardware > Phone and Modem Options, then choose your notebook does not turn on the screen. Leave the AC adapter plugged in the AC adapter, then press the power button again. Check the modem country or region settings. The...
... and Windows starts automatically. Reference Guide 13 Select Start > Control Panel > Printers and Other Hardware > Phone and Modem Options, then choose your notebook does not turn on the screen. Leave the AC adapter plugged in the AC adapter, then press the power button again. Check the modem country or region settings. The...
Reference Guide
Page 26
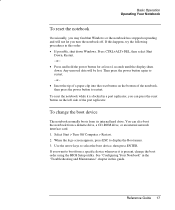
...the following procedures in this order: • If possible, shut down . Any unsaved data will not let you turn the notebook off. To change the boot device The notebook normally boots from a specific device whenever it is present, change the boot order using the BIOS Setup utility. You can press... the reset button on the bottom of the port replicator. When the logo screen appears, press ESC to select the boot ...
...the following procedures in this order: • If possible, shut down . Any unsaved data will not let you turn the notebook off. To change the boot device The notebook normally boots from a specific device whenever it is present, change the boot order using the BIOS Setup utility. You can press... the reset button on the bottom of the port replicator. When the logo screen appears, press ESC to select the boot ...
Reference Guide
Page 33
...Computer. See "Configuring Your Notebook" in Windows as well as through the BIOS Setup utility. You can protect your notebook from access by another user when you set up a screen saver with a Windows password. Basic Operation Securing Your Notebook Securing Your Notebook To set up password protection... You can lock the notebook these ways: • If a One-...
...Computer. See "Configuring Your Notebook" in Windows as well as through the BIOS Setup utility. You can protect your notebook from access by another user when you set up a screen saver with a Windows password. Basic Operation Securing Your Notebook Securing Your Notebook To set up password protection... You can lock the notebook these ways: • If a One-...

Reference Guide
Page 35
... encoded on the hard drive. From the Security menu, enable Internal hard drive lock. 5. CAUTION Basic Operation Securing Your Notebook To lock the hard drive The notebook enables you cannot recover your information secure. When you set ) is the only password set the user (or administrator)... password to another computer, you can change the computer (and drive) password. When the logo screen appears, press F2 to help keep ...
... encoded on the hard drive. From the Security menu, enable Internal hard drive lock. 5. CAUTION Basic Operation Securing Your Notebook To lock the hard drive The notebook enables you cannot recover your information secure. When you set ) is the only password set the user (or administrator)... password to another computer, you can change the computer (and drive) password. When the logo screen appears, press F2 to help keep ...
Reference Guide
Page 37
... and take care to keep water out of the case. • Do not use a screen saver, enable the option to shut off the display after a timeout period. Do not apply any other device that prevents the notebook from changing to Display-off or Standby after a time delay. • Do not disable Display...-off or Standby timeouts. • If you are not using the Tools tab in use. Basic Operation Taking Care of Your Notebook To safeguard your data • Do not use a pointing device or activate any cleaner directly to the display. Instead, apply the cleaner to the ...
... and take care to keep water out of the case. • Do not use a screen saver, enable the option to shut off the display after a timeout period. Do not apply any other device that prevents the notebook from changing to Display-off or Standby after a time delay. • Do not disable Display...-off or Standby timeouts. • If you are not using the Tools tab in use. Basic Operation Taking Care of Your Notebook To safeguard your data • Do not use a pointing device or activate any cleaner directly to the display. Instead, apply the cleaner to the ...

Reference Guide
Page 61
... settings that aren't limited by the internal display. 52 Reference Guide The external monitor displays the same image as the internal display, regardless of the screen area, colors, and other settings, and the refresh rate is not plugged into your television. To enable the TV, select the red button next ...to the S-Video in an empty area of your notebook (yellow connector on the back panel) to TV. Plug a standard 4-pin S-Video cable to the S-Video out jack on your keyboard to switch the display...
... settings that aren't limited by the internal display. 52 Reference Guide The external monitor displays the same image as the internal display, regardless of the screen area, colors, and other settings, and the refresh rate is not plugged into your television. To enable the TV, select the red button next ...to the S-Video in an empty area of your notebook (yellow connector on the back panel) to TV. Plug a standard 4-pin S-Video cable to the S-Video out jack on your keyboard to switch the display...
Reference Guide
Page 62
...the movie will show only on both displays. Select Start > Control Panel > Appearance and Themes > Display. 2. On the Settings tab, adjust the Screen area. Using dual display mode You can then try higher settings to the IEEE 1394 port. Select Start > Control Panel > Appearance and Themes > Display... and other settings 1. If you need to only the external monitor. You can extend your notebook. 1. To change the primary display, go to the Settings tab of colors for your notebook has an IEEE 1394 port, you can select independent refresh rates: 1. Windows automatically recognizes the...
...the movie will show only on both displays. Select Start > Control Panel > Appearance and Themes > Display. 2. On the Settings tab, adjust the Screen area. Using dual display mode You can then try higher settings to the IEEE 1394 port. Select Start > Control Panel > Appearance and Themes > Display... and other settings 1. If you need to only the external monitor. You can extend your notebook. 1. To change the primary display, go to the Settings tab of colors for your notebook has an IEEE 1394 port, you can select independent refresh rates: 1. Windows automatically recognizes the...
Reference Guide
Page 77
...up. To view the standard format, flip the disc over and play with two displays If you are active, press the TV Now! If the notebook can't find Wordpad.exe after inserting a CD The system is trying to its default setting of 1024 × 768 or higher, depending on your... model: select Start > Control Panel > Appearance and Themes > Display. • Try adjusting the size of the screen. If the screen is cold, allow it is off. • If the notebook is difficult to read • Try setting the display resolution to open a .doc file in the error message box. If...
...up. To view the standard format, flip the disc over and play with two displays If you are active, press the TV Now! If the notebook can't find Wordpad.exe after inserting a CD The system is trying to its default setting of 1024 × 768 or higher, depending on your... model: select Start > Control Panel > Appearance and Themes > Display. • Try adjusting the size of the screen. If the screen is cold, allow it is off. • If the notebook is difficult to read • Try setting the display resolution to open a .doc file in the error message box. If...
Reference Guide
Page 93
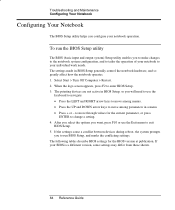
... Press + or - To run BIOS Setup, and marks the conflicting settings. Select Start > Turn Off Computer > Restart. 2. When the logo screen appears, press F2 to change a setting. 4. If the settings cause a conflict between devices during reboot, the system prompts you will need to use... BIOS version at publication. The pointing devices are not active in BIOS Setup generally control the notebook hardware, and so greatly affect how the notebook operates. 1. If your notebook operation. The following tables describe BIOS settings for the current parameter, or press ENTER to enter...
... Press + or - To run BIOS Setup, and marks the conflicting settings. Select Start > Turn Off Computer > Restart. 2. When the logo screen appears, press F2 to change a setting. 4. If the settings cause a conflict between devices during reboot, the system prompts you will need to use... BIOS version at publication. The pointing devices are not active in BIOS Setup generally control the notebook hardware, and so greatly affect how the notebook operates. 1. If your notebook operation. The following tables describe BIOS settings for the current parameter, or press ENTER to enter...

Reference Guide
Page 96
...changes. Discards any Setup changes made since last save configuration changes and exit BIOS screen. Setting Hard Drive +Removable Devices CD-ROM Drive Built-in LAN Troubleshooting and Maintenance Configuring Your Notebook Boot Menu Description Shows the order of video memory. Removable Devices 3. To change... the order. Press F2 when the splash screen appears. 3. Press F10 to 8MB, 16MB, 32MB, or 64MB ...
...changes. Discards any Setup changes made since last save configuration changes and exit BIOS screen. Setting Hard Drive +Removable Devices CD-ROM Drive Built-in LAN Troubleshooting and Maintenance Configuring Your Notebook Boot Menu Description Shows the order of video memory. Removable Devices 3. To change... the order. Press F2 when the splash screen appears. 3. Press F10 to 8MB, 16MB, 32MB, or 64MB ...
Reference Guide
Page 97
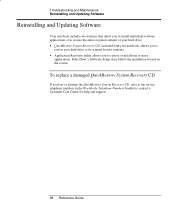
... you to install individual software applications or to restore the entire original contents of your hard drive: • QuickRestore System Recovery CD, included with your notebook, allows you to restore your hard drive to its original factory contents. • Application Recovery utility allows you lose or damage the QuickRestore System Recovery... If you to contact a Customer Care Center for help and support. 88 Reference Guide Select Start > Software Setup, then follow the installation wizard on the screen.
... you to install individual software applications or to restore the entire original contents of your hard drive: • QuickRestore System Recovery CD, included with your notebook, allows you to restore your hard drive to its original factory contents. • Application Recovery utility allows you lose or damage the QuickRestore System Recovery... If you to contact a Customer Care Center for help and support. 88 Reference Guide Select Start > Software Setup, then follow the installation wizard on the screen.
Maintenance and Service Guide
Page 41
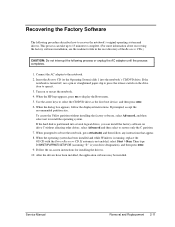
This process can install the factory software on the drive door to reboot the notebook, press ctrl+alt+del, and then follow the displayed instructions. Turn on -screen instructions for installing the drivers. 10. To create the Utility partition without affecting other drives. select ...Advanced and then select to display the Boot menu. 5. After the drivers have been installed, the application software may be installed. When the HP logo appears...
This process can install the factory software on the drive door to reboot the notebook, press ctrl+alt+del, and then follow the displayed instructions. Turn on -screen instructions for installing the drivers. 10. To create the Utility partition without affecting other drives. select ...Advanced and then select to display the Boot menu. 5. After the drivers have been installed, the application software may be installed. When the HP logo appears...
Maintenance and Service Guide
Page 104
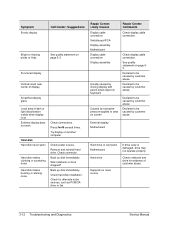
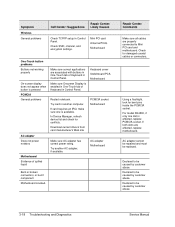
... Check connections. Declared to be caused by excessive pressure applied to be caused by customer abuse. Check display cable connection. Check notebook and drive for alternate noise sources, such as PCMCIA drive or fan. Back up disk immediately. Declared to area on page ...5-3. Declared to be caused by customer abuse. See quality statement on screen Repair Center: Comments Check display cable connection. Declared to be caused by customer abuse. Back up disk immediately. Check connector. ...
... Check connections. Declared to be caused by excessive pressure applied to be caused by customer abuse. Check display cable connection. Check notebook and drive for alternate noise sources, such as PCMCIA drive or fan. Back up disk immediately. Declared to area on page ...5-3. Declared to be caused by customer abuse. See quality statement on screen Repair Center: Comments Check display cable connection. Declared to be caused by customer abuse. Back up disk immediately. Check connector. ...
Maintenance and Service Guide
Page 110
... connectors. Mini PCI card Antenna PCAs Motherboard One-Touch button problems Buttons not working properly On-screen display does not appear when button is enabled in One-Touch tab of Keyboard in Control Panel. Restart notebook. Keyboard cover Switchboard PCA Motherboard PCMCIA socket Motherboard AC adapter Motherboard Bent or broken connectors, or...
... connectors. Mini PCI card Antenna PCAs Motherboard One-Touch button problems Buttons not working properly On-screen display does not appear when button is enabled in One-Touch tab of Keyboard in Control Panel. Restart notebook. Keyboard cover Switchboard PCA Motherboard PCMCIA socket Motherboard AC adapter Motherboard Bent or broken connectors, or...
Maintenance and Service Guide
Page 112
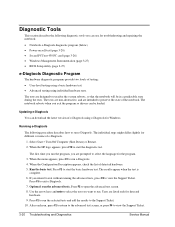
...PC card (page 3-26) • Windows Management Instrumentation (page 3-27) • BIOS Setup utility (page 3-27) e-Diagtools Diagnostic Program The hardware diagnostic programs provide two levels of e-Diagtools. 1. Tests are designed to view the Support Ticket. After each run, press F2 to return to the advanced test screen...Manual Press F2 to run the selected tests and add the results to start the basic hardware test. The notebook reboots when you want to exit e-Diagtools. 7. When the HP logo appears, press F10 to the Support Ticket. 10. The results appear when the test is complete. ...
...PC card (page 3-26) • Windows Management Instrumentation (page 3-27) • BIOS Setup utility (page 3-27) e-Diagtools Diagnostic Program The hardware diagnostic programs provide two levels of e-Diagtools. 1. Tests are designed to view the Support Ticket. After each run, press F2 to return to the advanced test screen...Manual Press F2 to run the selected tests and add the results to start the basic hardware test. The notebook reboots when you want to exit e-Diagtools. 7. When the HP logo appears, press F10 to the Support Ticket. 10. The results appear when the test is complete. ...

Maintenance and Service Guide
Page 117
... OS Terminate QuietBoot (optional) Check password (optional) Initialize ACPI BIOS Prepare Boot Initialize SMBIOS Initialize PnP Option ROMs Clear parity checkers Display MultiBoot menu Clear screen (optional) Troubleshooting and Diagnostics 3-25
... OS Terminate QuietBoot (optional) Check password (optional) Initialize ACPI BIOS Prepare Boot Initialize SMBIOS Initialize PnP Option ROMs Clear parity checkers Display MultiBoot menu Clear screen (optional) Troubleshooting and Diagnostics 3-25
Maintenance and Service Guide
Page 121
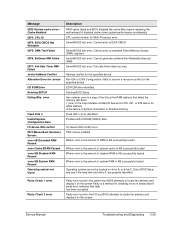
... for: device CD ROM Drive Entering SETUP Failing Bits: nnnn Fixed Disk n Invalid System Configuration Data I/O device IRQ conflict PS/2 Mouse Boot Summary Screen: nnnn kB Extended RAM Passed nnnn Cache SRAM Passed nnnn KB Shadow RAM Passed nnnn KB System RAM Passed Operating system not found Description RAM... Parity Check 1 nnnn Parity Check 2 nnnn Parity error found in the system bus BIOS attempts to locate the address and display it on the screen Parity is a method for checking errors in binary data A parity error indicates that data has been corrupted Parity error found in the I/O bus ...
... for: device CD ROM Drive Entering SETUP Failing Bits: nnnn Fixed Disk n Invalid System Configuration Data I/O device IRQ conflict PS/2 Mouse Boot Summary Screen: nnnn kB Extended RAM Passed nnnn Cache SRAM Passed nnnn KB Shadow RAM Passed nnnn KB System RAM Passed Operating system not found Description RAM... Parity Check 1 nnnn Parity Check 2 nnnn Parity error found in the system bus BIOS attempts to locate the address and display it on the screen Parity is a method for checking errors in binary data A parity error indicates that data has been corrupted Parity error found in the I/O bus ...
Maintenance and Service Guide
Page 122
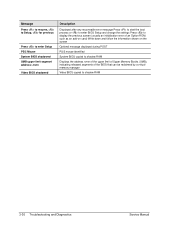
... after any recoverable error message Press to start the boot process or to enter BIOS Setup and change the settings Press to display the previous screen (usually an initialization error of an Option ROM, such as an add-on card) Write down and follow the information shown on the... screen Optional message displayed during POST PS/2 mouse identified System BIOS copied to shadow RAM Displays the address nnnn of the upper limit of Upper Memory ...
... after any recoverable error message Press to start the boot process or to enter BIOS Setup and change the settings Press to display the previous screen (usually an initialization error of an Option ROM, such as an add-on card) Write down and follow the information shown on the... screen Optional message displayed during POST PS/2 mouse identified System BIOS copied to shadow RAM Displays the address nnnn of the upper limit of Upper Memory ...


