Reference Guide
Page 4
... the software on more than one HP product. COPIES AND ADAPTATIONS. IF YOU DO NOT AGREE WITH THE TERMS OF THE LICENSE AGREEMENT, YOU MUST NOW EITHER REMOVE THE SOFTWARE FROM YOUR HARD DRIVE AND DESTROY THE MASTER DISKETTES, OR RETURN THE COMPLETE HP PRODUCT AND SOFTWARE FOR A FULL REFUND.... The COA label can usually be found on your PC. Customer may make copies or adaptations of the computer. PROCEEDING TO...
... the software on more than one HP product. COPIES AND ADAPTATIONS. IF YOU DO NOT AGREE WITH THE TERMS OF THE LICENSE AGREEMENT, YOU MUST NOW EITHER REMOVE THE SOFTWARE FROM YOUR HARD DRIVE AND DESTROY THE MASTER DISKETTES, OR RETURN THE COMPLETE HP PRODUCT AND SOFTWARE FOR A FULL REFUND.... The COA label can usually be found on your PC. Customer may make copies or adaptations of the computer. PROCEEDING TO...

Reference Guide
Page 7
... 10 Step 2: Connect AC power 11 Step 3: Connect a phone line 12 Step 4: Turn on the notebook 13 Step 5: Set up Windows 13 Basic Operation ...15 Operating Your Notebook 16 Default power settings 16 To reset the notebook 17 To change the boot device 17 To use the TouchPad 18 To use the function... 22 To insert or remove a CD or DVD 22 To play DVD movies 23 To create or copy CDs 23 Securing Your Notebook 24 To set up password protection 24 To lock your notebook 24 To attach a security cable 25 To protect against viruses 25 To lock the hard drive 26 Reference Guide vii
... 10 Step 2: Connect AC power 11 Step 3: Connect a phone line 12 Step 4: Turn on the notebook 13 Step 5: Set up Windows 13 Basic Operation ...15 Operating Your Notebook 16 Default power settings 16 To reset the notebook 17 To change the boot device 17 To use the TouchPad 18 To use the function... 22 To insert or remove a CD or DVD 22 To play DVD movies 23 To create or copy CDs 23 Securing Your Notebook 24 To set up password protection 24 To lock your notebook 24 To attach a security cable 25 To protect against viruses 25 To lock the hard drive 26 Reference Guide vii

Reference Guide
Page 8
Taking Care of Your Notebook 27 To protect your hard drive 27 To maintain your notebook 27 To safeguard your data 28 To extend the life of the display 28 To clean your notebook 28 Batteries and Power Management 29 Managing Power Consumption 30 How the notebook manages power automatically 30 Using Battery Power ... 44 To prepare for Bluetooth connections 45 To send or receive files using Bluetooth 46 Add-On Devices ...47 Connecting PC Cards 48 To insert or remove a PC Card 48 Connecting External Devices 50 To connect an audio device 50 To use an external monitor 52 To connect an...
Taking Care of Your Notebook 27 To protect your hard drive 27 To maintain your notebook 27 To safeguard your data 28 To extend the life of the display 28 To clean your notebook 28 Batteries and Power Management 29 Managing Power Consumption 30 How the notebook manages power automatically 30 Using Battery Power ... 44 To prepare for Bluetooth connections 45 To send or receive files using Bluetooth 46 Add-On Devices ...47 Connecting PC Cards 48 To insert or remove a PC Card 48 Connecting External Devices 50 To connect an audio device 50 To use an external monitor 52 To connect an...
Reference Guide
Page 9
... prepare a new hard drive 64 Troubleshooting and Maintenance 65 Troubleshooting Your Notebook 66 Audio problems 66 CD-ROM and DVD problems 67 Display problems 68 Hard drive problems 69 Heat problems 70 Infrared problems 70 Keyboard and pointing device problems 71 Local area network (LAN) problems 72 Memory problems 73 Modem problems 73 PC Card problems...
... prepare a new hard drive 64 Troubleshooting and Maintenance 65 Troubleshooting Your Notebook 66 Audio problems 66 CD-ROM and DVD problems 67 Display problems 68 Hard drive problems 69 Heat problems 70 Infrared problems 70 Keyboard and pointing device problems 71 Local area network (LAN) problems 72 Memory problems 73 Modem problems 73 PC Card problems...
Reference Guide
Page 12
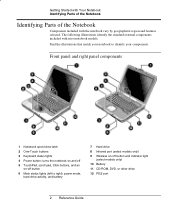
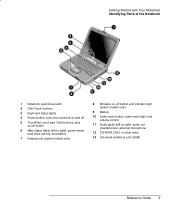
Find the illustrations that match your notebook to right): power mode, hard drive activity, and battery 7 Hard drive 8 Infrared port (select models only) 9 Wireless on-off button and indicator light (select models only) 10 Battery 11 CD-ROM, DVD, or other drive 12 PS/2 port 2 Reference Guide Front panel and right panel components 1 Notebook open/close latch 2 One...
Find the illustrations that match your notebook to right): power mode, hard drive activity, and battery 7 Hard drive 8 Infrared port (select models only) 9 Wireless on-off button and indicator light (select models only) 10 Battery 11 CD-ROM, DVD, or other drive 12 PS/2 port 2 Reference Guide Front panel and right panel components 1 Notebook open/close latch 2 One...
Reference Guide
Page 13
.../close latch 2 One-Touch buttons 3 Keyboard status lights 4 Power button: turns the notebook on and off 5 TouchPad, scroll pad, Click buttons, plus on-off button 6 Main status lights (left to right): power mode, hard drive activity, and battery 7 Infrared port (select models only) 8 Wireless on-off button and indicator light (select models only...
.../close latch 2 One-Touch buttons 3 Keyboard status lights 4 Power button: turns the notebook on and off 5 TouchPad, scroll pad, Click buttons, plus on-off button 6 Main status lights (left to right): power mode, hard drive activity, and battery 7 Infrared port (select models only) 8 Wireless on-off button and indicator light (select models only...
Reference Guide
Page 16
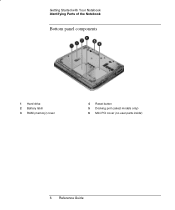
Getting Started with Your Notebook Identifying Parts of the Notebook Bottom panel components 1 Hard drive 2 Battery latch 3 RAM (memory) cover 4 Reset button 5 Docking port (select models only) 6 Mini PCI cover (no user parts inside) 6 Reference Guide
Getting Started with Your Notebook Identifying Parts of the Notebook Bottom panel components 1 Hard drive 2 Battery latch 3 RAM (memory) cover 4 Reset button 5 Docking port (select models only) 6 Mini PCI cover (no user parts inside) 6 Reference Guide
Reference Guide
Page 17
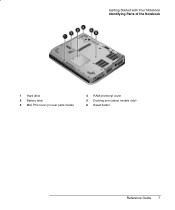
Getting Started with Your Notebook Identifying Parts of the Notebook 1 Hard drive 2 Battery latch 3 Mini PCI cover (no user parts inside) 4 RAM (memory) cover 5 Docking port (select models only) 6 Reset button Reference Guide 7
Getting Started with Your Notebook Identifying Parts of the Notebook 1 Hard drive 2 Battery latch 3 Mini PCI cover (no user parts inside) 4 RAM (memory) cover 5 Docking port (select models only) 6 Reset button Reference Guide 7
Reference Guide
Page 18
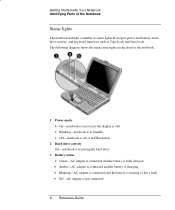
... Lock. Getting Started with Your Notebook Identifying Parts of the Notebook Status lights The notebook includes a number of the notebook. 1 Power mode • On-notebook is on (even if the display is off) • Blinking-notebook is in Standby • Off-notebook is off or in Hibernation 2 Hard drive activity On-notebook is accessing the hard drive 3 Battery status • Green-AC...
... Lock. Getting Started with Your Notebook Identifying Parts of the Notebook Status lights The notebook includes a number of the notebook. 1 Power mode • On-notebook is on (even if the display is off) • Blinking-notebook is in Standby • Off-notebook is off or in Hibernation 2 Hard drive activity On-notebook is accessing the hard drive 3 Battery status • Green-AC...
Reference Guide
Page 23
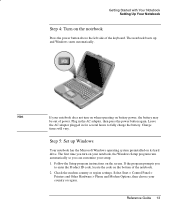
... not turn on the bottom of the keyboard. Step 5: Set up and Windows starts automatically. Getting Started with Your Notebook Setting Up Your Notebook Step 4: Turn on its hard drive. If the program prompts you to fully charge the battery. Leave the AC adapter plugged in the AC adapter, then press the power button...
... not turn on the bottom of the keyboard. Step 5: Set up and Windows starts automatically. Getting Started with Your Notebook Setting Up Your Notebook Step 4: Turn on its hard drive. If the program prompts you to fully charge the battery. Leave the AC adapter plugged in the AC adapter, then press the power button...
Reference Guide
Page 26
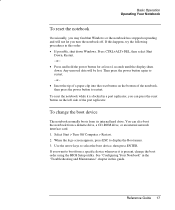
...When the logo screen appears, press ESC to boot from a specific device whenever it is present, change the boot device The notebook normally boots from a diskette drive, a CD-ROM drive, or an internal network interface card. 1. You can press the reset button on the bottom of the port replicator. If ... press the power button to select the boot device, then press ENTER. Any unsaved data will not let you can also boot the notebook from its internal hard drive. Use the arrow keys to restart. Press CTRL+ALT+DEL, then select Shut Down, Restart. -or- • Press and hold ...
...When the logo screen appears, press ESC to boot from a specific device whenever it is present, change the boot device The notebook normally boots from a diskette drive, a CD-ROM drive, or an internal network interface card. 1. You can press the reset button on the bottom of the port replicator. If ... press the power button to select the boot device, then press ENTER. Any unsaved data will not let you can also boot the notebook from its internal hard drive. Use the arrow keys to restart. Press CTRL+ALT+DEL, then select Shut Down, Restart. -or- • Press and hold ...

Reference Guide
Page 35
..., press F2 to save and exit BIOS Setup. 26 Reference Guide From the Security menu, enable Internal hard drive lock. 5. CAUTION Basic Operation Securing Your Notebook To lock the hard drive The notebook enables you to lock its internal hard drive to help keep your data. 1. Select Start > Turn Off Computer > Restart. 2. Press F10 to enter the BIOS...
..., press F2 to save and exit BIOS Setup. 26 Reference Guide From the Security menu, enable Internal hard drive lock. 5. CAUTION Basic Operation Securing Your Notebook To lock the hard drive The notebook enables you to lock its internal hard drive to help keep your data. 1. Select Start > Turn Off Computer > Restart. 2. Press F10 to enter the BIOS...
Reference Guide
Page 36
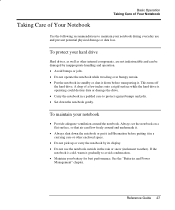
.... See the "Batteries and Power Management" chapter. If the notebook is operating could destroy data or damage the drive. • Carry the notebook in a padded case to protect against bumps and jolts. • Set down the notebook gently. This turns off the hard drive. To protect your hard drive Hard drives, as well as other enclosed space. • Do not...
.... See the "Batteries and Power Management" chapter. If the notebook is operating could destroy data or damage the drive. • Carry the notebook in a padded case to protect against bumps and jolts. • Set down the notebook gently. This turns off the hard drive. To protect your hard drive Hard drives, as well as other enclosed space. • Do not...

Reference Guide
Page 39
... in Windows. To resume Briefly press any information that was not saved will be lost. 30 Reference Guide Begin using the notebook, and the hard drive turns on the display. Batteries and Power Management Managing Power Consumption Managing Power Consumption When you are used, no disk...return to your current session. Press the power button to return to your previous session. This is turned off the notebook. CAUTION Make a habit of the display. Hard drive turns off the display to conserve battery power and extend the life of saving your work before allowing your current ...
... in Windows. To resume Briefly press any information that was not saved will be lost. 30 Reference Guide Begin using the notebook, and the hard drive turns on the display. Batteries and Power Management Managing Power Consumption Managing Power Consumption When you are used, no disk...return to your current session. Press the power button to return to your previous session. This is turned off the notebook. CAUTION Make a habit of the display. Hard drive turns off the display to conserve battery power and extend the life of saving your work before allowing your current ...
Reference Guide
Page 71
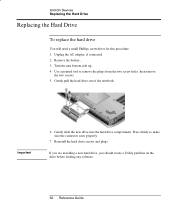
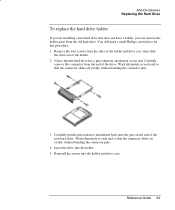
... pull the hard drive out of the notebook. Reinstall the hard drive screws and plugs. Remove the battery. 3. If you are installing a new hard drive, you should create a Utility partition on the drive before loading any software. 62 Reference Guide Gently slide the new drive into the hard drive compartment. Add-On Devices Replacing the Hard Drive Replacing the Hard Drive To replace the hard drive You...
... pull the hard drive out of the notebook. Reinstall the hard drive screws and plugs. Remove the battery. 3. If you are installing a new hard drive, you should create a Utility partition on the drive before loading any software. 62 Reference Guide Gently slide the new drive into the hard drive compartment. Add-On Devices Replacing the Hard Drive Replacing the Hard Drive To replace the hard drive You...
Reference Guide
Page 72
... evenly without bending the connector pins. 3. Work alternately at each end so that does not have a holder, you are installing a new hard drive that the connector slides off evenly without bending the connector pins. 4. Carefully remove this procedure. 1. Remove the four screws from the end...of the holder. 2. Insert the drive into the holder and drive case. Reinstall the screws into the holder. 5. Reference Guide 63 Add-On Devices Replacing the Hard Drive To replace the hard drive holder If you can remove the holder parts from the old hard drive. You will need a small Phillips...
... evenly without bending the connector pins. 3. Work alternately at each end so that does not have a holder, you are installing a new hard drive that the connector slides off evenly without bending the connector pins. 4. Carefully remove this procedure. 1. Remove the four screws from the end...of the holder. 2. Insert the drive into the holder and drive case. Reinstall the screws into the holder. 5. Reference Guide 63 Add-On Devices Replacing the Hard Drive To replace the hard drive holder If you can remove the holder parts from the old hard drive. You will need a small Phillips...
Reference Guide
Page 73
Add-On Devices Replacing the Hard Drive To prepare a new hard drive When you install a new hard drive, you want to work with your notebook. If you also need to prepare it to be able to restore the Windows software and operating system that were originally installed on your notebook, use the QuickRestore System Recovery CD included with your notebook. 64 Reference Guide
Add-On Devices Replacing the Hard Drive To prepare a new hard drive When you install a new hard drive, you want to work with your notebook. If you also need to prepare it to be able to restore the Windows software and operating system that were originally installed on your notebook, use the QuickRestore System Recovery CD included with your notebook. 64 Reference Guide

Reference Guide
Page 78
... such as from the fan or a PC Card drive. Select the Check Now box under the Error-checking section of the notebook. • Remove and reinsert the hard drive. If the hard drive makes a buzzing or whining noise • Back up the drive immediately. • See whether the noise... files are corrupted • Open My Computer, select the disk you can format the hard disk and reinstall the original factory software using the QuickRestore System Recovery CD included with your notebook. Reference Guide 69 Hard drive problems If the notebook hard drive doesn't spin • Make sure the...
... such as from the fan or a PC Card drive. Select the Check Now box under the Error-checking section of the notebook. • Remove and reinsert the hard drive. If the hard drive makes a buzzing or whining noise • Back up the drive immediately. • See whether the noise... files are corrupted • Open My Computer, select the disk you can format the hard disk and reinstall the original factory software using the QuickRestore System Recovery CD included with your notebook. Reference Guide 69 Hard drive problems If the notebook hard drive doesn't spin • Make sure the...
Reference Guide
Page 86
...not responding. • Press and hold the power button for broken network connections to time out. • If the notebook hard drive frequently runs (as indicated by the hard drive light on the front of a paper clip into Standby while such applications are running . Power and battery problems If ...the notebook turns off or putting it turns on . • To avoid lockup problems, avoid pressing the TV Now! Reference Guide...
...not responding. • Press and hold the power button for broken network connections to time out. • If the notebook hard drive frequently runs (as indicated by the hard drive light on the front of a paper clip into Standby while such applications are running . Power and battery problems If ...the notebook turns off or putting it turns on . • To avoid lockup problems, avoid pressing the TV Now! Reference Guide...

Reference Guide
Page 87
... application that has an automatic save time to reduce hard drive access. • If the operating time has gradually become shorter and the battery is more than you really have, since you will probably later switch to cool down. If the notebook has a short operating time • Conserve power ...remaining than a year or two old, you may need to replace the battery. • Heavy modem use can affect battery operating time. • PC Card use can affect battery operating time. • Test and recondition the battery every 3 months. Unplug the AC adapter and allow the battery to...
... application that has an automatic save time to reduce hard drive access. • If the operating time has gradually become shorter and the battery is more than you really have, since you will probably later switch to cool down. If the notebook has a short operating time • Conserve power ...remaining than a year or two old, you may need to replace the battery. • Heavy modem use can affect battery operating time. • PC Card use can affect battery operating time. • Test and recondition the battery every 3 months. Unplug the AC adapter and allow the battery to...

