
HP USB Digital Drive
Page 2
The HP USB Digital Drive 1 is running Microsoft Windows XP Home, Windows XP Pro, or Windows 2000. User Guide 1 The Digital Drive can purchase one (in various storage capacities) from any computer that is a pocket-sized SD (Secure Digital) memory drive for storing and transferring files such as digital pictures, music, video, and data. You can be included. However, you will need an SD memory card to operate the Digital Drive. An SD memory card 2 may not be used with any HP authorized reseller.
The HP USB Digital Drive 1 is running Microsoft Windows XP Home, Windows XP Pro, or Windows 2000. User Guide 1 The Digital Drive can purchase one (in various storage capacities) from any computer that is a pocket-sized SD (Secure Digital) memory drive for storing and transferring files such as digital pictures, music, video, and data. You can be included. However, you will need an SD memory card to operate the Digital Drive. An SD memory card 2 may not be used with any HP authorized reseller.

HP USB Digital Drive
Page 112
HP shall not be liable for HP products and services are trademarks of Microsoft Corporation in the express warranty statements accompanying such products and services. © 2003 Hewlett-Packard Development Company, L.P. SD Logo is subject to change without notice. User Guide HP USB Digital Drive First Edition July 2003 The information contained herein is a trademark. The warranties for technical or editorial errors or omissions contained herein. Microsoft and Windows are set forth in the U.S. and/or other countries.
HP shall not be liable for HP products and services are trademarks of Microsoft Corporation in the express warranty statements accompanying such products and services. © 2003 Hewlett-Packard Development Company, L.P. SD Logo is subject to change without notice. User Guide HP USB Digital Drive First Edition July 2003 The information contained herein is a trademark. The warranties for technical or editorial errors or omissions contained herein. Microsoft and Windows are set forth in the U.S. and/or other countries.
Reference Guide
Page 2
... manual, including, but not limited to change without prior written permission of merchantability and fitness for additional copyright notices. Microsoft®, MS-DOS®, and Windows® are subject to , the implied warranties of Hewlett-Packard Co. Notice This manual and any examples contained herein are provided "as allowed under the...
... manual, including, but not limited to change without prior written permission of merchantability and fitness for additional copyright notices. Microsoft®, MS-DOS®, and Windows® are subject to , the implied warranties of Hewlett-Packard Co. Notice This manual and any examples contained herein are provided "as allowed under the...

Reference Guide
Page 7
... battery 10 Step 2: Connect AC power 11 Step 3: Connect a phone line 12 Step 4: Turn on the notebook 13 Step 5: Set up Windows 13 Basic Operation ...15 Operating Your Notebook 16 Default power settings 16 To reset the notebook 17 To change the boot device 17 To use the TouchPad 18 To use the function...
... battery 10 Step 2: Connect AC power 11 Step 3: Connect a phone line 12 Step 4: Turn on the notebook 13 Step 5: Set up Windows 13 Basic Operation ...15 Operating Your Notebook 16 Default power settings 16 To reset the notebook 17 To change the boot device 17 To use the TouchPad 18 To use the function...
Reference Guide
Page 20
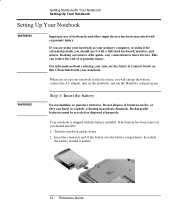
...reducing your risk, see the Safety & Comfort Guide on the notebook, and run the Windows setup program. Insert the connector end of properly. WARNING Step 1: Insert the battery Do not mutilate or puncture batteries. Your notebook is shipped with the battery installed. Docking accessories offer quick,...of batteries in until it with a full-sized keyboard, monitor, and mouse. If you are using your notebook as your notebook. When you set up your notebook for extended periods, you should use of ergonomic injury. Rechargeable batteries must be recycled or disposed of the ...
...reducing your risk, see the Safety & Comfort Guide on the notebook, and run the Windows setup program. Insert the connector end of properly. WARNING Step 1: Insert the battery Do not mutilate or puncture batteries. Your notebook is shipped with the battery installed. Docking accessories offer quick,...of batteries in until it with a full-sized keyboard, monitor, and mouse. If you are using your notebook as your notebook. When you set up your notebook for extended periods, you should use of ergonomic injury. Rechargeable batteries must be recycled or disposed of the ...
Reference Guide
Page 23
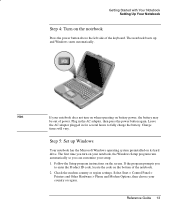
... Panel > Printers and Other Hardware > Phone and Modem Options, then choose your setup. 1. The notebook boots up Windows Your notebook has the Microsoft Windows operating system preinstalled on the screen. Hint If your notebook does not turn on your notebook, the Windows Setup program runs automatically so you turn on when operating on the bottom of the...
... Panel > Printers and Other Hardware > Phone and Modem Options, then choose your setup. 1. The notebook boots up Windows Your notebook has the Microsoft Windows operating system preinstalled on the screen. Hint If your notebook does not turn on your notebook, the Windows Setup program runs automatically so you turn on when operating on the bottom of the...

Reference Guide
Page 25
... active connections, and startup time. If the unit is already on the notebook. Allow the system to time out. To enter this guide. 16 Reference Guide If the system has stopped responding and Windows shutdown procedures cannot be used, press and hold the power button for at... certain times you may want to disk, then shuts down. • Restores network connections. Powers off the notebook. • Saves significant power. • Turns off...
... active connections, and startup time. If the unit is already on the notebook. Allow the system to time out. To enter this guide. 16 Reference Guide If the system has stopped responding and Windows shutdown procedures cannot be used, press and hold the power button for at... certain times you may want to disk, then shuts down. • Restores network connections. Powers off the notebook. • Saves significant power. • Turns off...
Reference Guide
Page 26
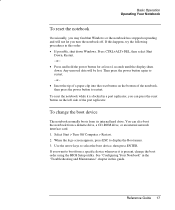
.... To reset the notebook while it is docked in this guide. Press CTRL+ALT+DEL, then select Shut Down, Restart. -or- • Press and hold the power button for at least 4 seconds until the display shuts down Windows. To change the boot order using the BIOS ...Setup utility. Reference Guide 17 Basic Operation Operating Your Notebook To reset the notebook Occasionally, you may find that Windows or the notebook has stopped responding and will be lost.
.... To reset the notebook while it is docked in this guide. Press CTRL+ALT+DEL, then select Shut Down, Restart. -or- • Press and hold the power button for at least 4 seconds until the display shuts down Windows. To change the boot order using the BIOS ...Setup utility. Reference Guide 17 Basic Operation Operating Your Notebook To reset the notebook Occasionally, you may find that Windows or the notebook has stopped responding and will be lost.
Reference Guide
Page 27
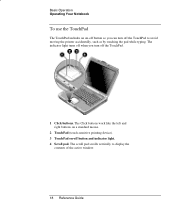
The indicator light turns off when you can turn off button and indicator light. 4 Scroll pad. The Click buttons work like the left and right buttons on a standard mouse. 2 TouchPad (touch-sensitive pointing device). 3 TouchPad on -off button so you turn off the TouchPad to display the contents of the active window. 18 Reference Guide The scroll pad scrolls vertically to avoid moving the pointer accidentally, such as by touching the pad while typing. Basic Operation Operating Your Notebook To use the TouchPad The TouchPad includes an on -off the TouchPad. 1 Click buttons.
The indicator light turns off when you can turn off button and indicator light. 4 Scroll pad. The Click buttons work like the left and right buttons on a standard mouse. 2 TouchPad (touch-sensitive pointing device). 3 TouchPad on -off button so you turn off the TouchPad to display the contents of the active window. 18 Reference Guide The scroll pad scrolls vertically to avoid moving the pointer accidentally, such as by touching the pad while typing. Basic Operation Operating Your Notebook To use the TouchPad The TouchPad includes an on -off the TouchPad. 1 Click buttons.
Reference Guide
Page 30
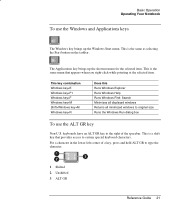
...at the selected item. This key combination Windows key+E Windows key+F1 Windows key+F Windows key+M Shift+Windows key+M Windows key+R Does this Runs Windows Explorer Runs Windows Help Runs Windows Find: Search Minimizes all displayed windows Returns all minimized windows to certain special keyboard characters. The ...Windows key brings up the shortcut menu for the selected item. This is the same as selecting the Start button on the taskbar. keyboards have an ALT GR key to type the character. 1 Shifted 2 Unshifted 3 ALT GR Reference Guide 21 Basic Operation Operating Your Notebook...
...at the selected item. This key combination Windows key+E Windows key+F1 Windows key+F Windows key+M Shift+Windows key+M Windows key+R Does this Runs Windows Explorer Runs Windows Help Runs Windows Find: Search Minimizes all displayed windows Returns all minimized windows to certain special keyboard characters. The ...Windows key brings up the shortcut menu for the selected item. This is the same as selecting the Start button on the taskbar. keyboards have an ALT GR key to type the character. 1 Shifted 2 Unshifted 3 ALT GR Reference Guide 21 Basic Operation Operating Your Notebook...
Reference Guide
Page 33
... your normal logon steps. 24 Reference Guide Basic Operation Securing Your Notebook Securing Your Notebook To set up password protection You can lock the notebook these ways: • If a One-Touch button is available through Windows and through BIOS Setup. Windows 1. See "Configuring Your Notebook" in Windows as well as through the BIOS Setup utility. Select Create...
... your normal logon steps. 24 Reference Guide Basic Operation Securing Your Notebook Securing Your Notebook To set up password protection You can lock the notebook these ways: • If a One-Touch button is available through Windows and through BIOS Setup. Windows 1. See "Configuring Your Notebook" in Windows as well as through the BIOS Setup utility. Select Create...
Reference Guide
Page 37
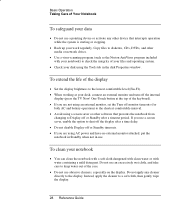
... Back up your work regularly. Instead, apply the cleaner to shut off the display after a timeout period. Basic Operation Taking Care of Your Notebook To safeguard your data • Do not use abrasive cleaners, especially on the display. Copy files to the shortest comfortable interval. • ...Avoid using the Tools tab in the disk Properties window. If you use . Do not apply any other device that prevents the notebook from changing to check the integrity of your files and operating system. • Check your disk using ...
... Back up your work regularly. Instead, apply the cleaner to shut off the display after a timeout period. Basic Operation Taking Care of Your Notebook To safeguard your data • Do not use abrasive cleaners, especially on the display. Copy files to the shortest comfortable interval. • ...Avoid using the Tools tab in the disk Properties window. If you use . Do not apply any other device that prevents the notebook from changing to check the integrity of your files and operating system. • Check your disk using ...

Reference Guide
Page 39
...the specified interval The hard drive is not accessed for a specified interval No pointing devices are running your working habits. Maintains your notebook to conserve battery power. Saves your current session to the hard drive, and turns off the display to conserve battery power and...can adjust these timeouts to occur shortly after specified timeout periods. This is in Windows. Hibernation is initiated. Your notebook is turned off the hard drive and display based on values set to suit your notebook on . Hard drive turns off. CAUTION Make a habit of the display....
...the specified interval The hard drive is not accessed for a specified interval No pointing devices are running your working habits. Maintains your notebook to conserve battery power. Saves your current session to the hard drive, and turns off the display to conserve battery power and...can adjust these timeouts to occur shortly after specified timeout periods. This is in Windows. Hibernation is initiated. Your notebook is turned off the hard drive and display based on values set to suit your notebook on . Hard drive turns off. CAUTION Make a habit of the display....
Reference Guide
Page 40
... runs down components or enters a power-saving mode. Reference Guide 31 CAUTION Batteries and Power Management Managing Power Consumption The notebook can also save the settings as a power scheme. 1. Select the Power Schemes tab, then enter the settings you do not want . If ...to save these settings as a power scheme, select Save As and enter a name for details. See Windows Help for the scheme. If you will find on resuming that all your notebook automatically shuts down completely. Changing timeout settings and creating power schemes You can adjust the length of timeouts...
... runs down components or enters a power-saving mode. Reference Guide 31 CAUTION Batteries and Power Management Managing Power Consumption The notebook can also save the settings as a power scheme. 1. Select the Power Schemes tab, then enter the settings you do not want . If ...to save these settings as a power scheme, select Save As and enter a name for details. See Windows Help for the scheme. If you will find on resuming that all your notebook automatically shuts down completely. Changing timeout settings and creating power schemes You can adjust the length of timeouts...
Reference Guide
Page 41
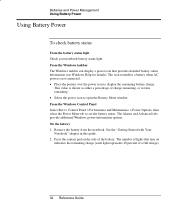
...Select Start > Control Panel > Performance and Maintenance > Power Options, then select the Power Meter tab to see Windows Help for details). Remove the battery from the notebook. Press the contact pad on indicates the remaining charge (each light represents 20 percent of the battery. On ...the battery 1. The number of lights that provides detailed battery status information (see the battery status. See the "Getting Started with Your Notebook" chapter in this guide. 2. The icon resembles a battery when AC power is shown as either a percentage of charge remaining, or as...
...Select Start > Control Panel > Performance and Maintenance > Power Options, then select the Power Meter tab to see Windows Help for details). Remove the battery from the notebook. Press the contact pad on indicates the remaining charge (each light represents 20 percent of the battery. On ...the battery 1. The number of lights that provides detailed battery status information (see the battery status. See the "Getting Started with Your Notebook" chapter in this guide. 2. The icon resembles a battery when AC power is shown as either a percentage of charge remaining, or as...

Reference Guide
Page 45
...and use your modem: • Internet Explorer, for browsing the World Wide Web • Outlook Express, for sending and receiving e-mail messages • Windows Fax Console software for sending and receiving faxes For best performance, you can connect your modem to a telephone line and communicate with your ISP for... a list of telephone numbers that support V.90 or V.92. (V.92 enables modem on-hold technology that work with your notebook to answer a phone call, then resumes the Internet session once the call is complete.) The maximum speed for faxing is 14.4 Kbps, even ...
...and use your modem: • Internet Explorer, for browsing the World Wide Web • Outlook Express, for sending and receiving e-mail messages • Windows Fax Console software for sending and receiving faxes For best performance, you can connect your modem to a telephone line and communicate with your ISP for... a list of telephone numbers that support V.90 or V.92. (V.92 enables modem on-hold technology that work with your notebook to answer a phone call, then resumes the Internet session once the call is complete.) The maximum speed for faxing is 14.4 Kbps, even ...
Reference Guide
Page 48
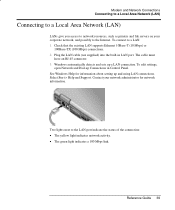
...light indicates a 100 Mbps link. Check that the existing LAN supports Ethernet 10Base-T (10 Mbps) or 100Base-TX (100 Mbps) connections. 2. Windows automatically detects and sets up and using LAN connections. To edit settings, open Network and Dial-up Connections in LAN port. Select Start > Help... access to network resources, such as printers and file servers on your network administrator for information about setting up a LAN connection. See Windows Help for network information. Contact your corporate network, and possibly to the Internet. The cable must have an RJ-45 connector. 3. ...
...light indicates a 100 Mbps link. Check that the existing LAN supports Ethernet 10Base-T (10 Mbps) or 100Base-TX (100 Mbps) connections. 2. Windows automatically detects and sets up and using LAN connections. To edit settings, open Network and Dial-up Connections in LAN port. Select Start > Help... access to network resources, such as printers and file servers on your network administrator for information about setting up a LAN connection. See Windows Help for network information. Contact your corporate network, and possibly to the Internet. The cable must have an RJ-45 connector. 3. ...
Reference Guide
Page 55
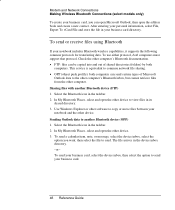
Sharing files with another Bluetooth device (OPP) 1. Use Windows Explorer or other software to copy or move files between your notebook and the other device. 3. In My Bluetooth Places, select and open the other device. Modem and Network Connections Making Wireless ... can send certain types of shared directories (folders) by both computers must support that protocol. This service is equivalent to send your notebook includes Bluetooth wireless capabilities, it supports the following common protocols for transferring data. Check the other computer. The file arrives in your ...
Sharing files with another Bluetooth device (OPP) 1. Use Windows Explorer or other software to copy or move files between your notebook and the other device. 3. In My Bluetooth Places, select and open the other device. Modem and Network Connections Making Wireless ... can send certain types of shared directories (folders) by both computers must support that protocol. This service is equivalent to send your notebook includes Bluetooth wireless capabilities, it supports the following common protocols for transferring data. Check the other computer. The file arrives in your ...

Reference Guide
Page 61
... Note Add-On Devices Connecting External Devices To use only the external monitor, you are prompted to restart Windows, select Yes. Restart your notebook has a 7-pin S-Video out jack, the notebook accepts either a 7-pin or 4-pin cable connection. 2. Then, select the Settings tab, select the ..., select the Settings tab, then select the Advanced button. -orSelect Start > Control Panel > Appearance and Themes > Display. Although your notebook. The external monitor displays the same image as the internal display, regardless of the screen area, colors, and other settings, and the ...
... Note Add-On Devices Connecting External Devices To use only the external monitor, you are prompted to restart Windows, select Yes. Restart your notebook has a 7-pin S-Video out jack, the notebook accepts either a 7-pin or 4-pin cable connection. 2. Then, select the Settings tab, select the ..., select the Settings tab, then select the Advanced button. -orSelect Start > Control Panel > Appearance and Themes > Display. Although your notebook. The external monitor displays the same image as the internal display, regardless of the screen area, colors, and other settings, and the ...
Reference Guide
Page 62
... to connect devices such as playing DVDs and running 3D graphics require extra video memory, so you want, and select Primary. Windows automatically recognizes the device. On the Settings tab, select the Advanced button, then the Displays or Monitor tab. In addition, certain... operations such as audio and video equipment, disk drives, printers, and other settings 1. An alternative is to your notebook. 1. Select the Settings tab. 3. To connect an IEEE 1394 device (select models only) If your applications. Select Start > Control Panel > Appearance...
... to connect devices such as playing DVDs and running 3D graphics require extra video memory, so you want, and select Primary. Windows automatically recognizes the device. On the Settings tab, select the Advanced button, then the Displays or Monitor tab. In addition, certain... operations such as audio and video equipment, disk drives, printers, and other settings 1. An alternative is to your notebook. 1. Select the Settings tab. 3. To connect an IEEE 1394 device (select models only) If your applications. Select Start > Control Panel > Appearance...


