User Guide
Page 5
... Turning on the monitor ...15 Connecting USB devices ...16 Removing the monitor stand ...17 Mounting the monitor ...17 Mounting the monitor to a fixture ...17 Locating the serial number and product number 19 Installing a cable lock ...19 4 Operating the monitor ...20 Software and utilities ...20 The Information file ...20 The Image Color Matching file ...20 Installing the .INF and .ICM files ...20 Installing from the disc ...20 Downloading from the Web ...21 Using the On-Screen Display (OSD) menu ...21 Using Picture...
... Turning on the monitor ...15 Connecting USB devices ...16 Removing the monitor stand ...17 Mounting the monitor ...17 Mounting the monitor to a fixture ...17 Locating the serial number and product number 19 Installing a cable lock ...19 4 Operating the monitor ...20 Software and utilities ...20 The Information file ...20 The Image Color Matching file ...20 Installing the .INF and .ICM files ...20 Installing from the disc ...20 Downloading from the Web ...21 Using the On-Screen Display (OSD) menu ...21 Using Picture...
User Guide
Page 6
... specifications ...25 23.8-inch Full HD/QHD Models ...25 24-inch Model ...26 25-inch QHD Model ...26 27-inch QHD Model ...27 Recognizing Preset Display Resolutions ...28 23.8-inch Full HD Model ...28 24-inch Model ...29 23.8-inch QHD/25-inch/27-inch Models 30 High Definition Video Formats ...30 Appendix B Support and troubleshooting ...31 Solving common problems ...31 Button lockouts ...31 Product support ...32 Preparing to call technical support ...32 Appendix C LCD monitor quality and pixel...
... specifications ...25 23.8-inch Full HD/QHD Models ...25 24-inch Model ...26 25-inch QHD Model ...26 27-inch QHD Model ...27 Recognizing Preset Display Resolutions ...28 23.8-inch Full HD Model ...28 24-inch Model ...29 23.8-inch QHD/25-inch/27-inch Models 30 High Definition Video Formats ...30 Appendix B Support and troubleshooting ...31 Solving common problems ...31 Button lockouts ...31 Product support ...32 Preparing to call technical support ...32 Appendix C LCD monitor quality and pixel...
User Guide
Page 7
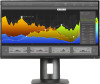
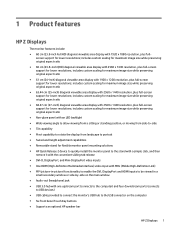
... maximum image size while preserving original aspect ratio ● 63.44 cm (25-inch) diagonal viewable area display with 2560 x 1440 resolution, plus full-screen support for lower resolutions; screen support for flexible monitor panel mounting solutions ● HP Quick Release 2 device to quickly install the monitor panel to the stand with a simple click, and then remove it with the convenient sliding tab release ● DVI-D, DisplayPort, and Mini-DisplayPort video inputs ● One HDMI...
... maximum image size while preserving original aspect ratio ● 63.44 cm (25-inch) diagonal viewable area display with 2560 x 1440 resolution, plus full-screen support for lower resolutions; screen support for flexible monitor panel mounting solutions ● HP Quick Release 2 device to quickly install the monitor panel to the stand with a simple click, and then remove it with the convenient sliding tab release ● DVI-D, DisplayPort, and Mini-DisplayPort video inputs ● One HDMI...
User Guide
Page 8
... ● Security slot provision on rear of monitor for optional cable lock ● Cable management feature for placement of cables and cords ● On-Screen Display (OSD) adjustments in several languages for easy setup and screen optimization ● HP Display Assistant for adjusting monitor settings and enabling theft deterrence features (refer to http://www.hp.com/support, and select your documentation kit. Select Drivers & Downloads, and then follow the onscreen instructions. 2 Chapter 1 Product features
... ● Security slot provision on rear of monitor for optional cable lock ● Cable management feature for placement of cables and cords ● On-Screen Display (OSD) adjustments in several languages for easy setup and screen optimization ● HP Display Assistant for adjusting monitor settings and enabling theft deterrence features (refer to http://www.hp.com/support, and select your documentation kit. Select Drivers & Downloads, and then follow the onscreen instructions. 2 Chapter 1 Product features
User Guide
Page 9
... A power cord is included with a 3-pin attachment plug on or trip over them so that they cannot be specifically labeled as a power strip or Uninterruptible Power Supply (UPS). CAUTION: For the protection of serious injury, read the Safety and Comfort Guide. It describes proper workstation, setup, posture, and health and work habits for entertainment purposes. Consider placing the display in a controlled luminous...
... A power cord is included with a 3-pin attachment plug on or trip over them so that they cannot be specifically labeled as a power strip or Uninterruptible Power Supply (UPS). CAUTION: For the protection of serious injury, read the Safety and Comfort Guide. It describes proper workstation, setup, posture, and health and work habits for entertainment purposes. Consider placing the display in a controlled luminous...
User Guide
Page 10
... ampere rating of the products connected to the cord does not exceed the rating of the monitor: ● Do not open the monitor cabinet or attempt to gently wipe the screen surface. For more difficult cleaning situations, use the damp cloth to service this product yourself. Cleaning the monitor 1. Shipping the monitor Keep the original packing box in a well-ventilated area, away from excessive light, heat...
... ampere rating of the products connected to the cord does not exceed the rating of the monitor: ● Do not open the monitor cabinet or attempt to gently wipe the screen surface. For more difficult cleaning situations, use the damp cloth to service this product yourself. Cleaning the monitor 1. Shipping the monitor Keep the original packing box in a well-ventilated area, away from excessive light, heat...

User Guide
Page 11
..., then follow the instructions below. Use caution when setting up the monitor, ensure that the power is in this occurs the screen will not recover to the front panel buttons. NOTE: Your monitor may cause non-uniformity of color or disorientation of the LCD panel. If installing a stand, lay the monitor face down on the rear panel of the monitor, is turned off to the monitor. If this illustration...
..., then follow the instructions below. Use caution when setting up the monitor, ensure that the power is in this occurs the screen will not recover to the front panel buttons. NOTE: Your monitor may cause non-uniformity of color or disorientation of the LCD panel. If installing a stand, lay the monitor face down on the rear panel of the monitor, is turned off to the monitor. If this illustration...

User Guide
Page 14
Connect a video cable. Before connecting the cables, route the cables through the On-Screen Display (OSD) by pressing the Menu button and selecting Input Control. ● Connect a DVI-D cable to the DVI-D connector on the source device. 8 Chapter 3 Setting up the monitor Connecting the cables NOTE: The monitor ships with the monitor. 1. The inputs can be selected by pressing the Next Input button on the rear of the stand. 3. Not all cables shown in the center of the monitor and the other...
Connect a video cable. Before connecting the cables, route the cables through the On-Screen Display (OSD) by pressing the Menu button and selecting Input Control. ● Connect a DVI-D cable to the DVI-D connector on the source device. 8 Chapter 3 Setting up the monitor Connecting the cables NOTE: The monitor ships with the monitor. 1. The inputs can be selected by pressing the Next Input button on the rear of the stand. 3. Not all cables shown in the center of the monitor and the other...

User Guide
Page 17
... not pull on power cords or cables. Connect one end of the provided audio cable to the audio connector on the monitor and connect the other end to the USB downstream port on the rear of the cable to the equipment: Do not disable the power cord grounding plug. For your safety, do not place anything on a cord or cable. 4. Connect the USB upstream cable's Type B connector to the USB upstream port on the source device. 5.
... not pull on power cords or cables. Connect one end of the provided audio cable to the audio connector on the monitor and connect the other end to the USB downstream port on the rear of the cable to the equipment: Do not disable the power cord grounding plug. For your safety, do not place anything on a cord or cable. 4. Connect the USB upstream cable's Type B connector to the USB upstream port on the source device. 5.
User Guide
Page 18
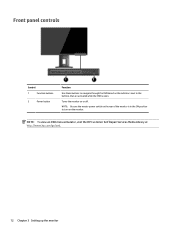
Turns the monitor on the rear of the monitor is open. NOTE: To view an OSD menu simulator, visit the HP Customer Self Repair Services Media Library at http://www.hp.com/go/sml. 12 Chapter 3 Setting up the monitor Front panel controls Control 1 Function buttons 2 Power button Function Use these buttons to navigate through the OSD based on the indicators next to the buttons that are activated while the OSD is in the ON position to turn on the monitor. NOTE: Be sure the master power switch on or off.
Turns the monitor on the rear of the monitor is open. NOTE: To view an OSD menu simulator, visit the HP Customer Self Repair Services Media Library at http://www.hp.com/go/sml. 12 Chapter 3 Setting up the monitor Front panel controls Control 1 Function buttons 2 Power button Function Use these buttons to navigate through the OSD based on the indicators next to the buttons that are activated while the OSD is in the ON position to turn on the monitor. NOTE: Be sure the master power switch on or off.

User Guide
Page 20
... mode. b. If you can pivot the monitor from landscape to portrait orientation viewing to adapt to portrait orientation (2). The monitor should not exceed a height that is positioned low and reclined may be repositioned as you adjust your application. You can install the HP Display Assistant software included on the front panel, select OSD Control from landscape to your working posture throughout the work day. 4. CAUTION: If the monitor...
... mode. b. If you can pivot the monitor from landscape to portrait orientation viewing to adapt to portrait orientation (2). The monitor should not exceed a height that is positioned low and reclined may be repositioned as you adjust your application. You can install the HP Display Assistant software included on the front panel, select OSD Control from landscape to your working posture throughout the work day. 4. CAUTION: If the monitor...

User Guide
Page 21
... LCD screens. Press the Menu button on . Turning on the monitor 1. The message shows which input is On), the current preset display resolution, and the recommended preset display resolution. Press the power button on the computer to turn it on the front of the monitor to the On position. 2. The monitor automatically scans the signal inputs for an active input and uses that display the same static image on screen for five seconds. Set the master power switch...
... LCD screens. Press the Menu button on . Turning on the monitor 1. The message shows which input is On), the current preset display resolution, and the recommended preset display resolution. Press the power button on the computer to turn it on the front of the monitor to the On position. 2. The monitor automatically scans the signal inputs for an active input and uses that display the same static image on screen for five seconds. Set the master power switch...
User Guide
Page 23
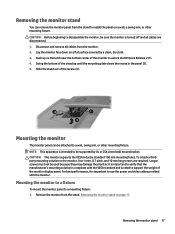
... the panel (2). 5. For best performance, it is turned off and all cables from the stand. Removing the monitor stand 17 Lay the monitor face down on page 17. Longer screws must not be supported by a clean, dry cloth. 3. CAUTION: This monitor supports the VESA industry standard 100 mm mounting holes. To attach a thirdparty mounting solution to disassemble the monitor, be sure the monitor is important to a mounting fixture: 1. Removing the monitor stand on a flat surface covered...
... the panel (2). 5. For best performance, it is turned off and all cables from the stand. Removing the monitor stand 17 Lay the monitor face down on page 17. Longer screws must not be supported by a clean, dry cloth. 3. CAUTION: This monitor supports the VESA industry standard 100 mm mounting holes. To attach a thirdparty mounting solution to disassemble the monitor, be sure the monitor is important to a mounting fixture: 1. Removing the monitor stand on a flat surface covered...
User Guide
Page 25
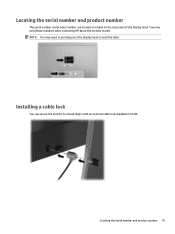
Installing a cable lock You can secure the monitor to read the label. Locating the serial number and product number 19 NOTE: You may need to partially pivot the display head to a fixed object with an optional cable lock available from HP. Locating the serial number and product number The serial number and product number are located on a label on the rear panel of the display head. You may need these numbers when contacting HP about the monitor model.
Installing a cable lock You can secure the monitor to read the label. Locating the serial number and product number 19 NOTE: You may need to partially pivot the display head to a fixed object with an optional cable lock available from HP. Locating the serial number and product number The serial number and product number are located on a label on the rear panel of the display head. You may need these numbers when contacting HP about the monitor model.
User Guide
Page 26
... Format specification. Installing the .INF and .ICM files After you determine that the proper resolution and refresh rates appear in the Windows Display control panel. View the HP Monitor Software Information file. 3. Ensure that you need to the HP Monitor Software Information file on the computer: ● an .INF (Information) file ● ICM (Image Color Matching) files (one for each calibrated color space) The Information file The .INF file defines monitor resources used...
... Format specification. Installing the .INF and .ICM files After you determine that the proper resolution and refresh rates appear in the Windows Display control panel. View the HP Monitor Software Information file. 3. Ensure that you need to the HP Monitor Software Information file on the computer: ● an .INF (Information) file ● ICM (Image Color Matching) files (one for each calibrated color space) The Information file The .INF file defines monitor resources used...
User Guide
Page 27
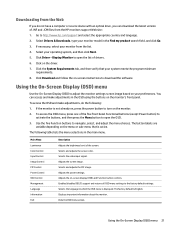
... in the main menu. Go to turn on the monitor's front panel. Select Drivers & Downloads, type your monitor from the HP monitors support Web site: 1. Click Driver - Display/Monitor to download the software. Using the On-Screen Display (OSD) menu Use the On-Screen Display (OSD) to adjust the monitor settings screen image based on -screen instructions to open the OSD. 3. To access the OSD and make adjustments in the OSD using the buttons on the monitor. 2. If the monitor is English. Selects the video input signal. Adjusts the power settings. The factory default is not...
... in the main menu. Go to turn on the monitor's front panel. Select Drivers & Downloads, type your monitor from the HP monitors support Web site: 1. Click Driver - Display/Monitor to download the software. Using the On-Screen Display (OSD) menu Use the On-Screen Display (OSD) to adjust the monitor settings screen image based on -screen instructions to open the OSD. 3. To access the OSD and make adjustments in the OSD using the buttons on the monitor. 2. If the monitor is English. Selects the video input signal. Adjusts the power settings. The factory default is not...
User Guide
Page 28
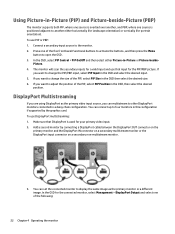
... PBP, where one source is positioned adjacent to adjust the position of the five front bezel Functional buttons to activate the buttons, and then press the Menu button to display the same image as the primary video input source, you want to change the size of the following: 22 Chapter 4 Operating the monitor To use PIP or PBP: 1. In the OSD for the PIP/PBP picture. If you want...
... PBP, where one source is positioned adjacent to adjust the position of the five front bezel Functional buttons to activate the buttons, and then press the Menu button to display the same image as the primary video input source, you want to change the size of the following: 22 Chapter 4 Operating the monitor To use PIP or PBP: 1. In the OSD for the PIP/PBP picture. If you want...

User Guide
Page 30
... the Menu button to open the OSD. Upon entering this reduced power mode. You can disable the Auto-Sleep Mode in this reduced power state sleep mode, the monitor screen is blanked, the backlight is enabled (enabled by default), the monitor will wake from the sleep mode when the host PC sends an active signal to the monitor (for the display. Using Auto-Sleep Mode The display supports an OSD (On-Screen Display) option called Auto-Sleep Mode that allows you to enable or disable a reduced power...
... the Menu button to open the OSD. Upon entering this reduced power mode. You can disable the Auto-Sleep Mode in this reduced power state sleep mode, the monitor screen is blanked, the backlight is enabled (enabled by default), the monitor will wake from the sleep mode when the host PC sends an active signal to the monitor (for the display. Using Auto-Sleep Mode The display supports an OSD (On-Screen Display) option called Auto-Sleep Mode that allows you to enable or disable a reduced power...

User Guide
Page 31
... product, go to http://www.hp.com/go/ quickspecs/ and search for your specific display model to find the model-specific QuickSpecs. 23.8-inch Full HD/QHD Models Display Type Viewable Image Size Maximum Weight (Unpacked) Dimensions (include base) Height (highest position) Height (lowest position) Depth Width Maximum Graphic Resolution Optimum Graphic Resolution Environmental Requirements Temperature Operating Temperature Storage Temperature Power Source Input Terminal 60 cm wide screen TFT-LCD 60 cm diagonal 5Fu.l0l...
... product, go to http://www.hp.com/go/ quickspecs/ and search for your specific display model to find the model-specific QuickSpecs. 23.8-inch Full HD/QHD Models Display Type Viewable Image Size Maximum Weight (Unpacked) Dimensions (include base) Height (highest position) Height (lowest position) Depth Width Maximum Graphic Resolution Optimum Graphic Resolution Environmental Requirements Temperature Operating Temperature Storage Temperature Power Source Input Terminal 60 cm wide screen TFT-LCD 60 cm diagonal 5Fu.l0l...
User Guide
Page 37
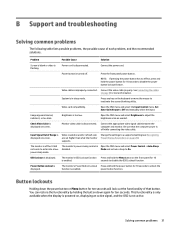
... button down the power button or Menu button for more information. Open the OSD menu and select the Input Control menu. Brightness is displayed. Video resolution and/or refresh rate are set auto-sleep to disable the OSD Lockout function. The monitor's power saving control is flashing. Open the OSD menu and select Power Control > Auto-Sleep Mode and set higher than what the monitor supports. The monitor's OSD Lockout function Press and hold the Menu button on the front panel for ten seconds. This functionality is only available when the display is powered on screen...
... button down the power button or Menu button for more information. Open the OSD menu and select the Input Control menu. Brightness is displayed. Video resolution and/or refresh rate are set auto-sleep to disable the OSD Lockout function. The monitor's power saving control is flashing. Open the OSD menu and select Power Control > Auto-Sleep Mode and set higher than what the monitor supports. The monitor's OSD Lockout function Press and hold the Menu button on the front panel for ten seconds. This functionality is only available when the display is powered on screen...


