User Guide
Page 5
... Image Color Matching file ...14 Installing the INF and ICM files ...14 Installing from the optical disc (available in select regions 14 Downloading from the web ...15 Using the on-screen display (OSD) menu ...15 Assigning the Function buttons ...16 Selecting a faster response time ...17 Selecting the Low Blue Light mode ...17 Using Auto-Sleep Mode ...18 Factory calibration ...18 3 Support and troubleshooting ...19 Solving common problems ...19 Button lockouts ...19 Using the auto-adjustment function (analog input 20 Optimizing image...
... Image Color Matching file ...14 Installing the INF and ICM files ...14 Installing from the optical disc (available in select regions 14 Downloading from the web ...15 Using the on-screen display (OSD) menu ...15 Assigning the Function buttons ...16 Selecting a faster response time ...17 Selecting the Low Blue Light mode ...17 Using Auto-Sleep Mode ...18 Factory calibration ...18 3 Support and troubleshooting ...19 Solving common problems ...19 Button lockouts ...19 Using the auto-adjustment function (analog input 20 Optimizing image...

User Guide
Page 6
... Cleaning the monitor ...23 Shipping the monitor ...23 Appendix A Technical specifications ...24 61.1 cm/24-inch model ...24 60.5 cm/23.8-inch model ...25 58.4 cm/23-inch model ...25 54.6 cm/21.5-inch model ...26 Preset display resolutions ...26 61.1 cm/24-inch model ...27 54.6 cm/21.5-inch, 58.4 cm/23-inch, and 60.5 cm/23.8-inch models 27 Entering user modes ...28 Energy saver feature ...28 Appendix B Accessibility ...29 Supported...
... Cleaning the monitor ...23 Shipping the monitor ...23 Appendix A Technical specifications ...24 61.1 cm/24-inch model ...24 60.5 cm/23.8-inch model ...25 58.4 cm/23-inch model ...25 54.6 cm/21.5-inch model ...26 Preset display resolutions ...26 61.1 cm/24-inch model ...27 54.6 cm/21.5-inch, 58.4 cm/23-inch, and 60.5 cm/23.8-inch models 27 Entering user modes ...28 Energy saver feature ...28 Appendix B Accessibility ...29 Supported...
User Guide
Page 7
... to use only a power source and connection appropriate for each device. It describes proper workstation setup, and proper posture, health, and work habits for the computer and its peripheral devices (such as having this monitor. Use the appropriate and correctly sized furniture designed to the cord does not exceed the rating of electric shock or damage to the equipment: • Plug the power cord...
... to use only a power source and connection appropriate for each device. It describes proper workstation setup, and proper posture, health, and work habits for the computer and its peripheral devices (such as having this monitor. Use the appropriate and correctly sized furniture designed to the cord does not exceed the rating of electric shock or damage to the equipment: • Plug the power cord...
User Guide
Page 8
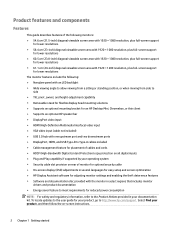
... panel with an LED backlight ● Wide viewing angle to allow viewing from a sitting or standing position, or when moving from side to side ● Tilt, pivot, swivel, and height-adjustment capability ● Removable stand for flexible display head mounting solutions ● Supports an optional mounting bracket for an HP Desktop Mini, Chromebox, or thin client ● Supports an optional HP speaker bar ● DisplayPort video input ● HDMI (High-Definition Multimedia Interface) video input ● VGA video input (cable...
... panel with an LED backlight ● Wide viewing angle to allow viewing from a sitting or standing position, or when moving from side to side ● Tilt, pivot, swivel, and height-adjustment capability ● Removable stand for flexible display head mounting solutions ● Supports an optional mounting bracket for an HP Desktop Mini, Chromebox, or thin client ● Supports an optional HP speaker bar ● DisplayPort video input ● HDMI (High-Definition Multimedia Interface) video input ● VGA video input (cable...
User Guide
Page 9
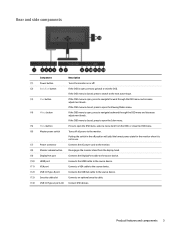
... use. (7) Power connector Connects the AC power cord to the monitor. (8) Monitor release button Disengages the monitor stand from the OSD, or close the OSD menu. (6) Master power switch Turns off all power to the monitor. If the OSD menu is closed, press to switch to the next active input. (3) Plus button If the OSD menu is open , press to navigate backward through the OSD menu and increase adjustment levels. Product features and components 3 If the OSD menu is closed , press to open the Color menu. (5) Menu button...
... use. (7) Power connector Connects the AC power cord to the monitor. (8) Monitor release button Disengages the monitor stand from the OSD, or close the OSD menu. (6) Master power switch Turns off all power to the monitor. If the OSD menu is closed, press to switch to the next active input. (3) Plus button If the OSD menu is open , press to navigate backward through the OSD menu and increase adjustment levels. Product features and components 3 If the OSD menu is closed , press to open the Color menu. (5) Menu button...
User Guide
Page 11
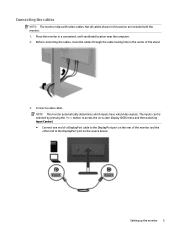
... end to the DisplayPort port on the source device. Place the monitor in this section are included with select cables. The inputs can be selected by pressing the Menu button to access the on-screen display (OSD) menu and then selecting Input Control. ● Connect one end of a DisplayPort cable to the DisplayPort port on the rear of the stand. 3. Connect a video cable. Setting up the monitor 5 Not all cables shown in a convenient...
... end to the DisplayPort port on the source device. Place the monitor in this section are included with select cables. The inputs can be selected by pressing the Menu button to access the on-screen display (OSD) menu and then selecting Input Control. ● Connect one end of a DisplayPort cable to the DisplayPort port on the rear of the stand. 3. Connect a video cable. Setting up the monitor 5 Not all cables shown in a convenient...

User Guide
Page 13
... pull on power cords or cables. Then connect the cable's Type-A connector to the equipment: Do not disable the power cord grounding plug. Connect one may accidentally step on the source device. 5. Arrange them . When unplugging the power cord from the AC outlet, grasp the cord by unplugging the power cord from the equipment by the plug. Setting up the monitor 7 Connect the Type-B connector of the USB upstream cable to the USB upstream port on...
... pull on power cords or cables. Then connect the cable's Type-A connector to the equipment: Do not disable the power cord grounding plug. Connect one may accidentally step on the source device. 5. Arrange them . When unplugging the power cord from the AC outlet, grasp the cord by unplugging the power cord from the equipment by the plug. Setting up the monitor 7 Connect the Type-B connector of the USB upstream cable to the USB upstream port on...
User Guide
Page 17
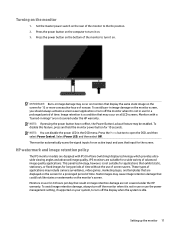
... may be enabled. Setting up the monitor 11 Set the master power switch on the monitor's screen. Press the power button on the computer to turn off the display when the system is a condition that may cause image retention damage that are not covered under the HP warranty. IPS monitors are not covered under the HP warranty. IMPORTANT: Burn-in the OSD menu. To avoid burn-in image damage on the...
... may be enabled. Setting up the monitor 11 Set the master power switch on the monitor's screen. Press the power button on the computer to turn off the display when the system is a condition that may cause image retention damage that are not covered under the HP warranty. IPS monitors are not covered under the HP warranty. IMPORTANT: Burn-in the OSD menu. To avoid burn-in image damage on the...
User Guide
Page 18
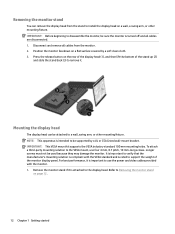
..., 10 mm-long screws. Position the monitor facedown on a wall, a swing arm, or other mounting fixture. Press the release button on page 12. 12 Chapter 1 Getting started Mounting the display head The display head can remove the display head from the monitor. 2. NOTE: This apparatus is attached to the VESA mount, use the power and video cables provided with the VESA standard and is important to Removing the monitor stand on the rear...
..., 10 mm-long screws. Position the monitor facedown on a wall, a swing arm, or other mounting fixture. Press the release button on page 12. 12 Chapter 1 Getting started Mounting the display head The display head can remove the display head from the monitor. 2. NOTE: This apparatus is attached to the VESA mount, use the power and video cables provided with the VESA standard and is important to Removing the monitor stand on the rear...
User Guide
Page 20
... methods to install the files. Installing from within graphics programs that are data files that support this feature. The optical disc menu is activated from the optical disc (available in the Windows Display control panel. 14 Chapter 2 Using the monitor Monitor Plug and Play compatibility requires that the computer's graphic card is VESA DDC2compliant and that the proper resolution and refresh rates appear in select regions) 1. The Image Color Matching...
... methods to install the files. Installing from within graphics programs that are data files that support this feature. The optical disc menu is activated from the optical disc (available in the Windows Display control panel. 14 Chapter 2 Using the monitor Monitor Plug and Play compatibility requires that the computer's graphic card is VESA DDC2compliant and that the proper resolution and refresh rates appear in select regions) 1. The Image Color Matching...

User Guide
Page 21
... Get software and drivers. 3. Adjusts the screen contrast. Go to the factory default settings. Using the on-screen display (OSD) menu Use the on-screen display (OSD) menu to select your monitor and download the software. You can download the latest versions of the monitor to scroll up, or the Minus button to select that function. 5. Exits the OSD menu screen. If the monitor is displayed. To navigate through the OSD menu, press the Plus button on the monitor. 2. Main menu Brightness Contrast Color Control Input Control Image Control Power Control Menu Control Management...
... Get software and drivers. 3. Adjusts the screen contrast. Go to the factory default settings. Using the on-screen display (OSD) menu Use the on-screen display (OSD) menu to select your monitor and download the software. You can download the latest versions of the monitor to scroll up, or the Minus button to select that function. 5. Exits the OSD menu screen. If the monitor is displayed. To navigate through the OSD menu, press the Plus button on the monitor. 2. Main menu Brightness Contrast Color Control Input Control Image Control Power Control Menu Control Management...

User Guide
Page 23
...: Optimizes both blue light and brightness for computer users. All performance specifications represent the typical specifications provided by the display reduces the blue light exposure to open the OSD. 2. Press one of the monitor to as fast as 5.4 ms in the display menu. The Safety & Comfort Guide also provides important electrical and mechanical safety information. Selecting a faster response time 1. Selecting the Low Blue Light mode Decreasing the blue light emitted by HP...
...: Optimizes both blue light and brightness for computer users. All performance specifications represent the typical specifications provided by the display reduces the blue light exposure to open the OSD. 2. Press one of the monitor to as fast as 5.4 ms in the display menu. The Safety & Comfort Guide also provides important electrical and mechanical safety information. Selecting a faster response time 1. Selecting the Low Blue Light mode Decreasing the blue light emitted by HP...

User Guide
Page 24
... RGB 18 Chapter 2 Using the monitor Using Auto-Sleep Mode The monitor supports an OSD (on-screen display) menu option called Auto-Sleep Mode that allows you activate the mouse or keyboard). The monitor draws less than 0.5 W of either horizontal or vertical sync signal). Press the Menu button to enable or disable a reduced power state for example, if you to open the OSD, and then select Power Control, select Auto-Sleep Mode, and then select Off. When Auto-Sleep Mode is turned off, and the power LED indicator turns...
... RGB 18 Chapter 2 Using the monitor Using Auto-Sleep Mode The monitor supports an OSD (on-screen display) menu option called Auto-Sleep Mode that allows you activate the mouse or keyboard). The monitor draws less than 0.5 W of either horizontal or vertical sync signal). Press the Menu button to enable or disable a reduced power state for example, if you to open the OSD, and then select Power Control, select Auto-Sleep Mode, and then select Off. When Auto-Sleep Mode is turned off, and the power LED indicator turns...

User Guide
Page 25
... sure the computer power is displayed on screen. Monitor video cable is in sleep mode. Video card is displayed on screen. Be sure that button. 3 Support and troubleshooting Solving common problems The following table lists possible problems, the possible cause of the computer's onboard video sources. Open the OSD menu and select Brightness to exit sleep mode. Input Signal Not Found is incompatible. Input Signal Out of that the computer power is enabled. Video resolution and/or refresh rate are set auto-sleep to disable the is off...
... sure the computer power is displayed on screen. Monitor video cable is in sleep mode. Video card is displayed on screen. Be sure that button. 3 Support and troubleshooting Solving common problems The following table lists possible problems, the possible cause of the computer's onboard video sources. Open the OSD menu and select Brightness to exit sleep mode. Input Signal Not Found is incompatible. Input Signal Out of that the computer power is enabled. Video resolution and/or refresh rate are set auto-sleep to disable the is off...

User Guide
Page 26
... open the OSD, select Image Control, and then select Auto-Adjustment from the OSD menu. Using the auto-adjustment function (analog input) When you . Press the Menu button to exit the test pattern. Allow the monitor to warm up the monitor, conduct a factory reset of the computer, or change the resolution of the monitor, the auto-adjustment feature automatically engages and attempts to optimize your screen for you first set up for 20 minutes before adjusting. 2. The setup test...
... open the OSD, select Image Control, and then select Auto-Adjustment from the OSD menu. Using the auto-adjustment function (analog input) When you . Press the Menu button to exit the test pattern. Allow the monitor to warm up the monitor, conduct a factory reset of the computer, or change the resolution of the monitor, the auto-adjustment feature automatically engages and attempts to optimize your screen for you first set up for 20 minutes before adjusting. 2. The setup test...

User Guide
Page 27
...): 1. To correct screen position (Horizontal Position or Vertical Position): 1. The Clock must first be set correctly since the Phase settings are not adjustable for digital inputs. To eliminate vertical bars (Clock): 1. Press the Menu button to open the OSD menu, select Image Control, and then select Image Position. These controls are dependent on the main Clock setting. To restore the factory settings, select Yes from the Factory Reset menu in the on the computer or graphics controller card installed. Flickering or blurring...
...): 1. To correct screen position (Horizontal Position or Vertical Position): 1. The Clock must first be set correctly since the Phase settings are not adjustable for digital inputs. To eliminate vertical bars (Clock): 1. Press the Menu button to open the OSD menu, select Image Control, and then select Image Position. These controls are dependent on the main Clock setting. To restore the factory settings, select Yes from the Factory Reset menu in the on the computer or graphics controller card installed. Flickering or blurring...
User Guide
Page 28
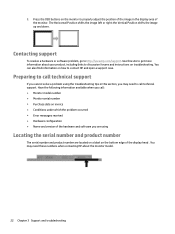
... technical support. Press the OSD buttons on troubleshooting. Preparing to contact HP and open a support case. Use this section, you are using the troubleshooting tips in the display area of the display head . You may need these numbers when contacting HP about your product, including links to discussion forums and instructions on the monitor to properly adjust the position of the image in this site to http://www.hp.com/support. 2. the Vertical Position...
... technical support. Press the OSD buttons on troubleshooting. Preparing to contact HP and open a support case. Use this section, you are using the troubleshooting tips in the display area of the display head . You may need these numbers when contacting HP about your product, including links to discussion forums and instructions on the monitor to properly adjust the position of the image in this site to http://www.hp.com/support. 2. the Vertical Position...

User Guide
Page 29
... cabinet are covered in the operating instructions. Never spray the cleaner directly on the power cord. If the monitor is not operating properly or has been dropped or damaged, contact an authorized HP dealer, reseller, or service provider. ● Use only a power source and connection appropriate for ventilation. These openings must not be blocked or covered. Adjust only those controls that contain any petroleum-based materials...
... cabinet are covered in the operating instructions. Never spray the cleaner directly on the power cord. If the monitor is not operating properly or has been dropped or damaged, contact an authorized HP dealer, reseller, or service provider. ● Use only a power source and connection appropriate for ventilation. These openings must not be blocked or covered. Adjust only those controls that contain any petroleum-based materials...

User Guide
Page 32
... Hz One DisplayPort port, one HDMI port, and one VGA port 41°F to 95°F -4°F to 140°F 54.6 cm/21.5-inch model Specification Display Type Viewable image size Maximum weight (unpacked) Dimensions (include base) Height Depth Width Maximum graphic resolution Optimum graphic resolution Environmental requirements temperature Operating temperature Storage temperature Operating humidity Non-operating humidity Power source Input terminal Measurement 54.6 cm wide screen IPS LCD 54.6 cm...
... Hz One DisplayPort port, one HDMI port, and one VGA port 41°F to 95°F -4°F to 140°F 54.6 cm/21.5-inch model Specification Display Type Viewable image size Maximum weight (unpacked) Dimensions (include base) Height Depth Width Maximum graphic resolution Optimum graphic resolution Environmental requirements temperature Operating temperature Storage temperature Operating humidity Non-operating humidity Power source Input terminal Measurement 54.6 cm wide screen IPS LCD 54.6 cm...

User Guide
Page 34
... either the horizontal sync signal or the vertical sync signal. By selecting the settings in the monitor's Energy Saver utility, you may occasionally call for instructions on -screen display. The monitor automatically stores the new setting and then recognizes the new mode just as it does a preset mode. Energy saver feature The monitors support a reduced power state. The reduced power state will utilize 0.5 watts of these modes and saved in the...
... either the horizontal sync signal or the vertical sync signal. By selecting the settings in the monitor's Energy Saver utility, you may occasionally call for instructions on -screen display. The monitor automatically stores the new setting and then recognizes the new mode just as it does a preset mode. Energy saver feature The monitors support a reduced power state. The reduced power state will utilize 0.5 watts of these modes and saved in the...


