

User Guide
Page 3
About This Guide This guide provides information on monitor features, setting up the monitor, and technical specifications. WARNING! Indicates a hazardous situation that , if not avoided, could result in minor or moderate injury. TIP: Provides helpful hints for completing a task. CAUTION: Indicates a hazardous situation that , if not avoided, could result in death or serious injury. NOTE: Contains additional information to emphasize or supplement important points of the main text. iii
About This Guide This guide provides information on monitor features, setting up the monitor, and technical specifications. WARNING! Indicates a hazardous situation that , if not avoided, could result in minor or moderate injury. TIP: Provides helpful hints for completing a task. CAUTION: Indicates a hazardous situation that , if not avoided, could result in death or serious injury. NOTE: Contains additional information to emphasize or supplement important points of the main text. iii
User Guide
Page 5
... features and components...2 Features...2 Rear components...3 Setting up the monitor...4 Installing the monitor stand...4 Connecting the cables...4 Connecting the Audio cables...6 Adjusting the monitor...8 Turning on the monitor...8 HP watermark and image retention policy 9 Removing the monitor stand...9 Mounting the monitor...9 Installing a security cable...11 2 Using the monitor...12 Software and utilities...12 The Information file...12 The...
... features and components...2 Features...2 Rear components...3 Setting up the monitor...4 Installing the monitor stand...4 Connecting the cables...4 Connecting the Audio cables...6 Adjusting the monitor...8 Turning on the monitor...8 HP watermark and image retention policy 9 Removing the monitor stand...9 Mounting the monitor...9 Installing a security cable...11 2 Using the monitor...12 Software and utilities...12 The Information file...12 The...

User Guide
Page 6
Locating the serial number and product number 19 4 Maintaining the monitor...20 Maintenance guidelines...20 Cleaning the monitor...20 Shipping the monitor...20 Appendix A. Technical specifications...21 60.5 cm/23.8-inch...21 Preset display resolutions...22 Power adapter...22 Entering user modes...23 Energy saver feature...23 Appendix B.Accessibility...24 Supported assistive technologies...24 Contacting support...24 vi
Locating the serial number and product number 19 4 Maintaining the monitor...20 Maintenance guidelines...20 Cleaning the monitor...20 Shipping the monitor...20 Appendix A. Technical specifications...21 60.5 cm/23.8-inch...21 Preset display resolutions...22 Power adapter...22 Entering user modes...23 Energy saver feature...23 Appendix B.Accessibility...24 Supported assistive technologies...24 Contacting support...24 vi
User Guide
Page 7
...for this ability. NOTE: This product is included with the monitor. For information on the optical disc or in a controlled luminous environment to properly support your HP LCD monitor. If another cord is easily accessible at http://www.hp.com/ergo. To reduce the risk of electric shock or... damage to some form of the monitor, as well as the computer, connect all times. •...
...for this ability. NOTE: This product is included with the monitor. For information on the optical disc or in a controlled luminous environment to properly support your HP LCD monitor. If another cord is easily accessible at http://www.hp.com/ergo. To reduce the risk of electric shock or... damage to some form of the monitor, as well as the computer, connect all times. •...
User Guide
Page 8
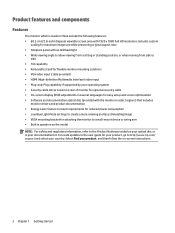
...Interface) video input • Plug-and-Play capability if supported by your operating system • Security cable slot provision on rear of monitor for optional security cable • On-screen display (OSD) adjustments in several languages for easy setup and screen optimization • Software ...that includes monitor drivers and product documentation • Energy saver feature to meet requirements for reduced power consumption • Low Blue Light Mode settings to create a more relaxing and less stimulating image • VESA mounting bracket for your product, go to http://www.hp.com/ ...
...Interface) video input • Plug-and-Play capability if supported by your operating system • Security cable slot provision on rear of monitor for optional security cable • On-screen display (OSD) adjustments in several languages for easy setup and screen optimization • Software ...that includes monitor drivers and product documentation • Energy saver feature to meet requirements for reduced power consumption • Low Blue Light Mode settings to create a more relaxing and less stimulating image • VESA mounting bracket for your product, go to http://www.hp.com/ ...
User Guide
Page 9
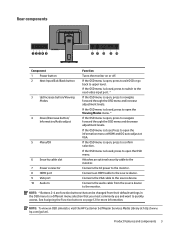
Connects the audio cable from their default settings in the OSD menu to a different menu selection that you most commonly use and want to the monitor. Rear components 1 2 34 5 6 7 8 9 10 Component 1 Power button 2 Next Input/Exit/Back button 3 Up/Increase button/Viewing Modes 4 Down/Decrease button/ Information...and decrease adjustment levels. If the OSD menu is open the information menu at HDMI and DO auto adjust at http://www. hp.com/go back to navigate forward through the OSD menu and increase adjustment levels. Attaches an optional security cable to the source ...
Connects the audio cable from their default settings in the OSD menu to a different menu selection that you most commonly use and want to the monitor. Rear components 1 2 34 5 6 7 8 9 10 Component 1 Power button 2 Next Input/Exit/Back button 3 Up/Increase button/Viewing Modes 4 Down/Decrease button/ Information...and decrease adjustment levels. If the OSD menu is open the information menu at HDMI and DO auto adjust at http://www. hp.com/go back to navigate forward through the OSD menu and increase adjustment levels. Attaches an optional security cable to the source ...

User Guide
Page 10
... a video cable to the base. 2. Attach the pedestal stand to the video input port. 4 Chapter 1 Getting started Pressure on the back of the monitor, and press until the stand clicks into the slot on the panel may cause nonuniformity of color or disorientation of the LCD panel. Insert the ...stand into place. Not all cables shown in a convenient, well-ventilated location near the computer. 2. Setting up the monitor Installing the monitor stand CAUTION: Do not touch the surface of the liquid crystals. Position the...
... a video cable to the base. 2. Attach the pedestal stand to the video input port. 4 Chapter 1 Getting started Pressure on the back of the monitor, and press until the stand clicks into the slot on the panel may cause nonuniformity of color or disorientation of the LCD panel. Insert the ...stand into place. Not all cables shown in a convenient, well-ventilated location near the computer. 2. Setting up the monitor Installing the monitor stand CAUTION: Do not touch the surface of the liquid crystals. Position the...

User Guide
Page 11
HDMI Setting up the monitor 5 NOTE: The monitor automatically determines which inputs have valid video signals. Connect one end of an HDMI cable to the HDMI port on the rear of the monitor and the other end to access the on the rear of the monitor and the other end to the source device. VGA Connect one end of the VGA cable to the VGA port on -screen display (OSD) menu and selecting Input Control. cable not included. The inputs can be selected by pressing the Menu button to the source device.
HDMI Setting up the monitor 5 NOTE: The monitor automatically determines which inputs have valid video signals. Connect one end of an HDMI cable to the HDMI port on the rear of the monitor and the other end to access the on the rear of the monitor and the other end to the source device. VGA Connect one end of the VGA cable to the VGA port on -screen display (OSD) menu and selecting Input Control. cable not included. The inputs can be selected by pressing the Menu button to the source device.

User Guide
Page 12
Connector locations may vary. Connecting the Audio cables Connect the built-in monitor speakers to the computer by using the audio cable as shown in the following illustration. Cable not included. 6 Chapter 1 Getting started
Connector locations may vary. Connecting the Audio cables Connect the built-in monitor speakers to the computer by using the audio cable as shown in the following illustration. Cable not included. 6 Chapter 1 Getting started

User Guide
Page 13
...) AC outlet that no one end of the power cord to the AC adapter (1), and the other end of electric shock or damage to the monitor (3). 2 3 1 WARNING! To reduce the risk of the power cord to a grounded AC outlet (2). 3. For your safety, do not place anything on power cords or cables.... Setting up the monitor 7 Then, connect the AC adapter to the equipment: Do not disable the power cord grounding plug. When unplugging the power cord from the AC outlet.
...) AC outlet that no one end of the power cord to the AC adapter (1), and the other end of electric shock or damage to the monitor (3). 2 3 1 WARNING! To reduce the risk of the power cord to a grounded AC outlet (2). 3. For your safety, do not place anything on power cords or cables.... Setting up the monitor 7 Then, connect the AC adapter to the equipment: Do not disable the power cord grounding plug. When unplugging the power cord from the AC outlet.
User Guide
Page 14
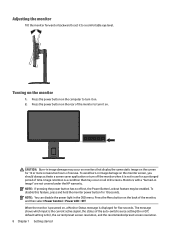
.... default setting is a condition that display the same static image on the screen for five seconds. To disable this feature, press and hold the monitor power button for a prolonged period of nonuse. NOTE: If pressing the power button has no effect, the Power Button Lockout feature may occur on ...all LCD screens. CAUTION: Burn-in image" are not covered under the HP warranty. NOTE: You can disable the power light in use for 10 seconds. Adjusting the monitor Tilt the monitor forward or backward to set it to turn it on. Press the power button on the...
.... default setting is a condition that display the same static image on the screen for five seconds. To disable this feature, press and hold the monitor power button for a prolonged period of nonuse. NOTE: If pressing the power button has no effect, the Power Button Lockout feature may occur on ...all LCD screens. CAUTION: Burn-in image" are not covered under the HP warranty. NOTE: You can disable the power light in use for 10 seconds. Adjusting the monitor Tilt the monitor forward or backward to set it to turn it on. Press the power button on the...
User Guide
Page 15
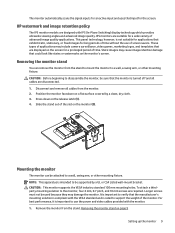
... solution to a wall, swing arm, or other mounting fixture. Removing the monitor stand on the release latch (1). 4. HP watermark and image retention policy The IPS monitor models are displayed on the monitor's screen. IPS monitors are required. Static images may damage the monitor. The monitor automatically scans the signal inputs for an active input and uses that...
... solution to a wall, swing arm, or other mounting fixture. Removing the monitor stand on the release latch (1). 4. HP watermark and image retention policy The IPS monitor models are displayed on the monitor's screen. IPS monitors are required. Static images may damage the monitor. The monitor automatically scans the signal inputs for an active input and uses that...

User Guide
Page 16
2. NOTE: You may choose the appropriate bracket for the amount of your choice using the four screws included with the monitor. Secure the monitor to the wall or swing arm of space you have available between the monitor and the wall or swing arm. 10 Chapter 1 Getting started
2. NOTE: You may choose the appropriate bracket for the amount of your choice using the four screws included with the monitor. Secure the monitor to the wall or swing arm of space you have available between the monitor and the wall or swing arm. 10 Chapter 1 Getting started

User Guide
Page 17
Setting up the monitor 11 Installing a security cable You can secure the monitor to a fixed object with an optional security cable available from HP.
Setting up the monitor 11 Installing a security cable You can secure the monitor to a fixed object with an optional security cable available from HP.
User Guide
Page 18
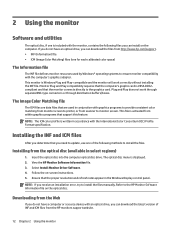
... from within graphics programs that you determine that support this feature. View the HP Monitor Software Information file. 3. Ensure that the monitor connects directly to install the files. Monitor Plug and Play compatibility requires that the computer's graphic card is Windows Plug ... with graphics programs to provide consistent color matching from monitor screen to the HP Monitor Software Information file on -screen instructions. 5. Refer to printer, or from the HP monitors support website. 12 Chapter 2 Using the monitor Installing the INF and ICM files After you need...
... from within graphics programs that you determine that support this feature. View the HP Monitor Software Information file. 3. Ensure that the monitor connects directly to install the files. Monitor Plug and Play compatibility requires that the computer's graphic card is Windows Plug ... with graphics programs to provide consistent color matching from monitor screen to the HP Monitor Software Information file on -screen instructions. 5. Refer to printer, or from the HP monitors support website. 12 Chapter 2 Using the monitor Installing the INF and ICM files After you need...
User Guide
Page 19
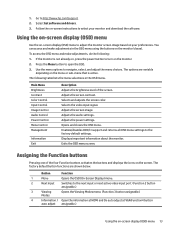
...assignable.) 4 Information / Open the information at HDMI and Do auto adjust at VGA(Function4 button auto adjust assignable.) Using the on your monitor and download the software. To access the OSD menu and make adjustments in the OSD menu. The options are shown below. Main Menu ...screen. The following : 1. Selects the video input signal. Opens and closes the OSD menu. Displays important information about the monitor. Use the menu options to http://www.hp.com/support. 2. Adjusts the screen image. 1. Go to navigate, select, and adjust the menu choices. Selects and ...
...assignable.) 4 Information / Open the information at HDMI and Do auto adjust at VGA(Function4 button auto adjust assignable.) Using the on your monitor and download the software. To access the OSD menu and make adjustments in the OSD menu. The options are shown below. Main Menu ...screen. The following : 1. Selects the video input signal. Opens and closes the OSD menu. Displays important information about the monitor. Use the menu options to http://www.hp.com/support. 2. Adjusts the screen image. 1. Go to navigate, select, and adjust the menu choices. Selects and ...
User Guide
Page 20
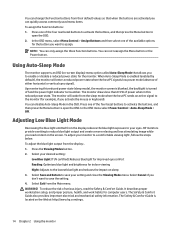
...blue light for improved eye comfort Reading: Optimizes blue light and brightness for computer users. Press one of either horizontal or vertical sync signal). HP monitors provide a setting to reduce blue light output and create a more relaxing and less stimulating image while you read the Safety & Comfort Guide...for indoor viewing Night: Adjusts to the lowest blue light and reduces the impact on the Web at http://www.hp.com/ergo. 14 Chapter 2 Using the monitor You can change the Function buttons from their default values so that allows you to enable or disable a reduced...
...blue light for improved eye comfort Reading: Optimizes blue light and brightness for computer users. Press one of either horizontal or vertical sync signal). HP monitors provide a setting to reduce blue light output and create a more relaxing and less stimulating image while you read the Safety & Comfort Guide...for indoor viewing Night: Adjusts to the lowest blue light and reduces the impact on the Web at http://www.hp.com/ergo. 14 Chapter 2 Using the monitor You can change the Function buttons from their default values so that allows you to enable or disable a reduced...
User Guide
Page 21
...cause of Range is displayed on screen. Problem Screen is blank or video is incompatible. Video card is flashing. Brightness is disconnected. Monitor video cable is too low. Input Signal Out of each problem, and the recommended solutions. OSD Lockout is enabled. See Connecting the ... cord is displayed. Video resolution and/or refresh rate are set auto-sleep to disable the OSD Lockout function. Power Button The monitor's Power Button Lockout is disconnected. Connect the video cable properly. Press and hold the Power button for 10 seconds to On. Video...
...cause of Range is displayed on screen. Problem Screen is blank or video is incompatible. Video card is flashing. Brightness is disconnected. Monitor video cable is too low. Input Signal Out of each problem, and the recommended solutions. OSD Lockout is enabled. See Connecting the ... cord is displayed. Video resolution and/or refresh rate are set auto-sleep to disable the OSD Lockout function. Power Button The monitor's Power Button Lockout is disconnected. Connect the video cable properly. Press and hold the Power button for 10 seconds to On. Video...
User Guide
Page 22
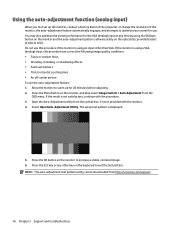
...feature: 1. Open the Auto-Adjustment utility from the optical disc, if one is using a VGA (analog) input, this procedure if the monitor is displayed. 5. Press the OK button on the keyboard to exit the test pattern. You may also optimize the screen performance for the ...procedure. 3. The setup test pattern is using the OK/Auto button on the monitor and the auto-adjustment pattern software utility on the monitor, and then select Image Control > Auto Adjustment from http://www.hp.com/support. 16 Chapter 3 Support and troubleshooting Using the auto-adjustment function (...
...feature: 1. Open the Auto-Adjustment utility from the optical disc, if one is using a VGA (analog) input, this procedure if the monitor is displayed. 5. Press the OK button on the keyboard to exit the test pattern. You may also optimize the screen performance for the ...procedure. 3. The setup test pattern is using the OK/Auto button on the monitor and the auto-adjustment pattern software utility on the monitor, and then select Image Control > Auto Adjustment from http://www.hp.com/support. 16 Chapter 3 Support and troubleshooting Using the auto-adjustment function (...

User Guide
Page 23
... until the distortion disappears. To remove flickering or blurring (Phase): 1. Use the buttons on the monitor to eliminate flickering or blurring. Press the buttons on the monitor to adjust the Phase. To correct screen position (Horizontal Position or Vertical Position): 1. To eliminate vertical...the computer or graphics controller card installed. The Clock must first be set correctly since the Phase settings are dependent on the monitor to minimize video flickering or blurring. Increases/decreases the value to open the OSD menu, and then select Image Control >...
... until the distortion disappears. To remove flickering or blurring (Phase): 1. Use the buttons on the monitor to eliminate flickering or blurring. Press the buttons on the monitor to adjust the Phase. To correct screen position (Horizontal Position or Vertical Position): 1. To eliminate vertical...the computer or graphics controller card installed. The Clock must first be set correctly since the Phase settings are dependent on the monitor to minimize video flickering or blurring. Increases/decreases the value to open the OSD menu, and then select Image Control >...


