
User Guide
Page 5
... information...1 Product features and components...2 Features...2 Rear components...3 Setting up the monitor...4 Installing the monitor stand...4 Connecting the cables...4 Connecting the Audio cables...6 Adjusting the monitor...8 Turning on the monitor...8 HP watermark and image retention policy 9 Removing the monitor stand...9 Mounting the monitor...9 Installing a security cable...11 2 Using the monitor...12 Software...
... information...1 Product features and components...2 Features...2 Rear components...3 Setting up the monitor...4 Installing the monitor stand...4 Connecting the cables...4 Connecting the Audio cables...6 Adjusting the monitor...8 Turning on the monitor...8 HP watermark and image retention policy 9 Removing the monitor stand...9 Mounting the monitor...9 Installing a security cable...11 2 Using the monitor...12 Software...
User Guide
Page 9
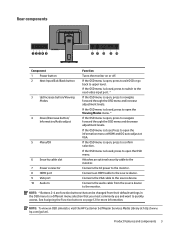
...press to exit OSD or go /sml. If the OSD menu is closed , press to open , press to upper level. Connects the audio cable from their default settings in the OSD menu to a different menu selection that can be changed from the source device to quickly access.... the Function buttons on or off. hp.com/go back to navigate forward through the OSD menu and decrease adjustment levels. Rear components 1 2 34 5 6 7 8 9 10 Component 1 Power button 2 Next Input/Exit/Back button 3 Up/Increase button/Viewing Modes 4 Down/Decrease button/ Information/Audio adjust 5 Menu/OK 6 Security cable...
...press to exit OSD or go /sml. If the OSD menu is closed , press to open , press to upper level. Connects the audio cable from their default settings in the OSD menu to a different menu selection that can be changed from the source device to quickly access.... the Function buttons on or off. hp.com/go back to navigate forward through the OSD menu and decrease adjustment levels. Rear components 1 2 34 5 6 7 8 9 10 Component 1 Power button 2 Next Input/Exit/Back button 3 Up/Increase button/Viewing Modes 4 Down/Decrease button/ Information/Audio adjust 5 Menu/OK 6 Security cable...

User Guide
Page 12
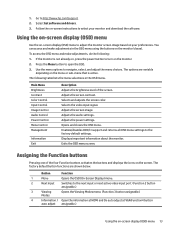
Connecting the Audio cables Connect the built-in monitor speakers to the computer by using the audio cable as shown in the following illustration. Cable not included. 6 Chapter 1 Getting started Connector locations may vary.
Connecting the Audio cables Connect the built-in monitor speakers to the computer by using the audio cable as shown in the following illustration. Cable not included. 6 Chapter 1 Getting started Connector locations may vary.
User Guide
Page 19
... menu to select your preferences. The following : 1. Adjusts the screen image. Adjusts the audio settings. Enables/disables DDC/CI support and returns all OSD menu settings to http://www.hp.com/support. 2. Go to the factory default settings. Main Menu Brightness Contrast Color Control... Input Control Image Control Audio Control Power Control Menu Control Management Information Exit Description Adjusts the brightness...
... menu to select your preferences. The following : 1. Adjusts the screen image. Adjusts the audio settings. Enables/disables DDC/CI support and returns all OSD menu settings to http://www.hp.com/support. 2. Go to the factory default settings. Main Menu Brightness Contrast Color Control... Input Control Image Control Audio Control Power Control Menu Control Management Information Exit Description Adjusts the brightness...


